Welcome to Newforma Field Notes for Android
With the Newforma Field Notes app on your Android device, you're always ready to capture field notes on the job site supplemented by photos, video, and audio. Using the Newforma Field Notes app, you can:
● Automatically associate field notes with their corresponding projects;
● Automatically upload captured data to ensure media files are never lost.
● Add notes and markups to photos;
When you create a new field note, the data automatically uploads to the Field Notes Activity Center in Newforma Info Exchange and Newforma Project Center, making the information available in both. Project Center and Info Exchange users can then assign the field note to site visit documents, daily reports, and action items.
Other helpful apps for managing field note data
To help you to manage field note data while you are in the field, consider downloading these additional applications if needed:
● To markup images - Skitch or PicSay.
● To view drawings - AutoCAD 360.
● To view and mark up PDFs - one option is qPDF Notes.
This Help system contains the following sections:
● To create a field note from a file on your device
● To share data from another app
● To edit an existing field note
● To email a single field note
● To remove a single field note
● To email, copy, or remove multiple field notes
To find and open a project
1. To get started, launch the Newforma Field Notes mobile app and login using your Newforma ID.
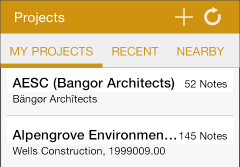
2. The Projects screen opens displaying all projects connected to your Newforma ID. You can sort the list by My Projects, Recent, Nearby, Project Name, or Project Number, as shown here. Tap a project to open it.
If the company is not available as a connection, contact the Newforma administrator for the company hosting the projects on Newforma Info Exchange to install an Eleventh Edition license that enables Newforma ID access. If a single project is missing for a specific company, you may not have Info Exchange access to the specific project.
Free accounts can only use one project at a time. Upgrade or remove the project to add another project.
Tap Upgrade to acquire unlimited project usage in all of mobile apps.
If you work with other companies and projects on different Info Exchange sites, you will be prompted to provide your credentials for your other Info Exchange accounts at the time you add the project.
3. To locate a different project, tap  to access the Search for a company screen, then tap
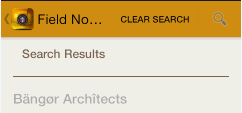
  to find and add more projects. Start typing the name of the company hosting the projects on Info Exchange on which you are a member of the project team, and the tap
  to show the results, or tap Clear Search to start again. Tap the company under Search Results, as shown here:
When prompted to login, enter your Info Exchange credentials, then tap Connect.
This step links your Newforma ID to your Info Exchange account for this company.
If you work with other projects and companies on different Info Exchange sites, you will be prompted to provide your credentials for your other Info Exchange accounts at the time you add the project.
5. Tap OK to accept the prompt to use your current location if desired.
To create a text note
Perform the following steps to create a new text field note:
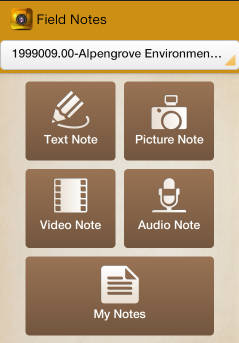
1. From the Field Notes screen, tap  to create a new text field note.
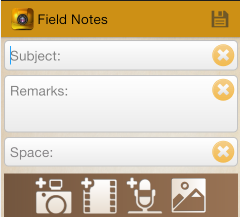
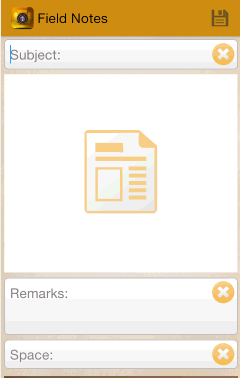
2. Enter a subject and remarks in the corresponding fields, as shown here. The subject becomes the name of the field note. If you do not enter a subject, the current date and time will be used as the subject.
3. Optional: Tap Space to open the Select a Space screen to view the available spaces in the project. Tap the space the note applies to to insert it into the field note.
4. Add any supporting media (photos, video, audio, or media files) from the Media Toolbar at the bottom, as shown here:

5. Tap  when finished to save the field note.
To create a photo note
Perform the following steps to create a field note from a photo:
1. From the Field Notes screen, tap  to launch the camera app on your device.
2. Take the photo.
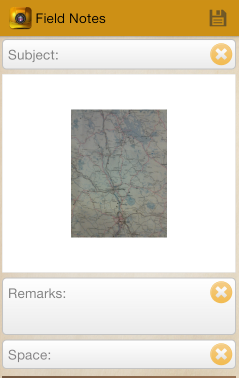
3. Tap Save to use the photo in the field note. The picture is imported into the new field note, as shown below.
Tap Cancel to discard and take a new photo.
4. In the Field Notes screen, enter a subject and remarks in the corresponding fields.
5. Optional: Tap Space to open the Select a Space screen to view the available spaces in the project. Tap the space the note applies to to insert it into the field note.
6. Tap when finished to save the field note.
To create a video note
Perform the following steps to create a field note from a video:
1. From the Field Notes screen, tap  to launch the camera app on your device.
2. Take the video.
3. Tap Save to use the video in the field note. The video is imported into the new field note, as shown below.
Tap Cancel to discard and take a new video.
.
4. In the Field Notes screen, enter a subject and remarks in the corresponding fields.
5. Optional: Tap Space to open the Select a Space screen to view the available spaces in the project. Tap the space the note applies to to insert it into the field note.
6. Tap when finished to save the field note.
To create an audio note
Perform the following steps to create a field note from an audio file:
1. From the Field Notes screen, tap  to launch the audio recorder app on your device.
2. Record the audio.
3. Tap OK when prompted to play the recorded file, as shown here:
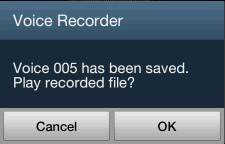
4. Tap  to attach the audio file to a new field note, as shown here:
5. In the Field Notes screen, enter a subject and remarks in the corresponding fields.
6. Optional: Tap Space to open the Select a Space screen to view the available spaces in the project. Tap the space the note applies to to insert it into the field note.
7. Tap when finished to save the field note.
To create a field note from a file on your device
Perform the following steps to create a field note from an existing file on your device.
1. Create a text note as described in the To create a text note section above.
2. Tap  and then select whether to add an image or video.
3. Locate and select the image or video to add it to the note.
4. Enter a subject and remarks in the corresponding fields.
5. Optional: Tap Space to open the Select a Space screen to view the available spaces in the project. Tap the space the note applies to to insert it into the field note.
6. Tap when finished to save the field note.
To share data from another app
You can share data from another app to create a new field note.
1. Open the app from which you want to share data. For this example we'll use a screen image.
2. Tap  to open the share menu, as shown here:
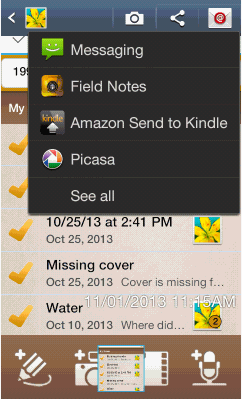
3. Tap Field Notes to open a new field note containing the selected item.
4. Create the field note as described in the sections above.
To view your field notes
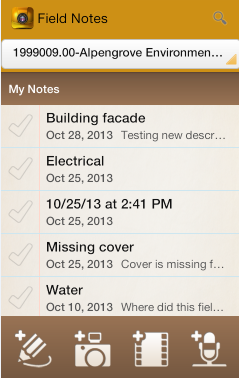
To view the field notes currently stored on your device for the current project, tap My Notes on the Field Notes screen, as shown here:
Tap a field note, as shown here, to open it to view its details:
To edit an existing field note
Perform the following steps to edit an existing field note:
1. From the Field Notes screen, tap  to open the My Notes screen.
2. Tap the note you want to edit.
3. In the field note, tap  to edit it.
4. Tap any of the fields you want to edit and type any additional information into the field note.
5. Tap any of the media buttons at the bottom of the screen if you wish to add additional supporting media to the field note, and follow the steps from the procedures above to add media to the field note.
6. Tap when finished to save the field note.
To email a single field note
1. From the Field Notes screen, tap to open the My Notes screen.
2. Tap the desired field note, then tap  to open a new email message (you may have to choose the email app first). Enter any details pertaining to the field note and send the message to your contacts. The email message will contain the details of the field note and will include any media files as attachments.
To remove a single field note
1. From the Field Notes screen, tap to open the My Notes screen.
2. Tap the desired field note, then tap  from your device and tap Remove from Device from the menu, as shown here:
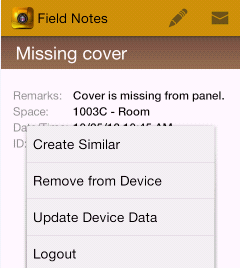
When you remove a field note, it does not delete it from Newforma Project Center or Info Exchange.
To email or remove multiple field notes
1. From the Field Notes screen, tap to open the My Notes screen.
2. Tap the checkboxes next to each item you wish to remove, as shown here:
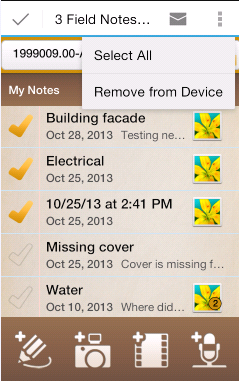
3. To remove the items, tapto open the menu, then tap Remove from Device. To remove all items, tap Select All then tap  .
.
4. To email the items, tap  to open a new email message (you may have to choose the email app first). Enter any details pertaining to the field note and send the message to your contacts. The email message will contain the details of the field note and will include any media files as attachments.
To modify a field note
After creating them on the job site, you can modify field notes in Info Exchange. In Info Exchange, you can take additional action by logging the field note information as an action item or an RFI if it warrants further attention. For more information, see Modify a Field Note.
Common questions
Refer to Common Questions.
Newforma Customer Support
If you cannot find the information you need in this Help system, use the following links for more information:
● Click www.newformant.com to access the Newforma Community Site.
● Click here to access Newforma video tutorials.
● For technical questions or problems, please contact Newforma Customer Support, or click http://www.newforma.com/support.aspx.
Revised 9/2/14
Table of Contents
Index
-Search-
Back