

Use Newforma Project Information Link
This topic explains how to use Newforma Project Information Link to create Project Center items from Autodesk Revit and synchronize object data. Click the following links to go to instructions on the Newforma Project Information Link action you want to perform (or scroll down the page):
-
Create markup sessions from Revit/View in the Newforma Model Viewer
-
Create and modify building elements in Project Center from Revit
-
Synchronize Revit object parameters and Project Center building properties
-
Synchronize Revit model enclosures and Project Center spaces
-
Create and modify record documents in Project Center from Revit sheets
-
Synchronize Revit sheets and Project Center record documents
Setup Newforma Project Information Link
See Set Up Newforma Project Information Link.
To add Revit project's (.RVT) files to a Project Center project
Now you must add the folder containing the Revit project's .RVT files a to a Project Center project, if it has not been added.
|
1. |
If you are not already there, open the Project Center Administration activity center by clicking Project Center Administration from the Tasks panel of the My Project Center activity center, or from the Activities list. |
|
2. |
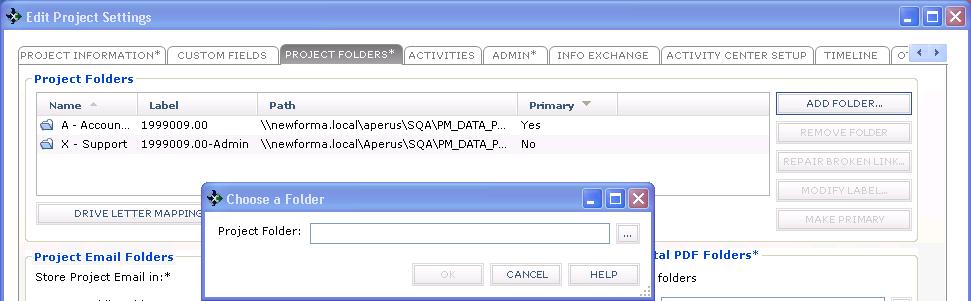
Select the project you want to add the Revit project file to, then click Edit Settings from the Tasks panel to open the Edit Project Settings dialog box. |
|
3. |
Click the Project Folders tab, and then click Add Folder to open the Choose a Folder dialog box.
|
|
4. |
Click
the |
|
5. |
Repeat these steps for any other Project Center projects you want to add .RVT files to. 1 You can then save Revit files directly from Revit to the project folder. |
 button and locate the folder
containing the Revit project files and click
button and locate the folder
containing the Revit project files and click
To register a Revit building model
You must register a Revit building model with a Project Center project before you can create items and synchronize it with Project Center.
1 It is best practice to register the central model. Newforma Project Information Link will always register a central model (if one exists within the Project Center project).
|
1. |
Open Autodesk Revit and the Revit project you want to use. |
|
2. |
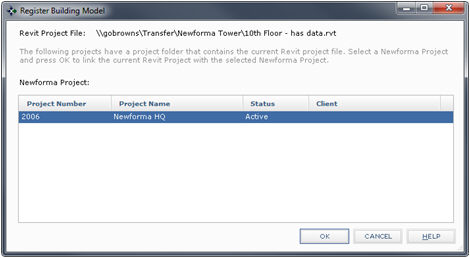
To link a Revit project with a Project Center project, click the Register Model button to open the Register Building Model dialog box (shown below), which lists any Project Center projects that were found containing the current Revit project file, as explained in the previous section. 1 The Register Model button is visible only if the current Revit project is not registered in a Project Center project.
1 The projects that are listed are the Project Center projects that have a project folder containing the Revit project file (the .RVT file on the file server). These projects do not have anything in the Project Center database that references the .RVT file yet, which is why you must register the Revit file. |
|
3. |
Select the Project Center project to register the Revit project with and click OK. When a building model is registered, Project Center automatically creates and adds the building model project item in the All Models category of the Building Models and Elements activity center, as shown here:
|
|
4. |
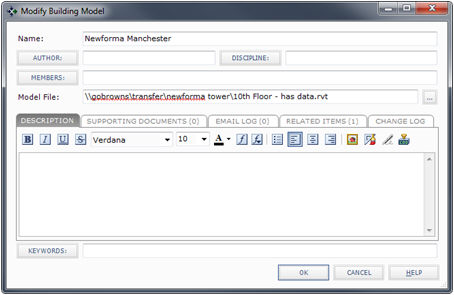
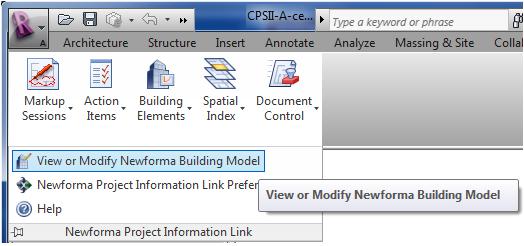
You can edit the building model's information by clicking Modify from the Tasks panel to open the Modify Building Model dialog box:
1 You can also access this dialog box from Newforma Project Information Link by clicking the Newforma Project Information Link drop-down and selecting View or Modify Newforma Building Model:
|


To create markup sessions from Revit/View in the Newforma Model Viewer
|
1. |
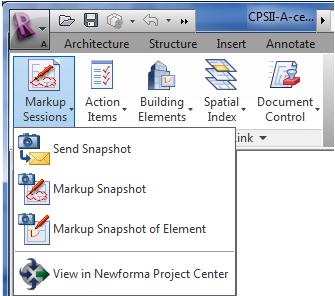
To create a markup session from Revit, click the Markup Sessions button and choose one of the options, depending on what you want to do.
|
|
2. |
● Select Send Snapshot to select and capture a region of the screen and then launch an email message with the snapshot included as an attachment. ● Select Markup Snapshot to select and capture a region of the screen and then launch the Newforma Viewer. When you save the markup session in the Newforma Viewer, it will be automatically related to the corresponding building model in the Building Models and Elements activity center in Project Center. ● Select Markup Snapshot of Element to select a Revit element, take a snapshot of the element, and then launch snapshot in the Newforma Viewer. When you save the markup session, it will be related to both the corresponding building model and the element you just selected. 1 If the element does not yet exist in Project Center, it will be created and added to the Building Models and Elements activity center. ● Select View in Newforma Project Center to open the Related Markup Sessions activity center showing all markup sessions related to the current Revit model. |
|
3. |
Optional: If you have the Newforma Model Viewer installed, you can select the markup session from the Project Markup Sessions activity center, click the Related Items tab, select the related building element, and open it in the Newforma Model Viewer by clicking Show in Latest Model from the Related Item Tasks panel, as shown here:
Similarly, if you have the Newforma Model Viewer installed, you can select the building element from the Building Models and Elements activity center and open it in the Newforma Model Viewer by clicking Show in Latest Model from the Tasks panel, as shown here:
|

To create action items from Revit
|
1. |
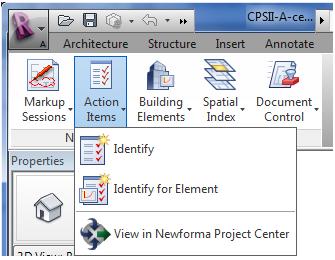
To create an action item from Revit, click the Action Items button and choose one of the options, depending on what you want to do.
|
|
2. |
● Select Identify to open the Identify an Action Item dialog box to create a new action item in the Action Items activity center and relate it to the Revit model in the Building Models and Elements activity center. ● Select Identify for Element to select a Revit element and open the Identify an Action Item dialog box. Once it is saved, the action item is related to the building model and the element you just selected. ● Select View in Newforma Project Center to open the Action Items activity center showing all action items related to the corresponding Revit model. |
To create and modify building elements in Project Center from Revit
|
1. |
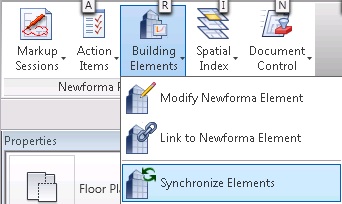
To create or modify a building element from Revit, click the Building Elements button and choose one of the following options, depending on what you want to do.
|
|
2. |
● Select Modify Newforma Element to select an element and open the Modify Building Element dialog box to edit the building element's data. The element will be automatically synchronized with the new settings. 1 If the selected element is not linked, you will be instructed to use the Link to Project Center Element option. ● Select Link to Newforma Element to select a Revit element and open the Create Linked Building Element dialog box to create a corresponding related building element in Project Center. It will be added to the Building Models and Elements activity center. ● Select Synchronize Elements to open the Synchronize Building Elements dialog box to create and synchronize links between Project Center building properties and Revit object parameters. See the next section for details. ● If you have Microsoft Excel, select Edit in Spreadsheet to open the Save Spreadsheet dialog box to create and open a spreadsheet containing the current set of building elements from Project Center. Edit the spreadsheet as necessary. Once it is saved and closed, return to Newforma Project Information Link and click OK from the pop-up message. The Synchronize Building Elements dialog box opens. Click Synchronize to sync the changes with Revit. ● Select View in Newforma Project Center to open the All Elements view in the Building Models and Elements activity center. |
To synchronize Revit object parameters and Project Center building properties
|
1. |
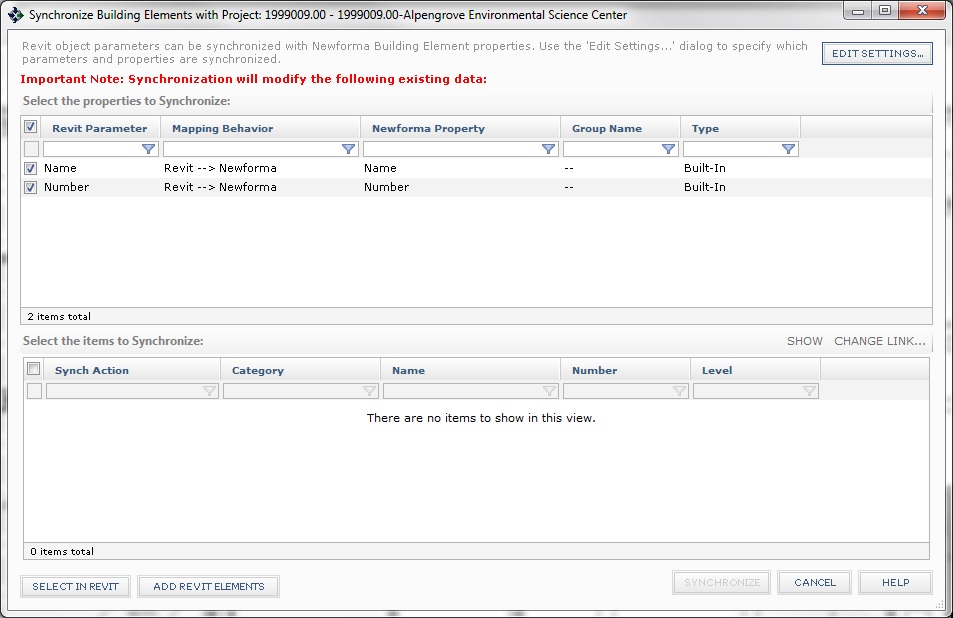
Click Building Elements > Synchronize Elements to open the Synchronize Building Elements dialog box, as shown here:
|
|
2 |
Click Add Revit Elements and then click and drag to select the elements you want to synchronize from the Revit model. Click Finish to add the elements to the bottom section of the Synchronize Building Elements dialog box, as shown in this example:
|
|
3. |
Click Edit Settings to open the Edit Settings for Building Element Properties dialog box (shown below) to specify which parameters and properties to synchronize. |
|
4. |
Filter the Parameter Name column to select the Revit parameters you want to map. For this example we'll use actual to find parameters that use the word Actual. |
|
5. |
Select the parameters and click Create Matching Extended Property, as shown below, to create matching Newforma extended properties for each of the parameters. |
|
6. |
Enter the group name for the new properties that will be created and click OK. |
|
|
The three Revit parameters in this example are added as extended properties in the Newforma Properties section at the bottom, as shown here:
|
|
7. |
Click OK to save the changes. The properties are automatically added to the top section of the Synchronize Building Elements dialog box, as shown here:
|
|
8. |
Click Synchronize in the Synchronize Building Elements dialog box to perform the sync. A message similar to the following will appear when it is finished:
The parameters in the bottom section will be added as properties in Project Center, and the properties in the top section will be added as extended properties and shown as columns in the Building Models and Elements activity center. |
|
9. |
In Project Center, open the Building Models and Elements activity center and select All Elements from the category drop-down list. ● There will be three new columns - Actual Number of Risers, Actual Riser Height, and Actual Tread Depth created from the Revit values, as shown below. ● The same three properties will be added as fields in the Create/Modify a Building Element dialog box. ● These values will now be updated whenever you click Synchronize in Revit.
1 Refer to the Add Building Elements from Revit to the Building Models and Elements Activity Center topic for additional information. |
To create and modify spaces in Project Center from Revit
|
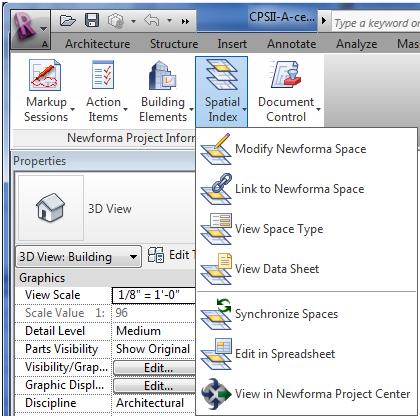
1. |
To create or modify a space from Revit, click the Spatial index button and choose one of the following options, depending on what you want to do.
|
|
2. |
● Select Modify Newforma Space to select a Revit enclosure and open the Modify Space dialog box to edit the space's data. The space will be automatically synchronized with the new settings. 1 If the selected enclosure is not linked, you will be instructed to use the Link to Newforma Space option. ● Select Link to Newforma Space to select a Revit enclosure and open the Link to Newforma Space Definition dialog box. Fro there you can create a new space, or link to a space that already exists in Project Center. ● Select View Space Type to select a Revit enclosure and open the Modify Space Type Definition dialog box for the associated Project Center space. If the enclosure does not have a space type, the Modify Space dialog box opens. ● Select View Data Sheet to select a Revit enclosure to open the associated data sheet. (Project Center space types and spaces allow you to reference an external file as a data sheet.) If the space doesn’t have a data sheet, then it will look for one from the space type. If neither the space nor the space type have a data sheet, it will display the form for the space. ● Select Synchronize Spaces to open the Synchronize Rooms, Spaces, and Areas dialog box to create and synchronize links between Project Center spaces and Revit enclosures. See the next section below for details. ● If you have Microsoft Excel, select Edit in Spreadsheet to open the Save Spreadsheet dialog box to create and open a spreadsheet containing the current set of spatial data from Project Center. Edit the spreadsheet as necessary. Once it is saved and closed, return to Newforma Project Information Link and click OK from the pop-up message. The Synchronize Rooms, Spaces, and Areas dialog box opens. Click Synchronize to sync the changes with Revit. ● Select View in Newforma Project Center to open the Spatial Index activity center. |
To synchronize Revit model enclosures and Project Center spaces
|
|
Syncing spaces – Revit as the sourcePerform the steps in the following example to populate the Project Center Spatial Index activity center from the enclosures defined in a Revit model. 1 Scroll to the bottom of this section to use Project Center as the source. |
|
1. |
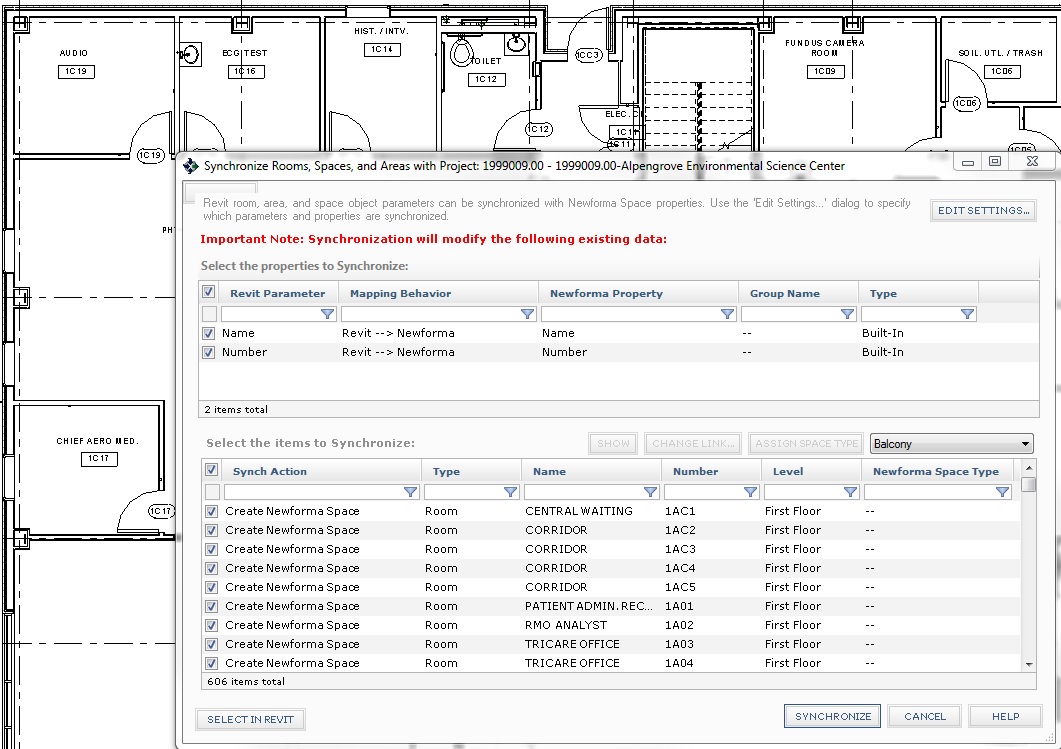
Click Spatial Index > Synchronize Spaces to open the Synchronize Rooms, Spaces, and Areas dialog box, as shown here:
All enclosures from the Revit model are automatically listed in the bottom section (under Select the Items to Synchronize) with the default action Create Newforma Space, which will create a space in Project Center from each Revit enclosure. |
|
2. |
Click Edit Settings to open the Edit Spatial Index Extended Properties dialog box to specify which parameters and properties to synchronize. |
|
3. |
Filter the Parameter Name column to select the Revit parameters you want to map. For this example we'll enter finish, as shown below. |
|
4. |
Select the parameters and click Create Matching Extended Property, as shown here, to create matching Newforma extended properties for each of them.
|
|
5. |
Enter the group name for the new properties that will be created and click OK. |
|
|
The four Revit parameters in this example are added as extended properties in the Newforma Properties section at the bottom, as shown here:
|
|
6. |
Click OK to save the changes. The properties are automatically added to the top section of the Synchronize Rooms, Spaces, and Areas dialog box, as shown here:
|
|
7. |
Click Synchronize in the Synchronize Rooms, Spaces, and Areas dialog box to perform the sync. A message similar to the following will appear when it is finished:
The enclosures in the bottom section will be added as spaces in Project Center, and the properties in the top section will be added as extended properties and shown as columns in the Spatial Index activity center. |
|
8. |
In Project Center, open the Spatial Index activity center. ● There will be four new columns - Base Finish, Ceiling Finish, Floor Finish, and Wall Finish created from the Revit values, as shown below. ● The same four properties will be added as fields in the Define/Modify a Space dialog box. ● These values will now be updated whenever you click Synchronize in Revit.
|
|
|
Syncing spaces – Project Center as the sourcePerform the steps in the following example to populate a Revit model with the spaces defined in a Project Center project. |
|
1. |
Create spaces in Project Center using the Define a Space dialog box, or import them from a spreadsheet. For this example, the spaces we add will be called Office - CEO and Office - CFO. |
|
2. |
Click Utilities > Edit Extended Properties from the Tasks panel to open the Edit Spatial Index Extended Properties dialog box, shown here, to update the extended properties. Click Add to add an extended property. Click OK when finished.
|
|
3. |
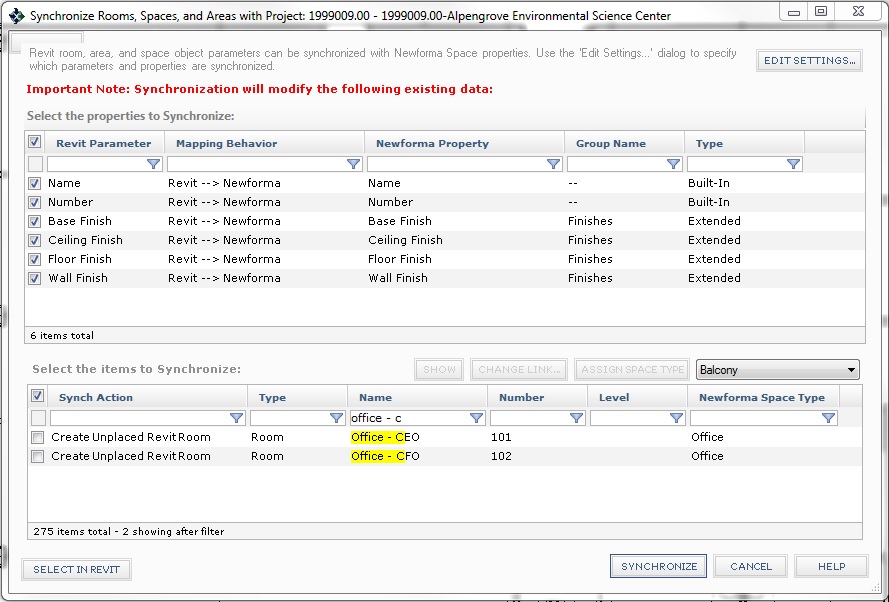
In Revit, click Spatial Index > Synchronize Spaces to open the Synchronize Rooms, Spaces, and Areas dialog box. The new spaces will appear in the bottom section, as shown here:
|
|
4. |
Click Edit Settings to open the Edit Settings for Spatial Index Extended Properties dialog box. |
|
5. |
Drag and drop the Revit parameters from the top section (Base Offset in this example) onto the Newforma extended properties that you want to map them to in the bottom section (Base Offset in this example), as shown here. Click OK to create and save the new mappings.
|
|
6. |
The new mappings will appear in the top section of the Synchronize Rooms, Spaces, and Areas dialog box, as shown here. In the bottom section, mark the checkboxes of the spaces listed as Create Unplaced Revit Room under the Synch Action column that you want to sync with Revit.
|
|
7. |
Click Synchronize to sync the items. |
|
8. |
Place the unplaced rooms in the Revit model. |
|
9. |
You can make other changes in Project Center (or in a spreadsheet) and re-sync to Revit at any time. |

To create and modify record documents in Project Center from Revit sheets
|
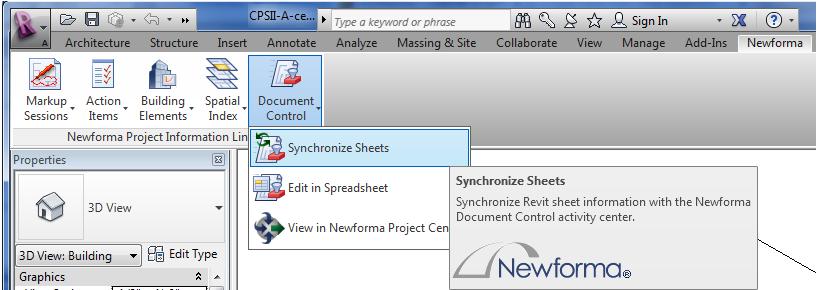
1. |
To create and modify a record document from Revit, click the Document Control button and choose one of the following options, depending on what you want to do.
|
|
2. |
● Select Synchronize Sheets to open the Synchronize Sheets dialog box to create and synchronize links between Project Center record documents and Revit sheets. See the next section below for details. ● If you have Microsoft Excel, select Edit in Spreadsheet to open the Save Spreadsheet dialog box to create and open a spreadsheet containing the current set of record documents from Project Center. Edit the spreadsheet as necessary. Once it is saved and closed, return to Newforma Project Information Link and click OK from the pop-up message. The Synchronize Sheets dialog box opens. Click Synchronize to sync the changes with Revit. ● Select View in Newforma Project Center to open the Document Control Activity center. |
To synchronize Revit sheets and Project Center record documents
|
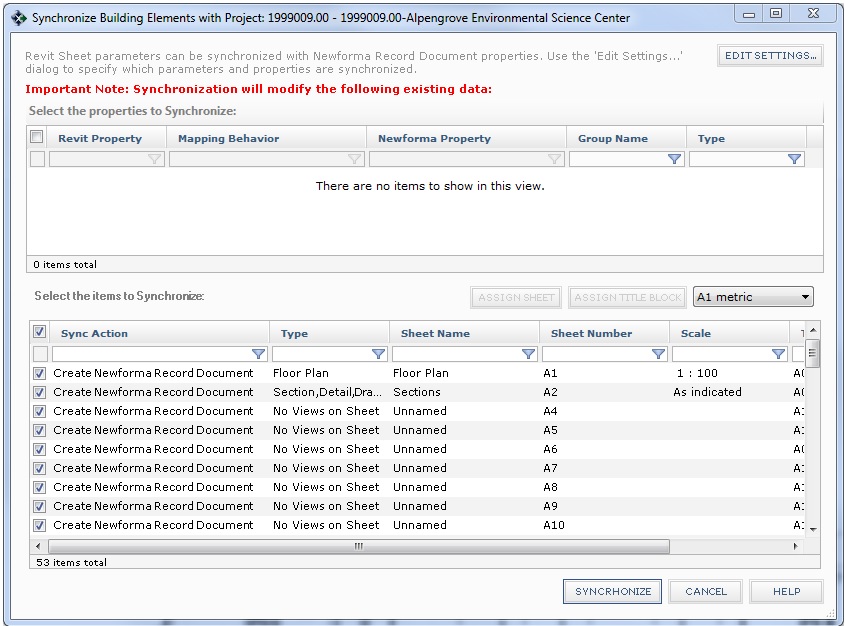
1. |
Click Document Control > Synchronize Sheets to open the Synchronize Sheets dialog box, as shown here:
All sheets from the Revit model are automatically listed in the bottom section (under Select the Items to Synchronize) with the default action Create Newforma Record Document, which will create an empty record document in Project Center for each Revit sheet. |
|
2. |
Click Edit Settings to open the Edit Settings for Document Control Properties dialog box to specify which properties to synchronize. |
|
3. |
Filter the Parameter Name column to select the Revit parameters you want to map. |
|
4. |
Select the parameters and click Create Matching Extended Property to create matching Newforma extended properties for each of them. |
|
5. |
Enter the group name for the new properties that will be created and click OK. |
|
|
The two Revit parameters from the top section are added as extended properties in the Newforma Properties section at the bottom, as shown in this example:
|
|
6. |
Click OK to save the changes. The properties are automatically added to the top section of the Synchronize Sheets dialog box, as shown here:
|
|
7. |
Click Synchronize in the Synchronize Sheets dialog box to perform the sync. A message similar to the following will appear:
The sheets in the bottom section will be added as record documents in Project Center, and the properties in the top section will be added as extended properties and shown as columns in the Document Control activity center. |
|
8. |
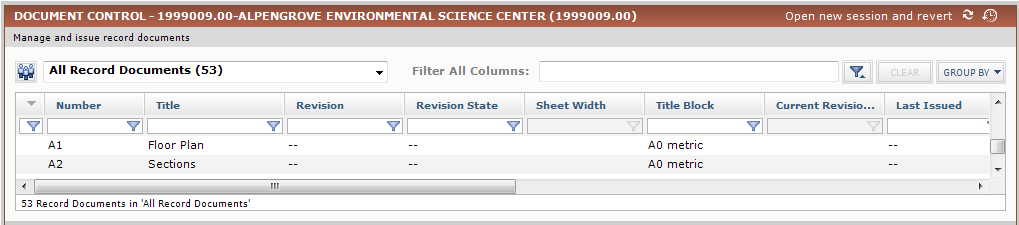
In Project Center, open the Document Control activity center, as shown below. ● There will be two new empty record documents added - Floor Plan and Sections, created from the Revit sheets, as shown below. ● The Sheet Width and Title Block parameters from the example above will be added as columns in the Document Control activity center, as shown below. ● The same two properties will be added as fields in the Add/Modify a Record Document dialog box. ● The record documents will now be updated whenever you click Synchronize in Revit.
|
To import mapping properties from another project
To save time, perform the following steps to import building element, space, or record document mapping properties from another project into the current one.
|
1. |
From either the Edit Settings for Spatial Index Extended Properties dialog box, the Edit Settings for Building Element Properties dialog box, or the Edit Settings for Document Control Properties dialog box, click Import from Project to open the Select a Project dialog box. |
|
2. |
Select the project from which to import the mapping properties and then click OK to open the Import Other Project Mapping Properties dialog box. |
|
3. |
Mark the checkboxes of the mapping properties you want to import and then click OK to import the properties, including extended properties, into the current project. ● If the imported Newforma property already exists in the current project with a mapped Revit parameter, the existing mapping is replaced if you click Yes when the confirmation message appears. If you click No, the action is cancelled. ● If the imported Newforma property already exists in the current project but is not mapped to a Revit parameter, the mapping is added. ● If the imported Newforma property does not exist in the current project, the property and mapping are added.
|