


Add a Daily Report
Perform the following step to create a new daily report from Info Exchange.
To view and create a new daily report, you must be a member of a Permission Set that allows the creation of new daily reports.
To add a daily report
1. If you are not already there, open the Daily Reports log from the View > Field Management menu.
2. Click Add Daily Report to open the Add Daily Report dialog box, shown below.
The Report Date, Created By and ID fields populate automatically but you may overwrite the values.
3. In the
section labeled Distribution,
select the To field to open the Select
Project Team Members as Recipients dialog box to add project team
members. Follow the same steps if you wish to add any contacts in the
CC field.

4. Select the Template Name drop-down to select from the list of available templates if you wish to assign different templates.
5. Select the Keywords drop-down to select project keywords to add further detail to the daily report.
6. Add any site observations in the Observations tab. For more information on adding information to the Observations tab, see To manually add an observation, To add an action item from the observation Tasks, and To add observations from a field note below.
7. Reorder observations (if needed). Click the arrows in the Order field, then click Reorder to assign the new order to the observation items.
8. Add a description on the Description tab.
9. Add weather information On the Weather tab.
● Select Add to create details about the weather for that day.
● Enter details about the site conditions: Total Precipitation, Time, Temperature, Wind Speed, Humidity, and Remarks.
● Select  next to the Remarks field to open
a larger dialog box so that you can see the full description.
next to the Remarks field to open
a larger dialog box so that you can see the full description.
● Select  to
delete the weather information.
to
delete the weather information.
10. Add subcontractor information on the Subcontractors tab.
● Select Add to create details for the subcontractors.
● Enter details about the subcontractors including: Company, Discipline, Headcount, and Description of Work/Location.
● Select
next to the Description of Work/Location
field to open a larger dialog box so that you can see the full description.
● Select to
delete the subcontractor information.
11. Add information regarding internal personnel on the Internal Personnel tab.
● Select Add to create details for the internal personnel.
● Enter details about the internal personnel including: Contact, Job Title, On Site, and Notes.
● Select
next to the Notes field to open
a larger dialog box so that you can see the full description.
● Select to
delete the internal personnel information.
12. Add information regarding other visitors on the Visitors tab.
● Select Add to create details for other visitors.
● Enter details about the visitors on the jobsite including: Company, Contact, Job Title, and Purpose.
● Select to
delete the visitors information.
13. Add information about the equipment on the site on the Equipment tab.
● Select Add to create more details for the equipment.
● Enter details about the equipment on site including: Equipment, Count, Owned By, Tag#, Planned Return Date, and Notes.
● Select
next to the Notes field to open
a larger dialog box so that you can see the full description.
● Select to
delete the equipment information.
14. Select Save and Close to save the daily report.
To save your work and continue editing the daily report, click Save.
To manually add an observation
1. 1. Select
Add on the Observations
tab to create an observation record, shown here.
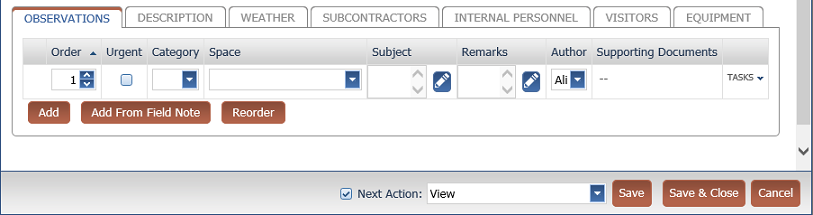
2. Select the arrows in the Order field to set the priority of the observation item in the list of observations.
3. Mark the Urgent checkbox if needed for this observation item.
4. Select a value from the Category drop-down to assign to the observation item.
5. Select the Space associated with the observation.
6. Add a Subject.
7. Enter any comments pertaining to site conditions in the Remarks field.
8. The Author field automatically populates with the currently logged in user, though you may select another contact.
You cannot add any supporting documents from Info Exchange. Supporting documents may be added if a daily report is created in Project Center.
9. Select Tasks if you wish to take further action on the daily report site observation.
When you click one of the options in the Tasks list, you remain on the daily report and the window expands, so that you won't lose any data for the current daily report.
You can use the commands in the Tasks list if you are a member of a permission set which allows these actions.
Tasks list actions
● Add Action Item - Select this task to create an action item linked to the current daily report. Enter the critical information for the action item.
● Add Similar - Select this task to create another site observation as a duplicate of the current item. You can then edit this new item as needed.
● Delete - Select to remove the observation item.
10. Select Save and Close to save the daily report or click another tab to add more information to the daily report.
To save your work and continue editing the daily report, click Save.
To add an action item from the observation Tasks
1. Select Add on the Observations tab then Add Action Item in the Tasks list.
2. Select an action item type from the Type drop-down list.
3. Enter
a subject for the action item in the Subject
field. Select next to this field to open a larger
dialog box so that you can see the full description.
4. Select the importance of the action item in the Priority field.
5. Select Assigned To to open the Select Project Team Members as Recipients dialog box. Select the contact responsible for fulfilling the action item.
6. Select CC to open the Select Project Team Members as Recipients dialog box to add other contacts.
7. Select Due Date to set the date on the action item by which the action should be completed.
8. To set a reminder on the action item, mark the Remind checkbox and set the number of days (prior to the due date) on which to send the reminder in the Remind Days drop-down list.
9. Select Status to set the relative status for the action item.
The action item is created when you save the daily report.
Once saved, you can further edit the action item in the Action Items log.
To add observations from a field note
1. Select Add From Field Note to open the
Add
Observations From Field Notes dialog box, shown here:
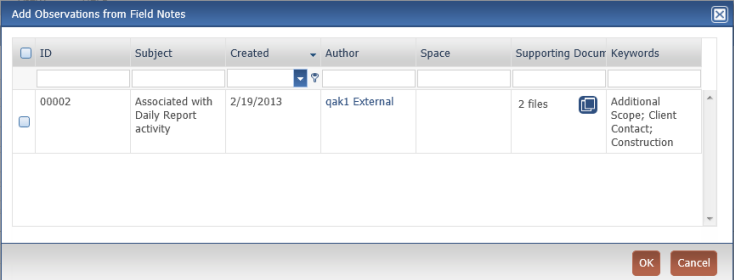
2. Use the filters to locate the desired field note. Once you find the field note, mark the checkbox and select OK.
To access this page
Select Add Daily Report from the Daily Reports log.
Related Topics
Table of Contents
Index
Search (English only)
Back