


Create an Extended Widget
Perform the following steps to create an extended widget for use on the Project Home page.
You must be an administrator to create extended widgets.
There are two types of extended widgets. Click on one for an example of how to create it:
For more information on the types of extended widgets available, please refer to Extended Info Exchange Widgets.
To create an extended image widget
In this example, you will create an extended image widget to display a weather map.
1. On the Info Exchange server, locate the nwc.xml file and the WidgetConfiguration.xml file in the Info Exchange installation folder.
The default location for the file is C:\Newforma Info Exchange\Eleventh Edition\UserWeb\App_Data\nwc.xml.
2. Open nwc.xml in an xml editor.
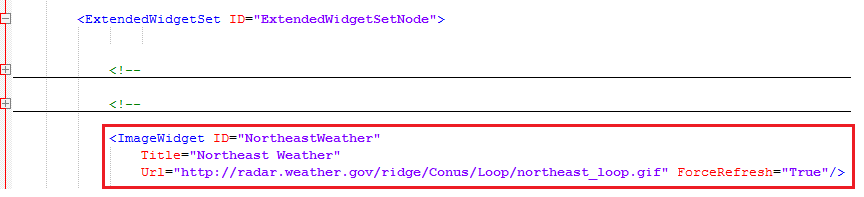
3. In the Extended Widget Set section (indicated by the <ExtendedWidgetSet> tags), add the following information to create the extended widget (a description of each field included in the widget definition appears below):
<ImageWidget ID="NortheastWeather" Title="Northeast Weather" Url="http://radar.weather.gov/ridge/Conus/Loop/northeast_loop.gif" ForceRefresh="True"/>
● Image Widget ID. A unique identifier for the image widget. This is a required field.
● Title. The title of the widget panel containing the image url as it should appear in the Project Home page. This is a required field.
● Url. The url of the image to be displayed. This can be a static (JPEG) or looping GIF) image.
● ForceRefresh. If ForceRefresh is set to true, the image will be re-downloaded from its original source on every page refresh. This is an optional field.
4. The code
for the extended widget must be placed between the start and end <ExtendedWidgetSet> tags,
as shown below, or it will not be available on the Project
Home page:
5. Save the changes to the nwc.xml file.
6. Open WidgetConfiguration.xml in an xml editor. Repeat steps 3-4.
The nwc.xml and WidgetConfiguration.xml files must match.
7. Save the changes to the WidgetConfiguration.xml file. The extended widget is now available for users to add to the Project Home page.
8. For information on adding widgets to the Project Home page, please refer to Configuring Info Exchange Widgets.
To create an extended link list widget
In this example, you will create an extended link list widget to display a list of website links.
1. On the Info Exchange server, locate the nwc.xml file and the WidgetConfiguration.xml file in the Info Exchange installation folder.
The default location for the file is C:\Newforma Info Exchange\Eleventh Edition\UserWeb\App_Data\nwc.xml.
2. Open nwc.xml in an xml editor.
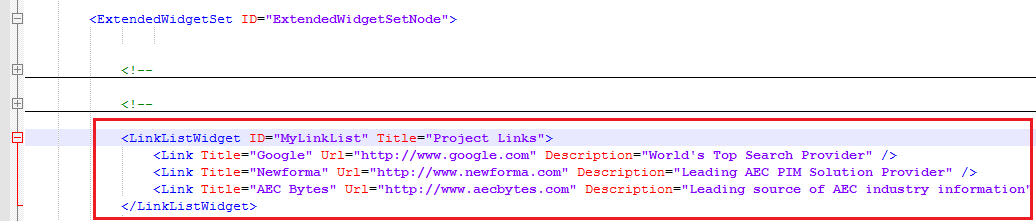
3. In the Extended Widget Set section (indicated by the <ExtendedWidgetSet> tags), add the following information to create the extended widget (a description of each field included in the widget definition appears below):
<LinkListWidget ID="MyLinkList" Title="Project Links">
<Link Title="Google" Url="http://www.google.com" Description="World's Top Search Provider" />
<Link Title="Newforma" Url="http://www.newforma.com" Description="Leading AEC PIM Solution Provider" />
<Link Title="AEC Bytes" Url="http://www.aecbytes.com" Description="Leading source of AEC industry information" />
</LinkListWidget>
● LinkListWidget ID. A unique identifier for the link list widget. This is a required field.
● Title. The title of the widget panel containing the website url(s) as it should appear in the Project Home page. This is a required field.
● Url. The url of the page to be displayed. This is a required field.
● Description. A description of the site the hyperlink points to. This is an optional field.
4. The code
for the extended widget must be placed between the start and end <ExtendedWidgetSet> tags,
as shown below, or it will not be available on the Project
Home page:
5. Save the changes to the nwc.xml file.
6. Open WidgetConfiguration.xml in an xml editor. Repeat steps 3-4.
The nwc.xml and WidgetConfiguration.xml files must match.
7. Save the changes to the WidgetConfiguration.xml file. The extended widget is now available for users to add to the Project Home page.
8. For information on adding widgets to the Project Home page, please refer to Configuring Info Exchange Widgets.
Table of Contents
Index
Search (English only)
Back