


Publish Project Folders and Document Sets to Info Exchange Workflow Example (Shared Folders)
This procedure gives one common workflow scenario for the entire process of publishing the contents of project folders or document sets to Info Exchange from Project Center so that they can be updated at anytime by anyone on the project team. It shows how to publish to Info Exchange, how to republish an edited folder to Info Exchange, how both internal and external project team members can then view the files and upload more files to the folder once it is on Info Exchange, and how internal team members can receive the uploaded files in Project Center, unzip them, and republish them to the same folder to update them on Info Exchange.
This process has been divided into the following sections:
-
To update the project folder to Info Exchange because it has changed
-
To manage the published folder on Info Exchange and upload to it
This procedure uses a folder from the Project
Files activity center for the example. If you are publishing a document
set (instead of a project folder) to Info Exchange, the workflow is basically
the same as in the following procedures, except you would initiate it
from the Project
Document Sets activity center instead of the Project
Files activity center.
If you are publishing a document set, be aware that only the selected document
set is published. Any sub-document sets within the selected document set
are not published.
To publish a project folder to Info Exchange
1. Open a project in Project Center. If you are not already there, open the Project Files activity center by clicking Project Files from the Project Home activity center or from the Activities list.
2. Select
the project folder you want to publish, then click Info
Exchange > Create Shared Folder from the Folder
Tasks panel to open the Create
Shared Folder dialog box.
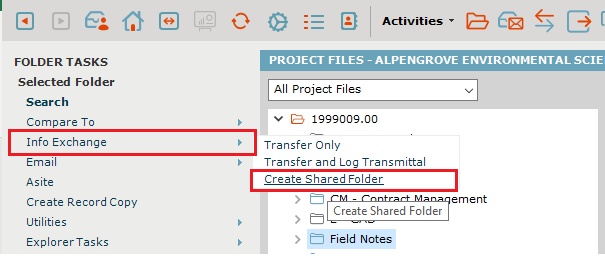
3. For this
example, a folder called Field Notes
was selected above, and it is being renamed Newforma
Mill - Notes for publishing, as shown below. Fill in the fields
as necessary. Enter any comments in the Remarks
tab. Click the Publish Options
tab:
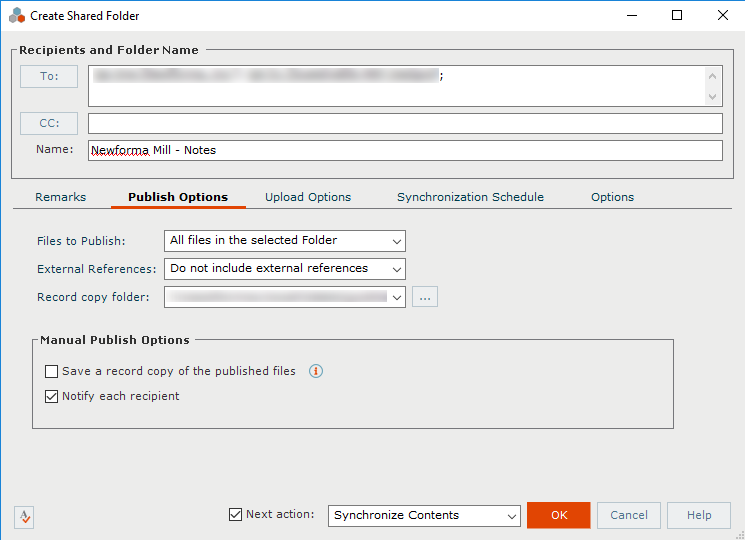
4. You can choose to publish all of the files in the folder, or selected files from the folder. In this example, you would select All Files in the Selected Folder from the Files to Publish drop-down list. A record copy .ZIP file can be saved to the location indicated in the Record Copy Folder field. You can save and log it in the Record Copies activity center by marking the Save a Record Copy of the Published Files checkbox (unless record copies were disabled for this project).
● Select the External References option to use.
● Mark the Notify Each Recipient checkbox to send an email message about the transfer to each recipient.
5. Click
the Upload Options tab:
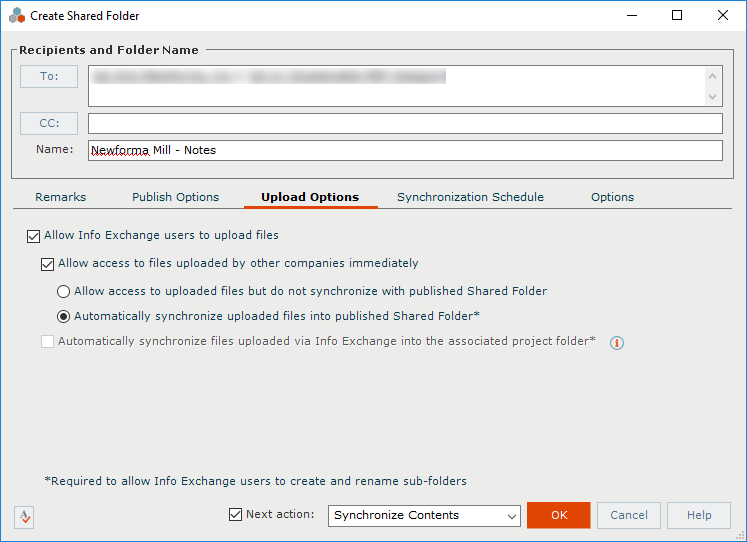
● Make sure the Allow Info Exchange Users to Upload Files checkbox is marked if you want external team members to be able to upload to and update the files in the folder.
● Mark the Allow Access to Files Uploaded By Other Companies Immediately checkbox to allow all recipients (including CC members) of the shared folder to be recipients on subsequent uploads to the folder from both internal and external project team members. Each recipient will receive a notification that an upload has been made and will have immediate access to the upload on Info Exchange. If cleared, then files uploaded to Info Exchange will not be visible to anyone except the internal Project Center publisher of the shared folder. The internal publisher will then have to receive the uploaded files, extract them to the project folder, and then republish. At that time external users would be notified that new files are available. Choose one of the following options:
-
-
Choose Allow Access to Uploaded Files but do not Synchronize with Published Shared Folder to allow the user who is uploading files to include all recipients on the uploaded transfer so that they are notified that files are being uploaded and can access them through the uploaded file transfer. The files, however, will not be integrated into the shared folder until the internal Project Center sender receives them, extracts them to the project folder, and republishes them to Info Exchange.
-
Choose Automatically Synchronize Uploaded Files into Published Shared Folder to make files uploaded to the Info Exchange website immediately available in the published folder on Info Exchange. The internal Project Center user will still need to receive them and extract them to the published folder (unless the option below is checked), but other external users will have immediate access to them.
-
● Mark the Automatically Synchronize Files Uploaded Via Info Exchange into the Associated Project Folder checkbox to have the Project Center Server automatically extract files that are uploaded to Info Exchange to the project folder after they are received.
This checkbox is only available if the Automatically Download Incoming Transfers option is selected in the Info Exchange tab of the Edit Project Settings dialog box.
Both the Automatically Synchronize Uploaded Files into Published Shared Folder option and the Automatically Synchronize Files Uploaded Via Info Exchange into the Associated Project Folder option must be selected to allow Info Exchange users to create and rename subfolders.
6. Click
the Synchronization Schedule tab:
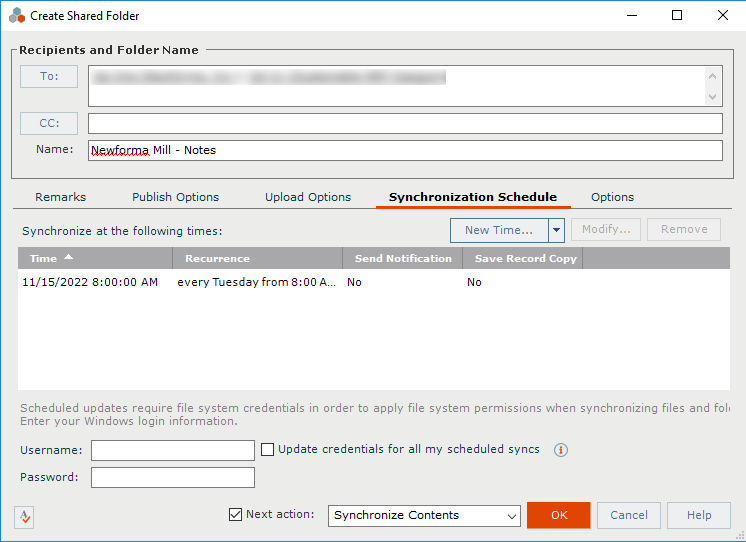
● Use this tab to schedule the publishing of shared folders. Click the New Time drop-down arrow to select from preset synchronization task times, or click New Time to open the Create Scheduled Task dialog box to schedule a new time (single or recurring) to synchronize (update) a published shared folder.
● Enter your Windows Username and Password if required.
7. Click the Options tab to edit the settings for the file transfer, including who can access it and reminder settings. Click OK to publish the contents to your Newforma Info Exchange server. The file transfer is logged in the All Outgoing category of the Info Exchange activity center.
If you select the Hide Recipient List option under Notification Options, only the internal member that created the shared folder is notified of changes to the folder. Additional notification recipients can be selected. If the option is disabled for a shared folder, everyone on the folder distribution list receives notifications.
8. When
you return to the Project Files activity
center, the icon of the project folder changes to indicate that
the folder was published, and the shared folder becomes a related
item and is added to the Related
Items tab, as shown here. The folder is now published to Info Exchange,
and can be updated at any time via Project Center or the web.
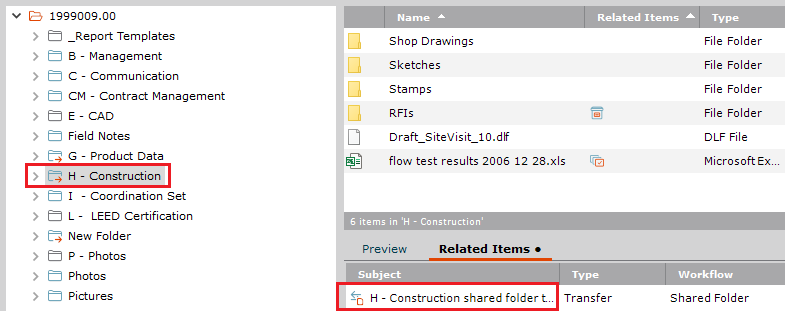
You can change the list of recipients at anytime by selecting the published folder in the Related Items tab, then clicking Shared Folder > Add or Remove Recipients from the Tasks panel, which opens the Modify File Transfer Recipients dialog box.
9. Continue with the next procedure if you want to continue the process.
To update the project folder to Info Exchange because it has changed
1. Let's say that the files in the project folder have changed (files have been added or removed or the published folder was removed from Info Exchange). If you want to update the contents of the folder from Project Center, select the same folder in the Project Files activity center (in this example the Comparison folder), and click Synchronize Contents from the Tasks panel. The Transfer to Info Exchange Options dialog box opens. Edit the settings for the file transfer, including who can access it and reminder settings. Click OK to re-publish the contents to your Newforma Info Exchange Server.
2. Optional: If you need to change
any of the publishing options, select the folder and click Modify
Shared Folder from the Tasks
panel to open the Modify
Shared Folder dialog box. Fill in the fields as necessary. Make sure
the Allow Info Exchange Users to Upload
Files checkbox is marked if you want external project team members
to be able to upload and update the files in the folder.
In the Next Action field, choose
one of the following:
-
Choose Synchronize Contents to republish the contents. Select the Options tab If you need to edit the settings for the file transfer, including who can access it and reminder settings before republishing.
-
Choose Notify New Recipients to add the new recipients to the transfer and send an email message to them that the transfer is available, without republishing the files. They will then be given the option to view the transfer, download the files, or go the Info Exchange website.
Click OK when finished.
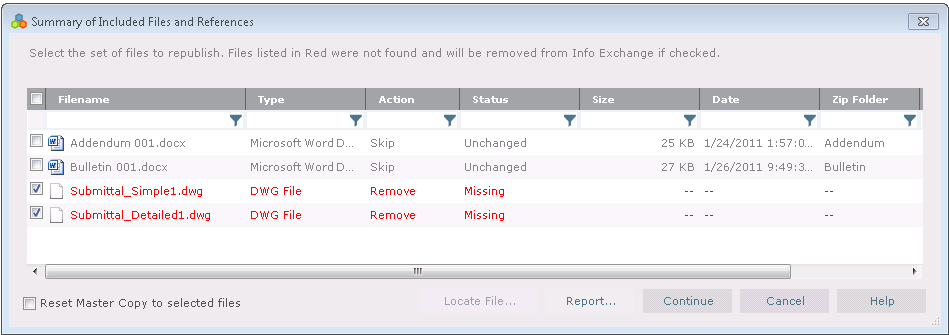
3. If the
shared folder Files to Synchronize
option on the Publish Options
tab is set to Choose Specific Files,
the Summary of Included Files and References
dialog box opens. Mark the checkboxes of the files you want to republish
to Info Exchange (files in red will be removed if they are checked). Click
Continue to republish the contents
to the folder on Info Exchange. Internal and external project team members
can now view, manage, and upload files to the folder on Info Exchange.
4. Continue with the next procedure if you want to continue the process.
To manage the published folder on Info Exchange and upload to it
The following steps can be performed by either an internal or external project team member on Info Exchange.
1. Open a web browser and log onto Info Exchange.
2. Click the project you want to open from the list of Projects.
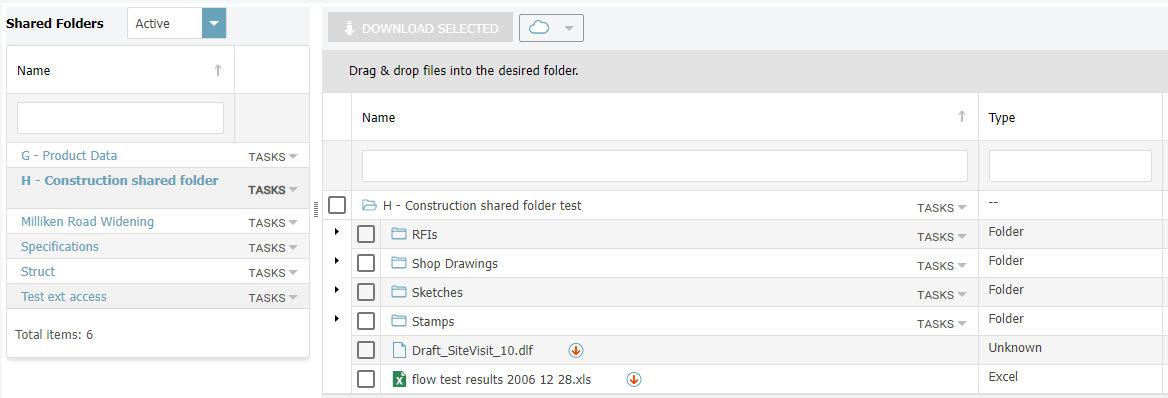
3. Click
View > Files and Documents > Shared
Folders to view the list of shared folders for the project in the
Shared
Folders log. Click the name of the published folder in the Shared
Folders panel. The Folder Contents
panel displays a list of all the files and subfolders contained in the
shared folder, as shown in the following example:
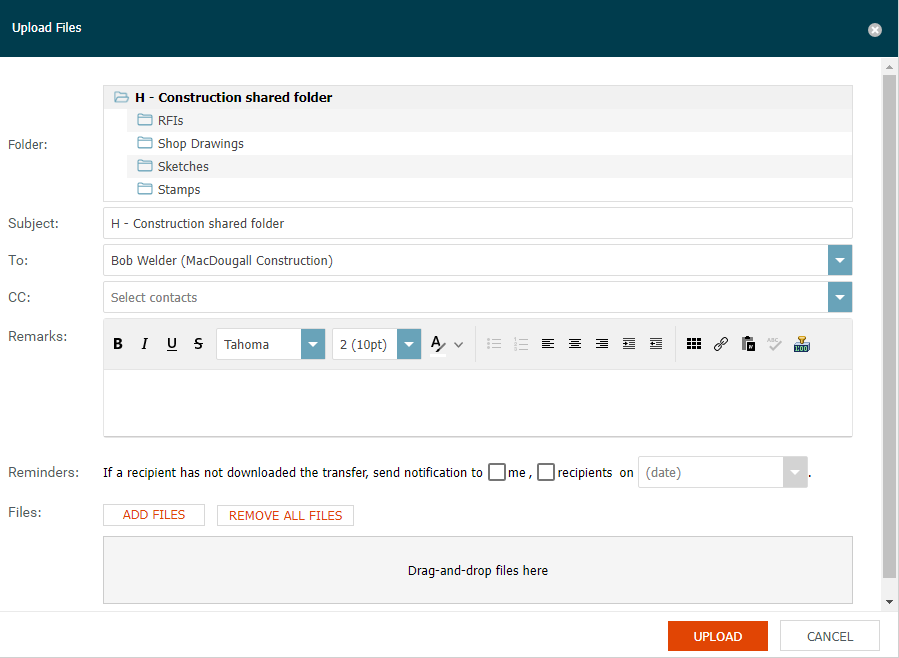
4. To upload
files to the folder via Info Exchange, click the Tasks
drop-down for the folder in the Shared
Folders panel, the select Upload
Files to open the Upload Files
dialog box, shown here:
Depending on your browser, you may also be able to drag and drop files directly onto the desired folder or subfolder in the Folder Contents panel of the Shared Folders log. For more information, please refer to Drag and Drop Files to a Shared Folder.
5. Select the folder or subfolder to which you want to upload files from Folder tree, then add the files you want to upload in the Files section of the dialog box.
6. Click Upload to upload the files to the shared folder on Info Exchange. In this example, the new file is added to the folder. The folder is updated to include the new file, and none of the other files are modified.
Depending on the project and shared folder settings, the uploaded files may be immediately available to other users. If this is not the case, an internal Project Center user must acknowledge receipt of the file from Info Exchange using Project Center before it can be seen by other users.
Table of Contents
Index
Search (English only)
Back