

Related Markup Sessions Activity Center
This activity center lists all markup sessions related (linked) to the source file that you selected. Instead of having to search for markup sessions that exist for a file, use this activity center to find and list them all quickly. The top section lists the markup sessions that exist for the selected source file, and the bottom section displays tabs containing a preview of the selected markup session, remarks about the markup session, a summary of the markups for the selected markup session, the history of the selected markup session, email messages liked to the markup session, and related items.
See the Project Markup Sessions activity center topic for related information.
|
Markup Sessions● Show All Markup Sessions Click to go to the Project Markup Sessions activity center to list all markup sessions for the current project. ● Search for Markups Click to search for all .DWF and .PDF files that contain markup information authored in their native applications (it won't return markups added in the Newforma Viewer). The Search Results window opens with the results. ● Create a Report Click to open the Create a Report dialog box to select the type of markup session report to create. Selected Markup Session● Open in Newforma Viewer Click to open the selected markup session in the Newforma Viewer to view it or to create markups. ● Modify Properties Click to open the Modify Markup Session dialog box to edit the properties of the markup session. ● Review Related Markup Session 1 This task is available only when you select an item that has related markup sessions. Click to open the Related Markup Sessions activity center to view information about and preview the related markup sessions. ● Review Related Action Items Click to open the Related Action Items activity center to view action items related to the selected item. ● Send Email Click to open an email message containing a link that opens Project Center to the markup session in this activity center. The recipient must be a Project Center user. ● Publish Click to open the Publish Files dialog box to print or create a .PDF of the selected markup session. ● Delete Click to delete the selected markup session.
● Add Comments Click to open the Markup View Properties dialog box to view the properties of the selected markup and add comments to it, which be added to the Markup Details and History section of the Markup Status Summary tab, as well as the comment field under the Markups panel of the Newforma Viewer. ● Set My Status Click to change the status of the markup selected from the Markup Status Summary tab.
See File Tasks panel.
See Email Tasks panel.
|
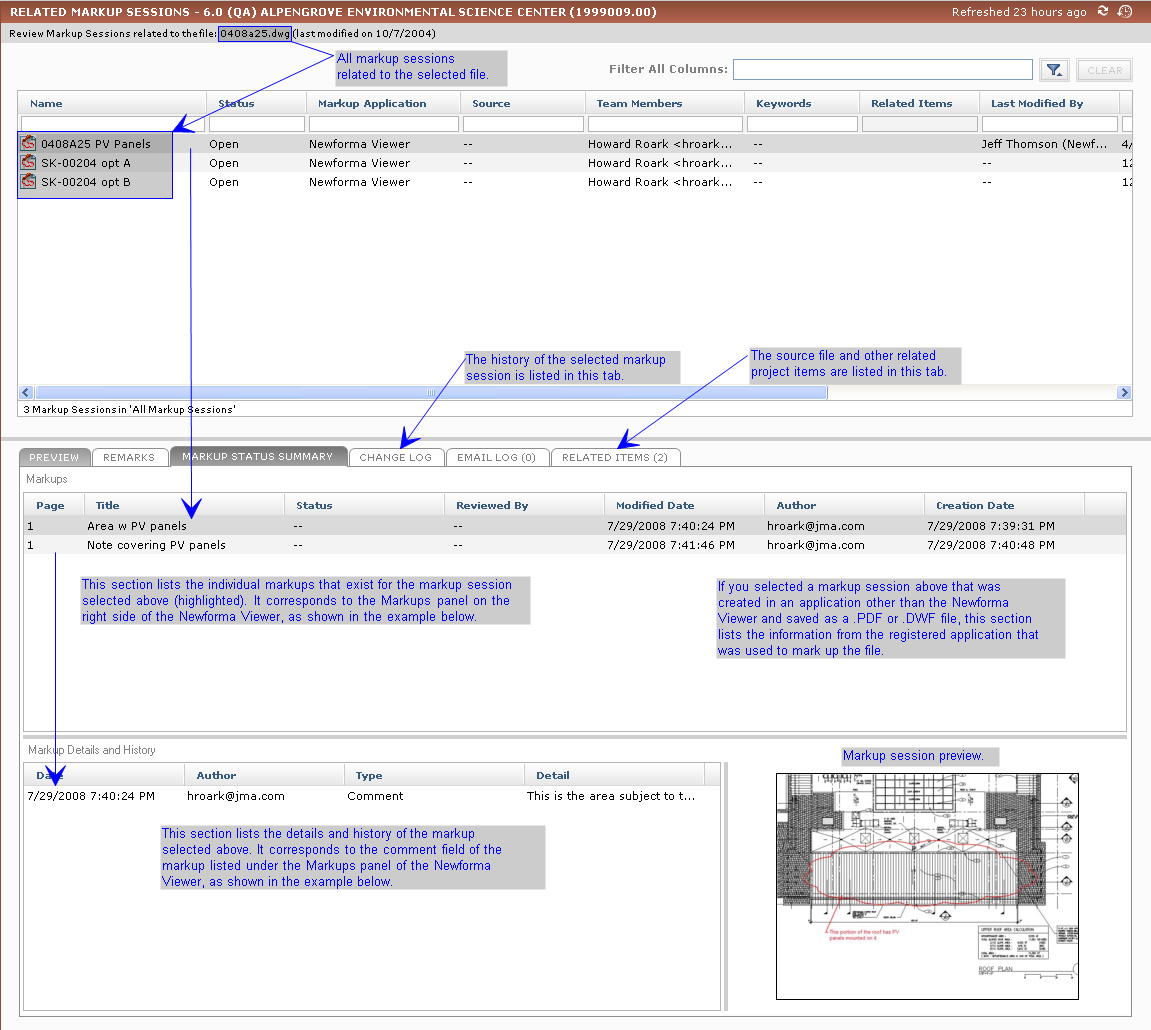
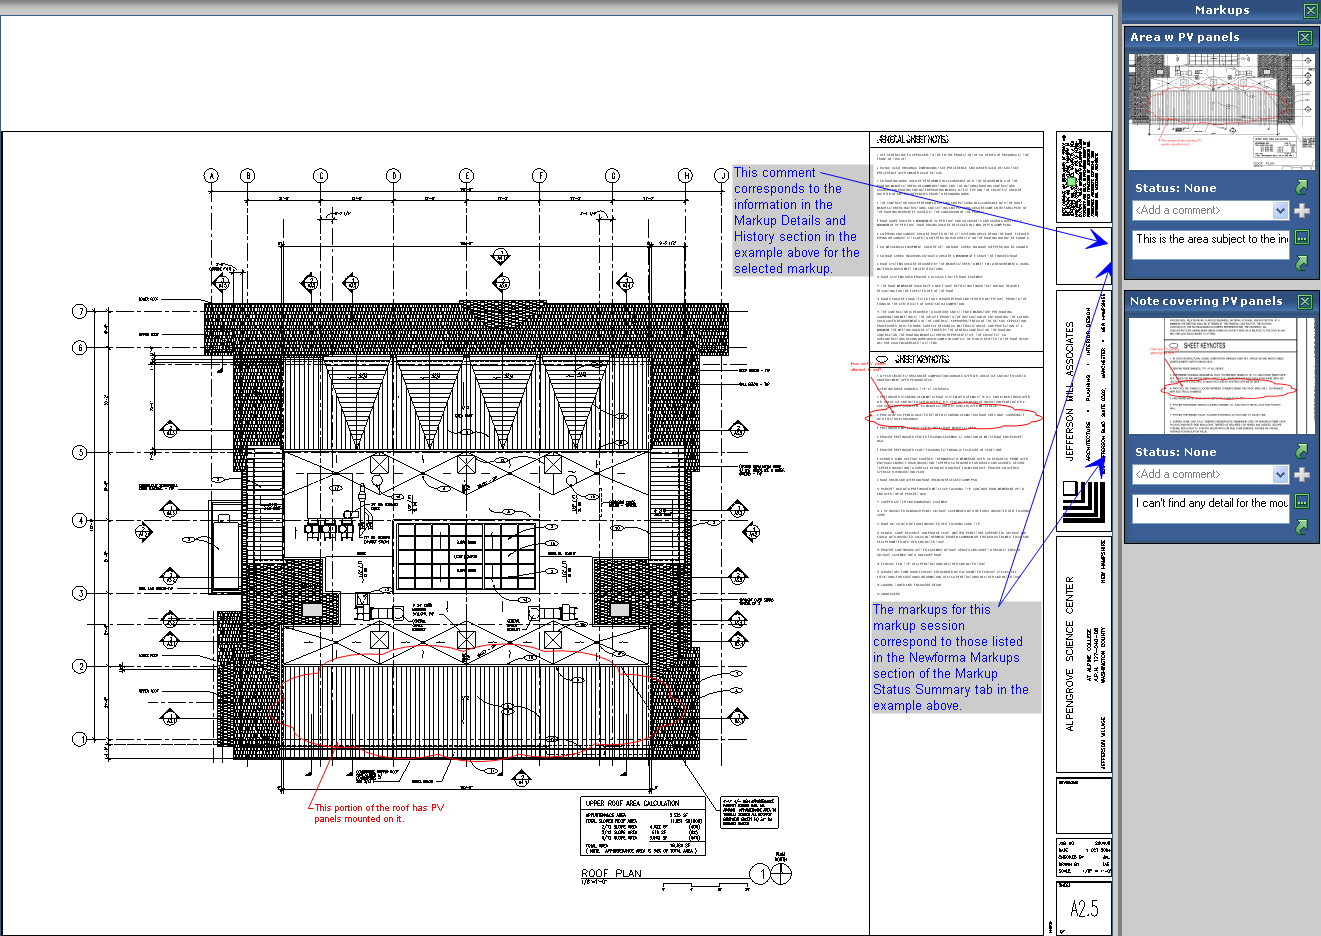
Related Markup SessionsThe following examples explain each section of this activity center. Refer to the descriptions at the bottom of this topic for more detailed information. Example with Markup Status Summary tab selectedThe following example shows how this activity center is related to the Newforma Viewer, shown below it.
Corresponding areas of the Newforma ViewerThe following example shows the markup session that is selected above in the Newforma Viewer (which is accessed by clicking Open in Newforma Viewer form the Tasks panel.
Filter All ColumnsYou can filter by any text that appears in any of the Items columns in this section. For example, if you know the name (or part of the name) of the markup session that you are searching for (or the status, date modified, etc.), enter at least part of the text in this field. The Items list updates automatically as you type. For example, if the markup session you are searching for has the number 30 somewhere in one of the columns, enter 30 in this field. The list will be narrowed down to only markup sessions that have the number 30 somewhere in one of the columns.
Click to toggle between showing and hiding the column filter fields. ClearClick to clear all filters. Group ByClick to group by the any of the columns. For example, if you want to group the list of markup sessions by name, select Name from the drop-down list. The markup sessions will be grouped into sections alphabetically by name. See Column Sorting, Filtering, and Grouping for more information. ColumnsAll columns are listed here. Right-click on any column header to list or de-list columns. Click the NameThe name of the markup session. StatusThe status of the markup session (Open or Closed). Markup ApplicationThe application in which the markup was created. SourceThe file that was marked up. If the source is a screen capture, the row is blank. Team MembersThe project team members involved with the markup session. KeywordsAny keywords applied to the markup session. Related itemsIf the markup session has any related items, the icons appear here. Related Project ItemsThis column is a text version of the icons in the Related Items column. The text will appear in reports. Last Modified ByThe team member who last modified the markup session. Date ModifiedThe date the markup session was last modified. Created ByThe team member who created the markup session. Date CreatedThe date the markup session was created. Preview tabA preview of the selected markup session appears here.
Remarks tabAny additional remarks about the markup session appear here.
Markup Status Summary tabThe Markup Views (top) section of this tab lists the individual markups that have been created for the selected markup session. When a markup is selected from the list, the details and history of the markup appear in the Markup Details and History section (the lower left section), and a preview of the markup appears in the lower right section. 1 If you selected a markup session that was created from a .PDF or .DWF file in an application other then the Newforma Viewer, this tab lists the information from the registered application that you used to mark up the file. For the markup session to be listed here, you must select the .PDF or .DWF in the Project Files activity center, then click Track in Markup Session Log from the File Tasks panel.
Change Log tabThis tab lists the dates and project team members who created, modified, and closed the markup session.
Email Log tabThis tab lists all email messages associated with the selected markup session. Users can drag and drop email messages from Microsoft Outlook and Windows Explorer into this log. Double-click an email message to open it in Microsoft Outlook or the Project Center Email Viewer. From there, you can reply to or forward the message. 1 The number in parentheses indicates the number of email messages linked to the markup session.
Related Items tabThis tab lists all related Project Center items for the selected markup session. Create Related > Action ItemClick to open the Identify an Action Item dialog box to create a new action item and link it to the current markup session. Create Related > Transfer > Via EmailClick to open the Send Files to Email Recipients dialog box to send project files via email. Nothing is logged in this tab. Create Related > Transfer > Via Info ExchangeClick to open the Transfer Files to a Newforma Info Exchange Server dialog box to transfer project files via your Newforma Info Exchange Server and link the transfer to the current markup session. Create Related > Transmittal > Via EmailClick to open the Send Files and Create an Outgoing Transmittal dialog box to send project files via email, file an outgoing transmittal for a file transfer, and link the transfer to the current markup session. Create Related > Transmittal > Via Info ExchangeClick to open the Transfer Files and Create an Outgoing Transmittal dialog box to transfer project files via your Newforma Info Exchange Server, create a new outgoing transmittal for the file transfer, and link the transfer to the current markup session. Create Related > Contract Management > Contract Management ItemClick to open the Create Contract Management Item dialog box for the type of contract management item you selected to create a new CM item and link it to the current markup session. Relate to >Click to select an existing project item and establish a relationship between it and the currently selected markup session. This gives you the ability to link two items that are related together. (For example, an action item that is related to a markup session.) Select Another Project Item to open the Select Project Item dialog box to locate an item that is not in the list. When you create a relationship between two items, each item's icon is added to the other item's Related Items column and tab. RemoveClick to unlink and remove the selected project item from the Related Items tab. 1 Removing a related item from the Related Items tab does not remove it from the database. The Relation Type column has two icons to indicate the relationship type: ● The ● The |


 icon indicates that the relationship was created by a user and can be deleted (such as an action item related to a markup session).
 icon indicates that the relationship was created by Project Center and cannot be deleted (such as a transmittal or record copy related to a markup session).
To access this activity center
Select a file from various activity centers throughout Project Center that has a corresponding  icon under the Related Items column, then click Review Related Markup Sessions from the Tasks panel.