Publish Project Folders and Document Sets to Info Exchange Workflow Example (Shared Folders)
This procedure gives one common workflow scenario for the entire process of publishing the contents of project folders or document sets to Info Exchange from Project Center so that they can be updated at anytime by anyone on the project team. It shows how to publish to Info Exchange, how to republish an edited folder to Info Exchange, how both internal and external project team members can then view the files and upload more files to the folder once it is on Info Exchange, and how internal team members can receive the uploaded files in Project Center, unzip them, and republish them to the same folder to update them on Info Exchange.
This process has been divided into the following four sections:
-
To update the project folder to Info Exchange because it has changed
-
To manage the published folder on Info Exchange and upload to it
1 This procedure uses a folder from the Project Files activity center for the example. If you are publishing a document set (instead of a project folder) to Info Exchange, the workflow is basically the same as in the following procedures, except you would initiate it from the Project Document Sets activity center instead of the Project Files activity center.
If you are publishing a document set, be aware that only the selected document set is published. Any sub-document sets within the selected document set are not published.
To publish a project folder to Info Exchange
|
1. |
Open a project in Project Center. If you are not already there, open the Project Files activity center by clicking Project Files from the Project Home activity center or from the Activities list. |
|
2. |
Select the project folder you want to publish, then click Info Exchange > Create Shared Folder from the Folder Tasks panel to open the Create Shared Folder dialog box.
|
|
3. |
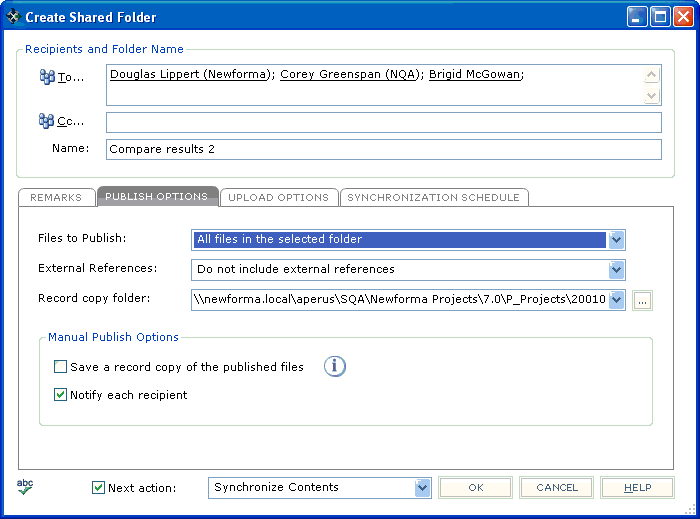
For this example, a folder called Comparison was selected above, and it is being renamed Newforma Mill - Plans for publishing, as shown below. Fill in the fields as necessary. Enter any comments in the Remarks tab. Click the Publish Options tab:
|
|
4. |
You can choose to publish all of the files in the folder, or selected files from the folder. In this example, you would select All Files in the Selected Folder from the Files to Publish drop-down list. A record copy .ZIP file can be saved to the location indicated in the Record Copy Folder field. You can save and log it in the Record Copies activity center by marking the Save a Record Copy of the Published Files checkbox (unless record copies were disabled for this project).
|
|
5. |
Click the Upload Options tab:
|
|
6. |
1 This checkbox is only available if the Automatically Download Incoming Transfers option is selected in the Info Exchange tab of the Edit Project Settings dialog box. |
|
7. |
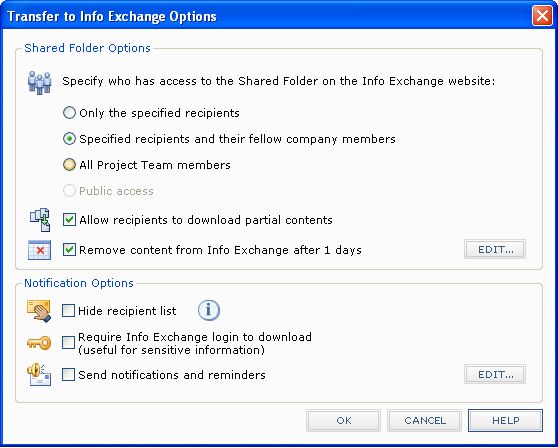
Click OK when finished to open the Transfer to Info Exchange Options dialog box to edit the settings for the file transfer, including who can access it and reminder settings. Click OK to publish the contents to your Newforma Info Exchange server. The file transfer is logged in the All Outgoing category of the Info Exchange activity center.
|
|
8. |
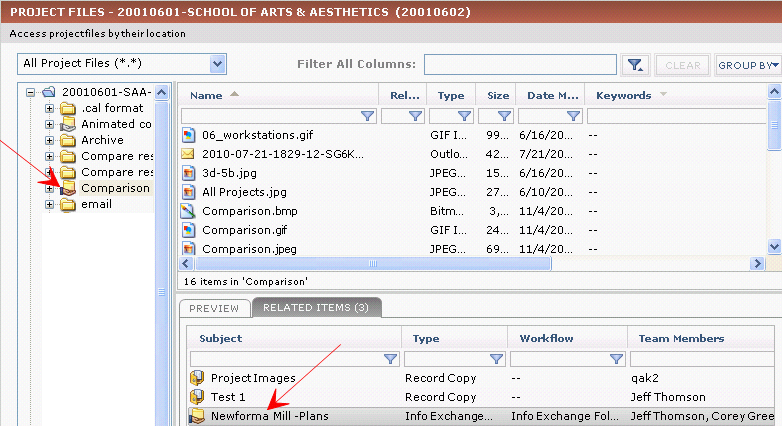
When you return to the Project Files activity center, the icon of the project folder changes to indicate that the folder was published, and the published folder becomes a related item and is added to the Related Items tab, as shown here. The folder is now published to Info Exchange, and can be updated at any time via Project Center or the web.
1 You can change the list of recipients at anytime by selecting the published folder in the Related Items tab, then clicking Shared Folder > Add or Remove Recipients from the Tasks panel, which opens the Modify File Transfer Recipients dialog box. |
|
9. |
Continue with the next procedure if you want to continue the process. |


To update the project folder to Info Exchange because it has changed
|
1. |
Let's say that the files in the project folder have changed (files have been added or removed or the published folder was removed from Info Exchange). If you want to update the contents of the folder from Project Center, select the same folder in the Project Files activity center (in this example the Comparison folder), and click Synchronize Contents from the Tasks panel. The Transfer to Info Exchange Options dialog box opens. Edit the settings for the file transfer, including who can access it and reminder settings. Click OK to re-publish the contents to your Newforma Info Exchange Server. |
|
2. |
Optional: If you need to change any of the publishing options, select the folder and click Modify Shared Folder from the Tasks panel to open the Modify Shared Folder dialog box. Fill in the fields as necessary. Make sure the Allow Info Exchange Users to Upload Files checkbox is marked if you want external project team members to be able to upload and update the files in the folder. In the Next Action field, choose one of the following: ● Choose Synchronize Contents to republish the contents. This option opens the Transfer to Info Exchange Options dialog box (after you click OK) so you can edit the settings for the file transfer, including who can access it and reminder settings, and republish the contents to your Newforma Info Exchange server. The file transfer is logged in the All Outgoing category of the Info Exchange activity center. ● Choose Notify New Recipients to add the new recipients to the transfer and send an email message to them that the transfer is available, without republishing the files. They will then be given the option to view the transfer, download the files, or go the Info Exchange website. Click OK when finished. |
|
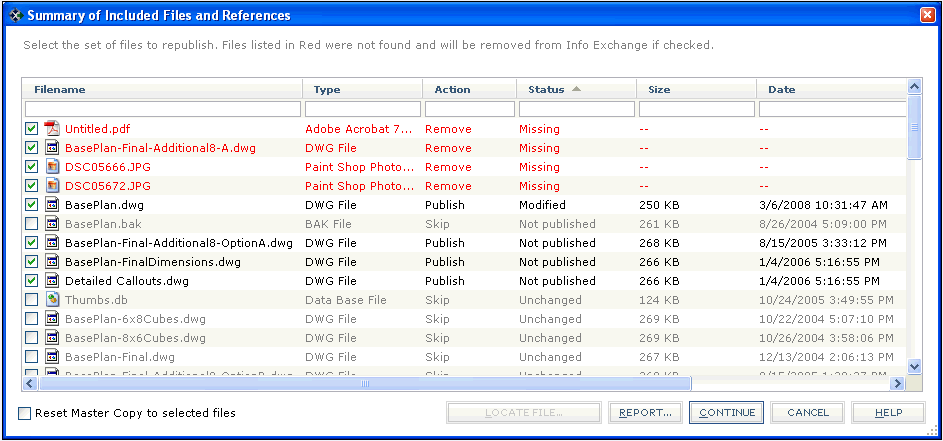
3. |
When the Summary of Included Files and References dialog box opens, mark the checkboxes of the files you want to republish to Info Exchange (files in red will be removed if they are checked). Click Continue to republish the contents to the folder on Info Exchange. Internal and external project team members can now view, manage, and upload files to the folder on Info Exchange.
|
|
4. |
Continue with the next procedure if you want to continue the process. |
To manage the published folder on Info Exchange and upload to it
The following steps can be performed by either an internal or external project team member on Info Exchange.
|
1. |
Open a web browser and log onto Info Exchange. |
|
2. |
Click the project you want to open from the list of Projects. |
|
3. |
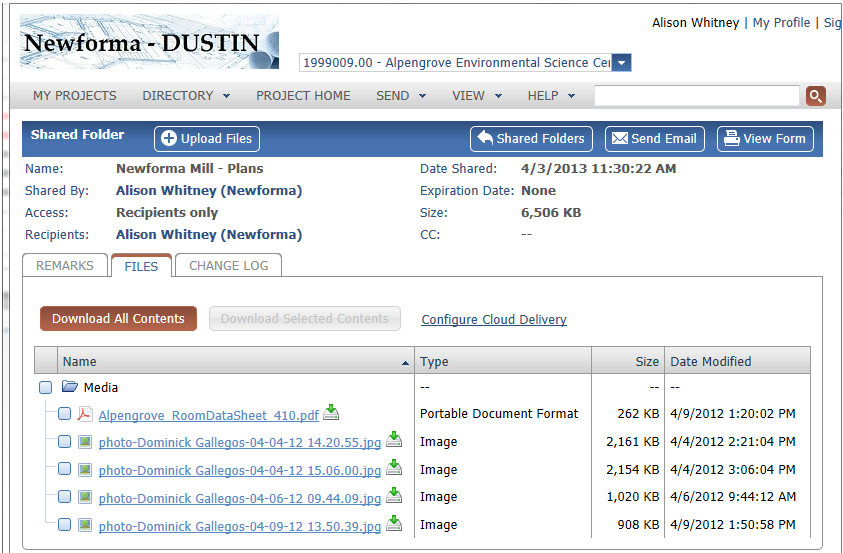
Click View > Shared Folders to view the list of shared folders for the project. Click the name of the published folder from the Shared Folers log (which is Newforma Mill - Plans in this example). The Shared Folder page opens, which lists all of the files in the folder, as shown in the following example:
|
|
4. |
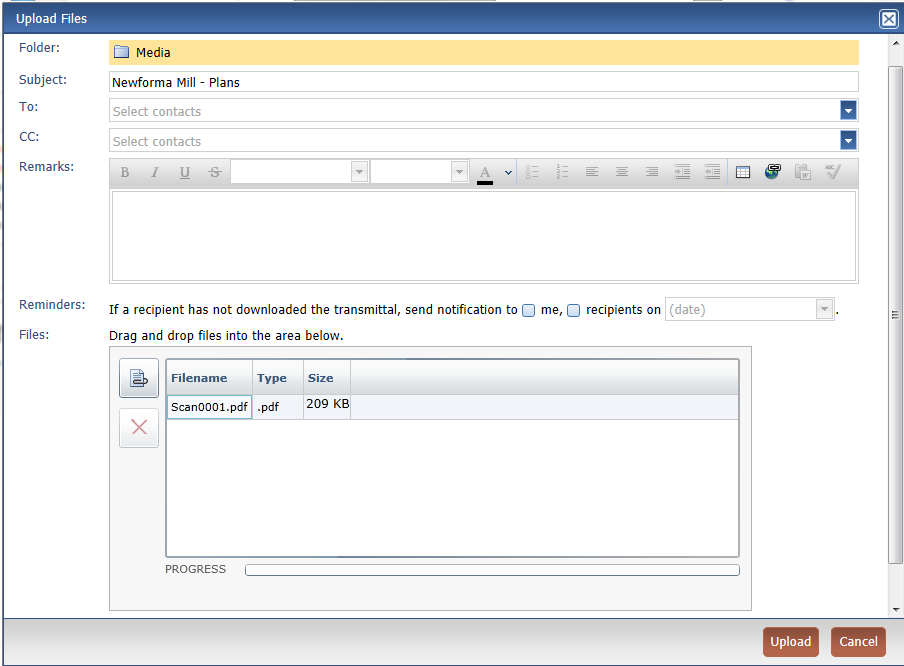
To upload files to the folder via Info Exchange, click Upload Files (as shown above), then select the files to upload, as shown in the following example.
|
|
5. |
Click Upload to upload the files to the Newforma Mill - Plans folder on Info Exchange. In this example, the new file is added to the folder. The folder is updated to include the new file, and none of the other files are modified. |
|
|
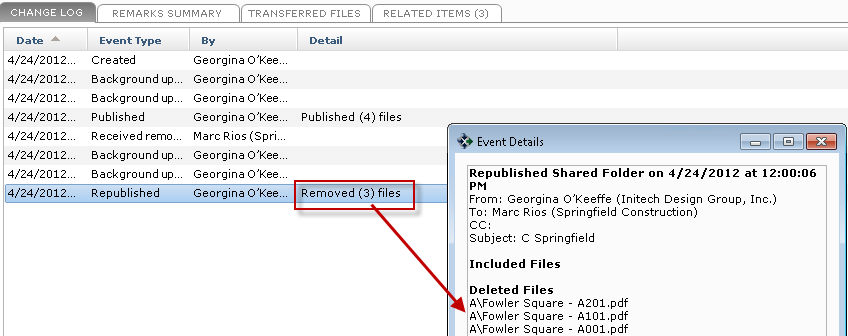
In order for the newly added file to be seen and used, an internal Project Center user must download the file from Info Exchange using Project Center. Continue with the next procedure if you want to continue the process. 1 If files are deleted from a folder on the network that has been published as a Shared Folder, they will be deleted from the corresponding Shared Folder on Info Exchange the next time the folder is synchronized. The Change Log tab for the Shared Folder will have a record of the files that have been deleted, but the files themselves are not retained (unless the Record Copies option has been enabled for the Shared Folder). Double-click the Removed event to see the names of the deleted files, as shown here: 1 If files are deleted from a Shared Folder that has been connected using Newforma to Newforma, the files will also be deleted from the incoming Shared Folder on the connected company's network the next time the folder in synchronized. 1 Files with the same names will be overwritten. The exception to this is with Newforma to Newforma shared folders - Project Center will check the time of the file on the file server and skip the overwrite if the file on the server is newer. |
To receive the files from Info Exchange and download them to Project Center so they can be extracted and uploaded back to Info Exchange
|
1. |
In Project Center, go back to the same project and open the Info Exchange activity center by clicking Info Exchange from the Project Home activity center or the Activities list. |
|
2. |
The file transfer will be listed as a Pending Shared Folder Upload in the All Incoming log. Select the pending upload, then click Receive Pending Shared Folder Upload from the Tasks panel, as shown in the following example:
|
|
3. |
If the transfer was uploaded to Info Exchange by an internal team member, you will be prompted to record the transfer as an outgoing file transfer. Click No.
|
|
4. |
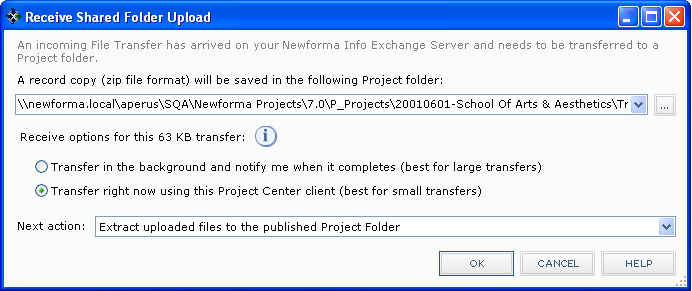
When following dialog box appears, select the Extract Uploaded Files to the Published Project Folder option, then click OK to transfer and extract the files to the Newforma Mill - Plans project folder in Project Center.
|
|
5. |
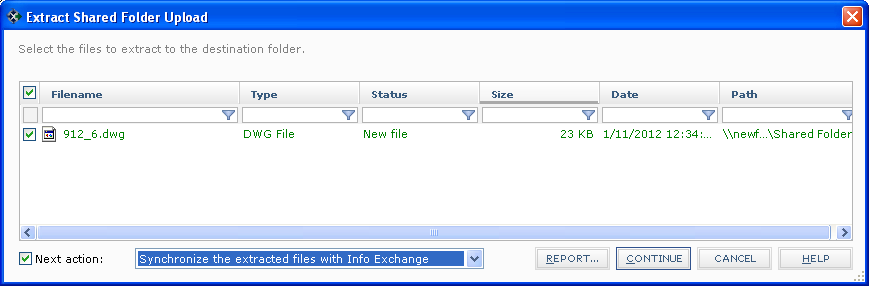
When the following dialog box appears, mark the checkboxes of the files you want to extract (in this example, there is only one file) and select Synchronize the Extracted Files with Info Exchange (or Synchronize the Entire Shared Folder) from the Next Action drop-down list.
|
|
6. |
Click Continue to open the Transfer to Info Exchange Options dialog box to edit the settings for the file transfer, including who can access it and reminder settings. Click OK to extract and publish the newly extracted contents of the folder back to the published folder on Info Exchange. |
|
7. |
Repeat the above procedures as necessary to continue the publishing process. |