

Set Up Project Email Addressing
Each Project Center project can have its own email address. Email messages sent to a project email address will be filed directly to that project. When an email message is sent to a project email address, the SMTP relay on the Info Exchange Server, which you will configure in the Configure the SMTP relay for your Info Exchange Server section below, will relay all email messages sent to the project email addresses to the corporate mailbox defined here. (Only one corporate mailbox is required for this feature.) The Project Center Servers will then file the email messages to each project.
Perform the steps in the following procedures to set up project email addressing for your Microsoft Exchange or IMAP-based email server.
1 You must be a Project Center administrator to perform the following procedures.
1 The Project Email Addressing component of email auto-filing is incompatible with Microsoft Office 365‘s hosted version of Microsoft Exchange Server due to a requirement of 365 that Newforma‘s project email addressing component cannot work around. Customers using Microsoft Office 365 will not be able to configure project-specific email accounts such as ‘projectABC@company.com’ to automatically file email messages sent to those addresses. However, other standard email filing methods such as File in Project via the Add-in for Outlook and drag and drop into Outlook project folders are fully supported in Microsoft Office 365.
-
Configure how email messages arrive at the project email mailbox
-
Connect Project Center to a project mailbox on Microsoft Exchange
-
Set the Project Center SMTP Relay Service to start up automatically and to automatically restart
-
Configure the project email settings on your Project Center Servers
Configure how email messages arrive at the project email mailbox
You must configure the method in which email messages arrive at the project email mailbox. Most sites will configure this feature with an MX record and SMTP relay. However, if your email server supports sub-addressing, you can configure project email addresses to use sub-addressing.
Using an MX record and SMTP relay
Using this method, email messages sent to the project email address will arrive at the Info Exchange Server, which will relay it to the corporate email mailbox. To do this, you must create an MX record that points to the Info Exchange Server. For example, if your corporate email domain is newforma.com, you could create an MX record named projectemail.newforma.com. If your corporation has multiple regions, you could create multiple MX records, one for each region. For example, usa.newforma.com, europe.newforma.com, etc. Each Info Exchange Server will be configured for the MX record that each one is using. (They will each have their own MX record.) You will also later need to configure the SMTP relay for your Info Exchange Server.
1 Creating a new email sub-domain and using an MX record to relay the messages through your Info Exchange Server is necessary for the project email addressing process to function correctly.
1 The Info Exchange Server must be allowed to relay email to the corporate email server.
Create a project mailbox
Before you can begin configuring Project Center for project email addressing, a network administrator must create a project mailbox on the corporate email server (outside of Project Center). An example mailbox would be projectemail@yourdomain.com. This mailbox can service multiple Project Center Servers and projects. This topic does not cover how to do that, as it is an administrative task outside of Project Center. Once the project mailbox is configured and running, continue with the following procedures.
1 The mailbox created here must only be used for processing Project Center project email addresses. It should not be used for any other purpose.
1 If you have multiple email servers and Project Center Servers, you may want to perform all of the procedures in this topic for each region. For example, if you have offices on different continents, you would create separate mailboxes for the North American office, the European office, and the Asian office.
Connect Project Center to a project mailbox on Microsoft Exchange
Perform the steps in this section only if you are connecting Project Center to a project mailbox on Microsoft Exchange. If you are connecting to a mailbox on an IMAP-based email server (such as Lotus Notes, Novell GroupWise, or Gmail), skip this section and continue with the next section below.
1 You must perform this procedure on a machine running both Microsoft Outlook and the Project Center client. Do not perform it on a machine running the Project Center Server.
|
1. |
First you need to give the Project Center Server permission to access the mailbox by creating a new profile. Open the Control Panel by clicking Start, Control Panel. |
|
2. |
Click User Accounts, then Mail to open the Mail Setup - Outlook dialog box, as shown here:
|
|
3. |
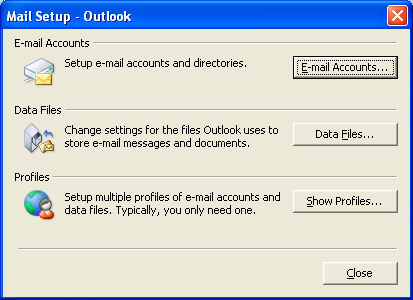
Click Show Profiles to open the Mail dialog box, as shown here:
|
|
4. |
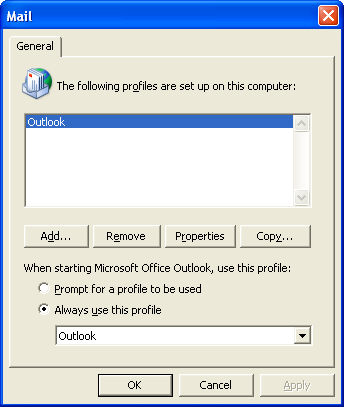
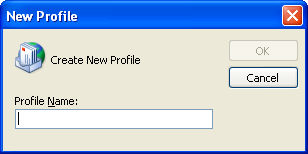
Click Add to open the New Profile dialog box and type in the Exchange project mailbox created in the section above to add it to this profile, then click OK, as shown here:
|
|
5. |
Choose the Always Use This Profile option in the Mail dialog box (see step 3 above), and select the new profile from the drop-down list. Click OK. 1 Remember the original value in the Always Use This Profile option field as you will need to reset it in step 9. |
|
6. |
Open Microsoft Outlook and confirm that it is using the new profile (it will be listed under All Mail Items and will be listed as Mailbox - New Profile Name). |
|
7. |
Close Outlook. |
|
8 |
On the same machine, open a Command Prompt and run the following command, including the quotes: "c:\program files\newforma\tenth edition\project center\n4" projectemail setpermissions smtp_address 1 Smtp_address is the address of the Newforma service account, which is the email account that was configured during the Project Center Server installation. 1 If you use Outlook after executing the N4 command, Outlook may change the mailbox permissions and prevent project email addressing from working. If this happens, exit Outlook and run the N4 command again. |
|
9. |
Return to the Mail dialog box (see step 3 above) and change the value in the Always Use This Profile field to what it was originally. |
|
10. |
Continue with the next section. |
Define an email server for all Project Center Servers
Perform the following steps to configure an email server. You must define at least one email server before you can configure project email mailboxes in the next section. Define an email server for each corporate mailbox that you created in the Create a project mailbox section above. The settings configured in this section apply to all Project Center Servers.
|
1. |
If you are not already there, open the Project Center Administration activity center (shown below) by clicking Project Center Administration from the Tasks panel of the My Project Center activity center or from the Activities list. |
|
2. |
Click the Global Settings tab. |
|
3. |
From the Mail Servers section, click Add to open the Configure Mail Server dialog box, as shown here, to configure Project Center to connect to your company's email server.
|
|
4. |
Enter the name of your company's email server in the Incoming Mail Server Address field. |
|
5. |
Select one of the following options:
Incoming IMAP ServerEnter either the IP address or the name of your company's IMAP-based email server that Project Center is connecting to. Port NumberEnter the port number Project Center will use to connect to your company's email server for IMAP communications. Two common port numbers for IMAP-based email servers are 143 and 993. Encrypted Connection TypeSelect the encrypted connection type Project Center will use to connect to the IMAP-based email server.
IMAP SecuritySelect the IMAP security Project Center uses to connect to your IMAP-based email server.
|
|
6. |
Enter any characters that will not be allowed in IMAP folder names in the Illegal Folder Characters field. |
|
7. |
Click Test Connection to test the connection to your IMAP-based email server. A message will appear indicating whether or not the connection was successful. |
|
8. |
Click OK and continue with the next section. |

Link Project Center to the project email mailbox
Perform the following steps to link Project Center to the email mailbox on your corporate email server that will collect all email messages sent to each project's email address.
|
1. |
If you are not already there, open the Project Center Administration activity center (shown below) by clicking Project Center Administration from the Tasks panel of the My Project Center activity center or from the Activities list. |
|
2. |
Click the Global Settings tab. |
|
3. |
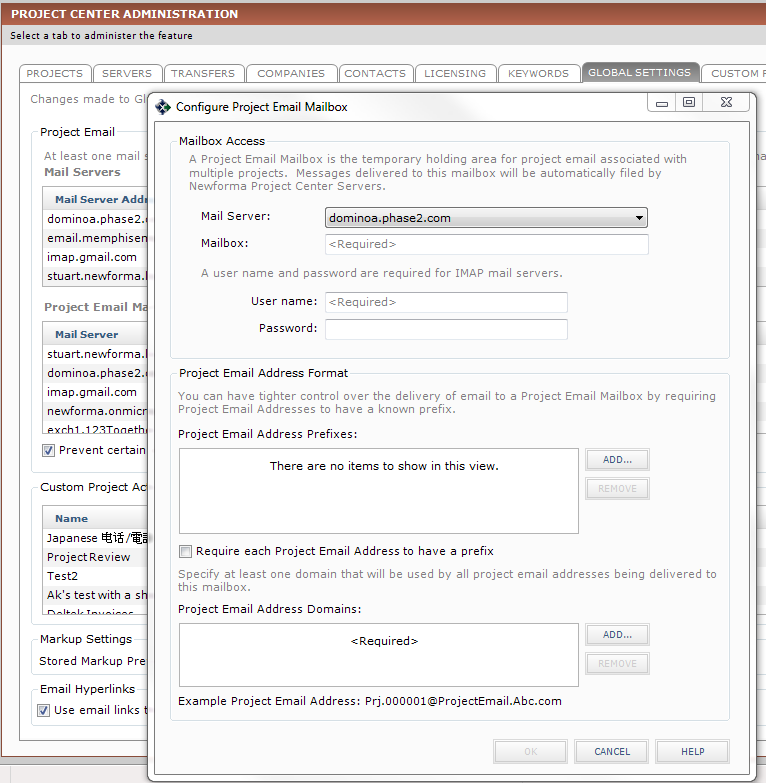
From the Project Email Mailboxes section, click Add to open the Configure Project Email Mailbox dialog box, as shown here, to link Project Center to the email mailbox.
|
|
4. |
From the Mail Server drop-down list, select the corporate email server on which you created the mailbox. |
|
5. |
In the Mailbox field, enter the SMTP address of the mailbox that was created. For example, projectemail@newforma.com. If you are using an IMAP-based email server, enter the user name and password of the mailbox that was created. |
Add project email address prefixes and domains
1 This section is optional. If you will not be adding prefixes, skip to the following section.
One reason you may want to use email address prefixes is to help control spam. If the Require Each Project Email Address to Have a Prefix checkbox is marked, the email sender must add the prefix assigned below to the beginning of the project email address. This can help prevent spammers from guessing email addresses at your company. If the prefix is required and is not present, the email message will be automatically deleted. If the sender uses the prefix, then the message will be processed by Project Center.
Perform the following steps to assign prefixes.
|
1. |
If you are not already there, open the Project Center Administration activity center by clicking Project Center Administration from the Tasks panel of the My Project Center activity center or from the Activities list. |
|
2. |
Click the Global Settings tab. |
|
3. |
From the Project Email Mailboxes section, click Add to open the Configure Project Email Mailbox dialog box (shown below) to configure email prefixes. |
|
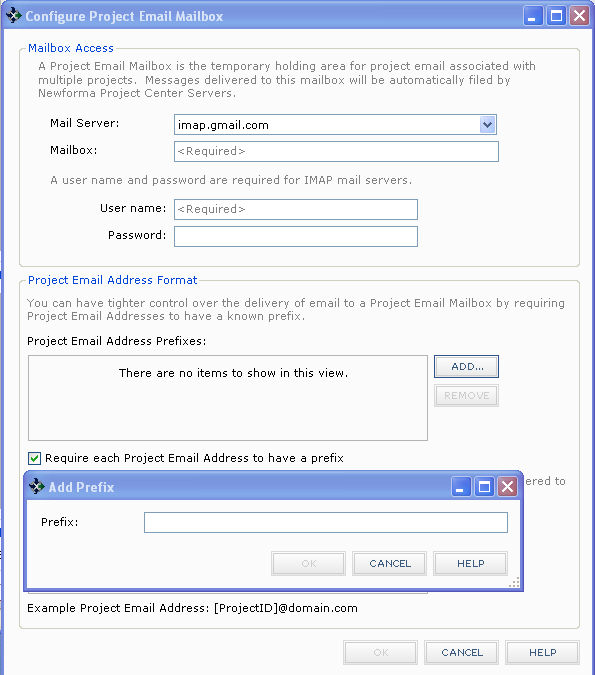
4. |
In the Project Email Address Prefixes field, click Add to open the Add Prefix dialog box, as shown here, to add email prefixes.
|
|
5. |
Enter the email prefix in the Prefix field, then click OK. |
|
|
Mark the Require Each Project Email Address to Have a Prefix checkbox, as shown above, to require the email sender to add a prefix assigned above to the beginning of the project email address. |
|
6. |
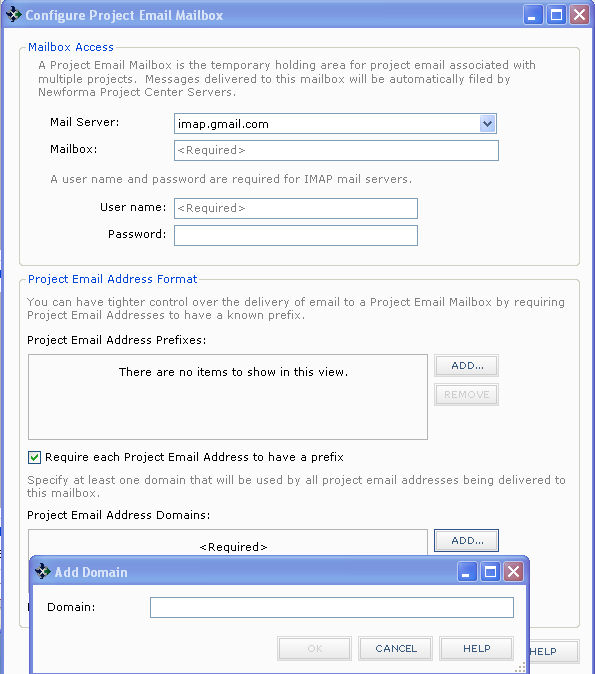
Use the Project Email Address Domains field to configure the email domain name (the name that follows the @ sign) in the project's email address. There are two different ways of configuring the domain name. The most common method is to first create an MX record that points to the Info Exchange Server on which the SMTP relay is configured. (This is configured in the SMTP Relay tab, which is in the Project Center Administration Activity Center Servers tab.) |
|
7. |
In the Project Email Address Domains field, click Add to open the Add Domain dialog box, as shown here, to add a new domain name.
|
|
8. |
Enter the domain name in the Domain field, then click OK. |
|
9. |
Click OK when finished adding prefixes and domains. |
Configure the SMTP relay for your Info Exchange Server
If you are using the SMTP relay for project email addressing, perform the following steps to configure it. The SMTP relay requires a working folder on the Info Exchange Server. You must log onto the Info Exchange Server and create the folder before performing this procedure.
1 The firewall on the Info Exchange Server must be configured to allow SMTP traffic (port 25).
|
1. |
If you are not already there, open the Project Center Administration activity center (shown below) by clicking Project Center Administration from the Tasks panel of the My Project Center activity center or from the Activities list. |
|
2. |
Click the Servers tab. |
|
3. |
Select your Info Exchange Server from the Server Topology section. |
|
4. |
Click the SMTP Relay tab. |
|
5. |
Mark the Enable the SMTP Relay Service on Info Exchange checkbox (as shown below) to enable the SMTP relay on Info Exchange. |
|
6. |
In the Working Directory field, enter the name of a folder on the Info Exchange Server in which the relay will temporarily store email messages and log files. |
|
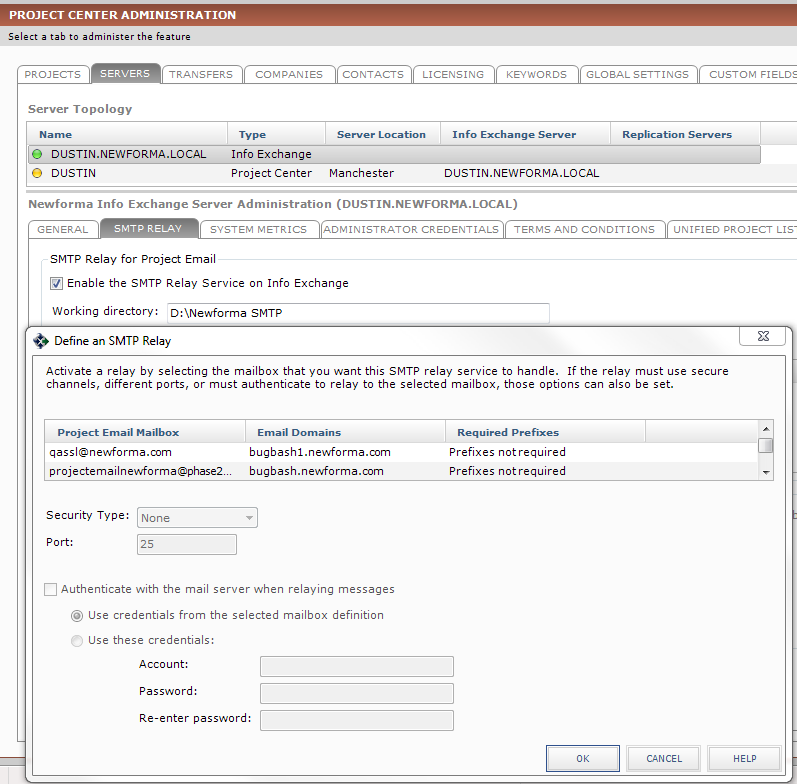
7. |
Specify which project email boxes the relay will perform relay services for in the Specify the Mailboxes and Domains that will be Handled by the Forwarding Service field. Click Add to open the Define an SMTP Relay dialog box, as shown here, to select the project email mailbox that you want to be serviced by the Info Exchange SMTP relay service, then click OK.
|
|
8. |
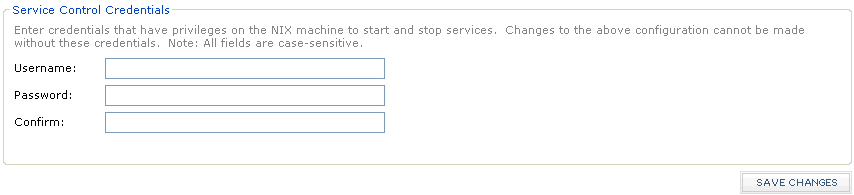
Use the Service Control Credentials section, shown here, to enter the credentials for an account that can start, stop, and configure services on the Info Exchange Server. Enter the username and password of the account. If the username is in a domain, enter it in the following format: domain\username.
|
|
9. |
Click Save Changes when you are finished. |
Optional: Set the Project Center SMTP Relay Service to automatically restart
You must set the SMTP Service on the Info Exchange Server machine to automatically restart if there is ever a failure.
|
1. |
Click Start > Control Panel > System and Security > Administrative Tools. Double-click Services. |
|
2. |
Right-click on Newforma SMTP Relay Service, and select Properties to open the Newforma SMTP Relay Service Properties dialog box, as shown below. |
|
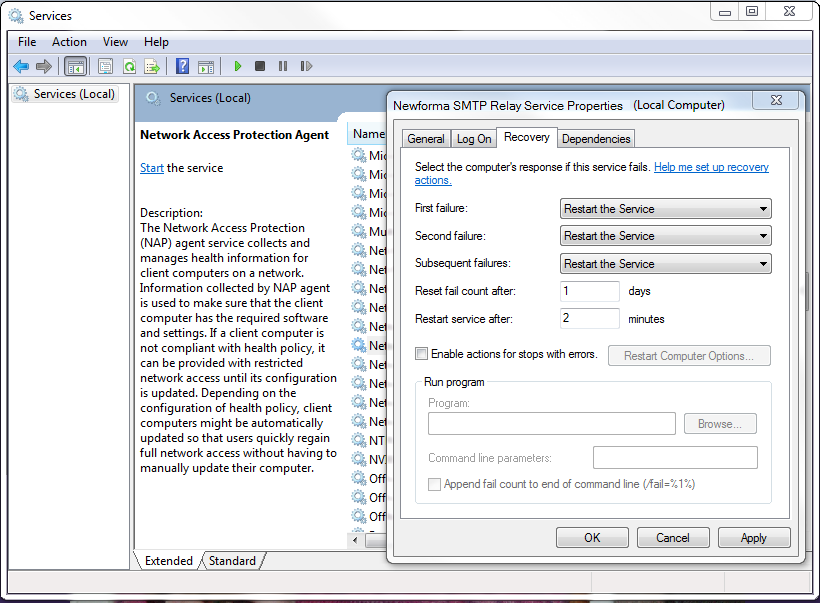
3. |
Click the Recovery tab. Set each value to Restart the Service, as shown here:
|
|
4. |
Click OK when finished. |
Configure the project email settings on your Project Center Servers
You must enable project email addressing on each Project Center Server that will have projects with project email addresses assigned to them.
|
1. |
If you are not already there, open the Project Center Administration activity center (shown below) by clicking Project Center Administration from the Tasks panel of the My Project Center activity center or from the Activities list. |
|
2. |
Click the Servers tab. |
|
3. |
Select the Project Center Server you want to configure from the Server Topology section. |
|
4. |
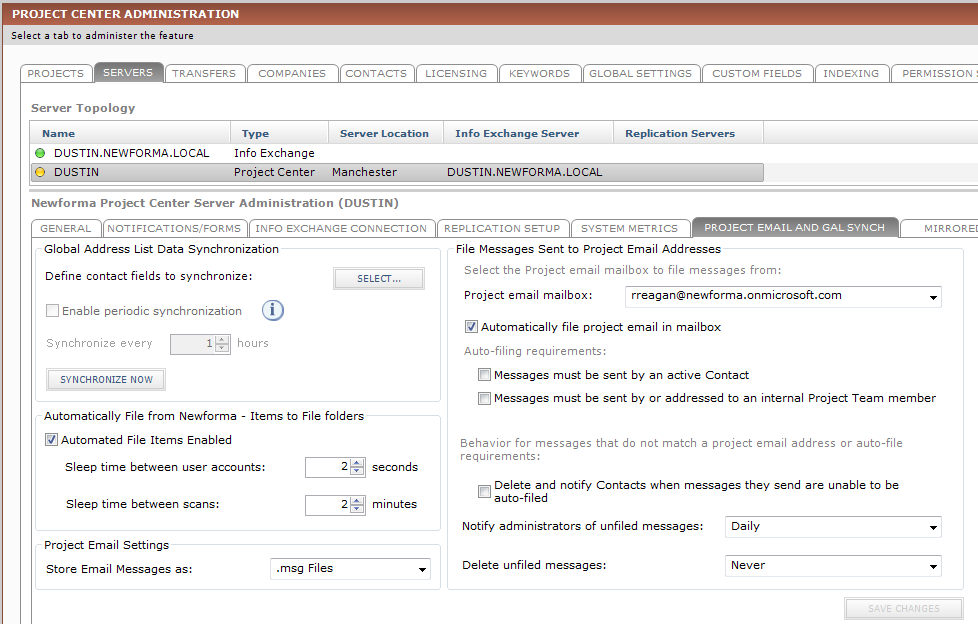
Click the Project Email and GAL Sync tab, as shown here:
|
|
5. |
From the Project Email Mailbox field, select the project email mailbox that you want to use with this Project Center Server. (The project email mailboxes are defined in the Project Center Administration Activity Center Global Settings tab.) |
|
6. |
Mark the Automatically File Project Email in Mailbox checkbox if you want to enable filing from the project email mailbox to the projects on this Project Center Server. |
|
7. |
Mark the Messages Must be Sent by an Active Contact checkbox to require that the sender of an email message must be an active Project Center contact. For example, you might use this option to help prevent spam from being filed into the project. If the email message comes from an email address that is not in the Project Center Administration Activity Center Contacts tab, the message will not be filed to a Project Center project. Messages that don't meet these criteria are not filed in Project Center. See Maintain the Project Email Addressing Mailbox for more information. |
|
8. |
Mark the Messages Must be Sent by or Addressed to an Internal Project Team Member checkbox to require that either the sender or a recipient of an email message must be a project team member of the project to which the email message is being filed. This feature is enabled by default to ensure that at least one project team member has seen the automatically-filed message. If the email message is not sent to or received by an email address that is a member of the project team, the message will not be filed to the Project Center project. Messages that don't meet these criteria are not filed in Project Center. See Maintain the Project Email Addressing Mailbox for more information. |
|
9. |
Mark the Delete and Notify Contacts when Messages They Send are Unable to be Auto-Filed checkbox to notify the sender of an email message that the email message they sent could not be filed to the project and was deleted. This enables the message sender to deal with the issue in a timely manner. |
|
10. |
In the Notify Administrators of unfiled messages field, select how often to notify Project Center administrators about email messages that were not filed to a project and are still in the project email mailbox. |
|
11. |
In the Delete Unfiled Messages field, select when to delete any unfiled email messages that are in the project email mailbox. This helps prevent the project mailbox from filling up with unfiled messages. |
|
12. |
Repeat the steps above for any other Project Center Servers, then click Save Changes. |
Assign project email addresses to a project
Now that the project email addressing set up is complete, you must configure one or more project email addresses for each project on which you want to enable this feature.
|
1. |
If you are not already there, open the Project Center Administration activity center by clicking Project Center Administration from the Tasks panel of the My Project Center activity center or from the Activities list. |
|
2. |
Click the Projects tab. |
|
3. |
Select the Project Center project you want to add an email address to. |
|
4. |
Click Edit Settings to open the Edit Project Settings dialog box, then click the Admin tab. |
|
5. |
In the Project Email Address section, click Add to open the Add Project Email Address dialog box to create a project email address for the project. Email sent to this address will be filed into the project. |
|
6. |
In the Prefix field, enter the text that can be used in front of the email address you are creating here. If the Require Each Project Email Address to Have a Prefix checkbox in the Configure Project Email Mailbox dialog box is marked, you must select a prefix for the email address. |
|
7. |
In the Project Identifier field, enter the text that comes before the @ sign in the email address. You can either select an option from the drop-down list or enter your own identifier. The identifiers suggested in the drop-down list are created from the project name and number. |
|
8. |
In the Domain field, enter the text that comes after the @ sign in the email address. Select an option from the drop-down list. The items in the drop-down list come from the Project Email Address Domains field in the Configure Project Email Mailbox dialog box. |
|
9. |
The Project Email Address field displays the project email address based on the settings entered in the field above. You can edit it if necessary. Click OK if you want to use the email address. |
|
10. |
Click Make Primary if you want to make the selected project email address the primary address. The primary address is indicated by a Yes. The primary project email address is the address that appears in Project Center wherever an email address is used. All of the email address will work, but only the primary one is displayed in Project Center. |
|
11. |
Send an email message to the address in the Add Project Email Address dialog box to verify that the feature is working. Open the Project Email activity center to verify that the email message was filed. If it is not logged after several minutes, refer to Maintain the Project Email Addressing Mailbox for more information. |
|
12. |
Repeat the steps above for any other Project Center projects. |
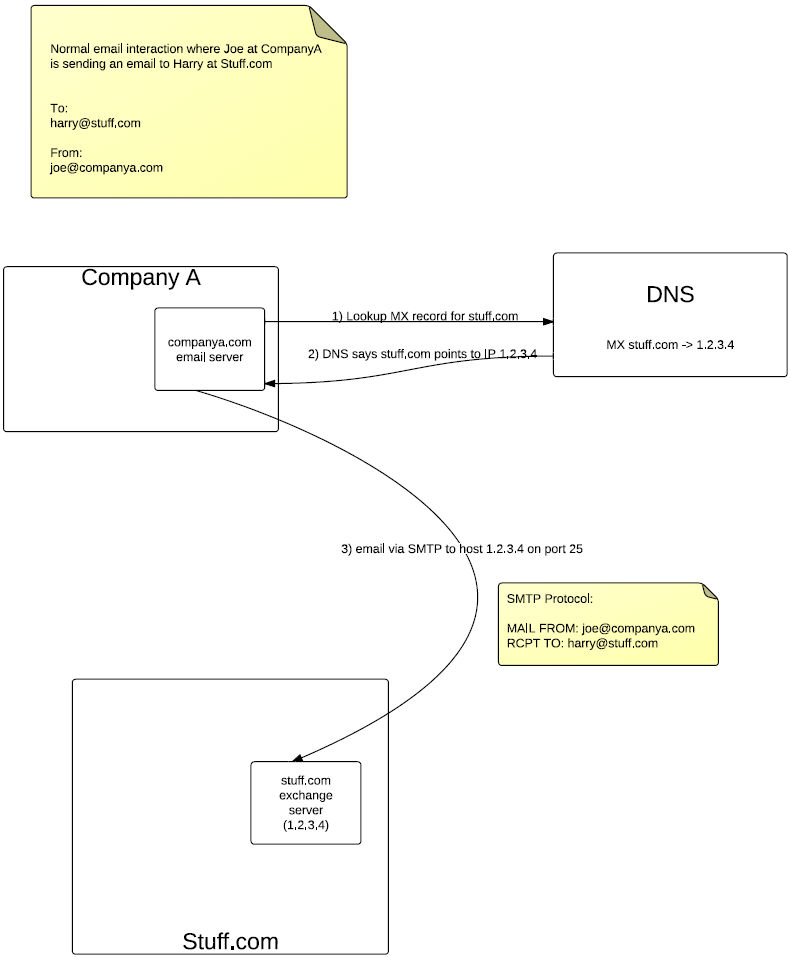
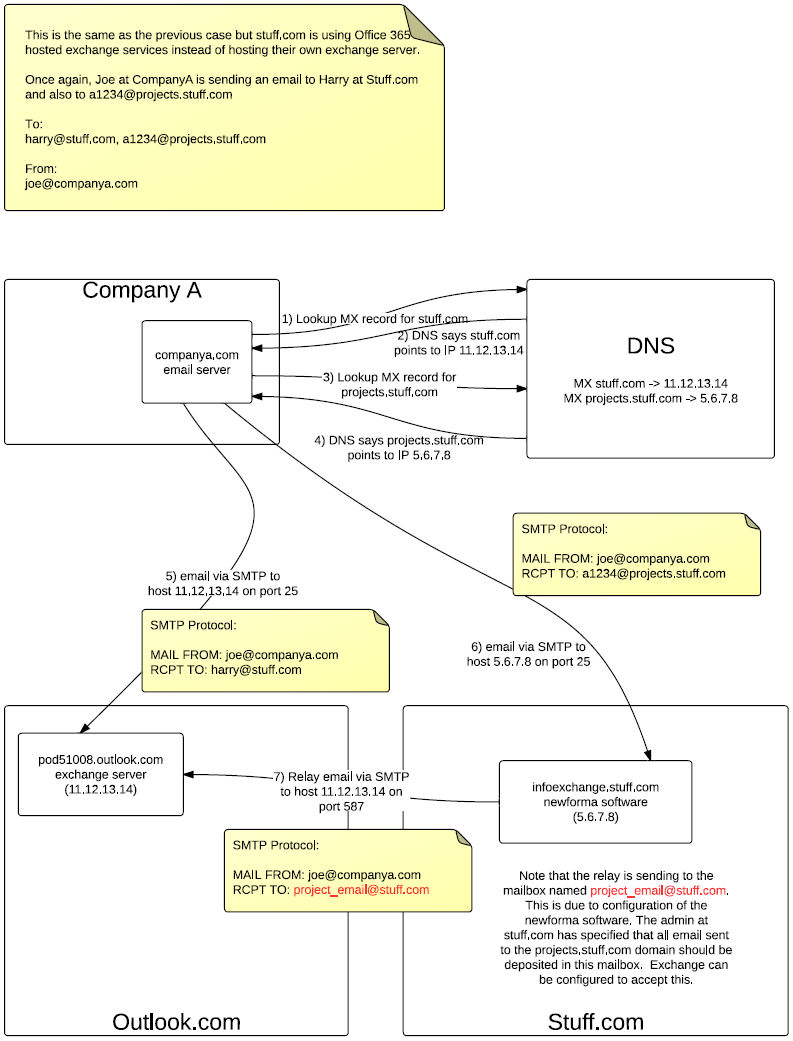
SMTP relay architectural diagrams
Troubleshooting
For troubleshooting issues, refer to the following video: Project Email Addressing Troubleshooting Video