|

Project Center administrators can set which tasks appear here using the Remove Contract Management Item Tasks dialog box.
Change Orders
● New Change Order > Create Change Order
Click to open the Create a Change Order dialog box to create a new change order or to file an expected one.
● New Change Order > Log Received Change Order
Click to open the Log a Received Change Order dialog box to log a change order that you have received.
● Create Report
Click to open the Create Report dialog box to select the type of change order report to create. The report contains the contents of this log.
You can customize which columns appear in reports simply by selecting which columns to show and hide in the activity center. Simply right-click on column headers to add or remove columns. A checkmark indicates the column will appear in the activity center and the report.
● Import Spreadsheet
Click to open the Select Spreadsheet dialog box to select a Microsoft Excel spreadsheet containing change order data that you can import. The imported change orders are placed in the appropriate change order log based on the type imported.
● View Pending Items
This task appears only when there are Pending Review Response change orders.
Click to list only Pending Review Response change orders.
Selected Change Order
The following list shows all available tasks for all change order categories, in alphabetical order. The tasks that appear depend on which category you select from.
● Add Similar Change Order
Click to create a new change order based on the one selected. The new one contains most of the information from the original, except for unique identifiers such as the ID. The new one is also automatically related to the original. Supporting documents from the original are included.
If the original has no received actions (such as a CO in a draft/expected state), the Create a Change Order dialog box opens. If the original has at least one receive action, the Log a Change Order dialog box opens, allowing you to choose whether to log a received change order or an expected one.
If the original contains a receive action with files and/or description of contents entries, the Select Files and Description of Contents dialog box opens first, enabling you to select the items to include in the new copy.
● Close > Close
Click to open the Close Change Order dialog box to close the change order without providing a response.
● Close > Respond and Close
Click to open the Respond to Change Order and Close dialog box to file your response to the sender of the change order and close it. If the change order has files associated with it, the Select Files to Send dialog box will open first.
● Close > Send and Close
Click to open the Send and Close Change Order dialog box to send the change order to team members and close it. If the change order has files associated with it, the Select Files to Send dialog box will open first.
● Delete
Click to delete the selected change order from Project Center.
You must be a Project Center administrator and have a contract management role to delete change orders.
● Forward
Click to open the Forward Change Order dialog box to forward the change order to any contacts who are responsible for reviewing the change order and to create a transmittal. If the change order has received files or supporting documents associated with it, the Select Files to Forward for Review dialog box will open first so you can select the files to forward.
● Link Change Order File
Click to open the Select File to Link to a Change Order File dialog box to locate and select a file to link to the currently open change order.
● Modify
Click to open the Modify Change Order dialog box to edit the settings for the selected change order, including estimated amount and time, and the description.
● Open Change Order File
Click to open the file linked to the change order. The file opens in its native application.
● Receive
Click to open the Receive Change Order dialog box to log the receipt of an expected change order.
● Receive Pending Review Response
Click to open the Record Reviewer Response for Change Order dialog box to record a response received about a change order via Info Exchange.
● Record Reviewer Response
Click to open the Record Reviewer Response for Change Order dialog box to record a response received about a change order that you forwarded to other contacts. When you receive a response back from a contact, record it using this task to track its progress.
● Reopen
Click to open the Reopen Change Order dialog box to re-open the closed change order.
● Review Related Action Items
This task is available only when you select an item that has related action items.
Click to open the Related Action Items activity center to view action items related to the selected item.
● Review Related Markup Sessions
This task is available only when you select an item that has related markup sessions.
Click to open the Related Markup Sessions activity center to view information about and preview the related markup sessions.
● Send
Click to open the Send Change Order dialog box to send the change order to other project team members.
● Send Email About Change Order > To the Sender
Click to open an email message in Microsoft Outlook to send to the contact who originally sent the change order. The email message includes information about the change order.
● Send Email About Change Order > To the Recipients
Click to open an email message in Microsoft Outlook to send to the original change order recipients as a reminder or with additional information. The email message includes information about the change order.
● Send Email About Change Order > To All Reviewers
Click to open an email message in Microsoft Outlook to send to the contacts who are currently reviewing the change order, as a reminder or with additional information. The email message includes information about the change order.
● Send Email About Change Order > To All Participants
Click to open an email message in Microsoft Outlook to send to all change order participants, including the sender, recipients, and reviewers as a reminder or with additional information. The email message includes information about the change order.
● View Form
Click to open the Change Order form to print or send the actual change order document.
Selected Action
See Selected Action panel. Access the actions by clicking the expand  icon in the first column next to each change order. icon in the first column next to each change order.

The file tasks apply to files in the Supporting Documents tab. See File Tasks panel for more information.

See Email Tasks panel for more information.

See Related Item Tasks panel for more information.
|
Change Orders
Category drop-down list
The category drop-down list contains filters to display the change orders in particular categories. For example, if you want to view overdue change orders, select Overdue from the list. Only overdue change orders will appear in the log. You can also choose to display change orders for all project users or only change orders on which you are listed as the sender or recipient. Each category is explained below.
  Click to toggle between showing change orders for all users or only change orders you are involved with. Click to toggle between showing change orders for all users or only change orders you are involved with.
All
Click to display all change orders that have been entered for this project.
Pending Incoming
Click to display all change orders sent via Info Exchange that need to be received. When a change order or change order response is logged by a project team member on Info Exchange, it will show up in this category.
Draft
Click to display all change orders that are in draft form and have not been sent.
Under Review
Click to display change orders that have been received, but responses have not been sent to the change order senders.
When a non-expected change order is first filed, it is placed in the Under Review category.
Awaiting Action
Click to display change orders that have been received, but they:
-
Have not been forwarded for review, or
-
Have been forwarded for review, but a response has not been received, or
-
Have been forwarded for review and all responses have been received, but there has been no response sent to the change order sender.
Forwarded for Review
Click to display change orders that have been forwarded with a due date for another contact to review that have not been received back yet.
Response Overdue
Click to display change orders that have been forwarded but the responses back from the reviewers are overdue.
Overdue
Click to display all change orders that are overdue.
Expected
Click to display all change orders filed as expected.
Expected Resubmission
Click to display expected change orders that were created for change orders that require the sender to resubmit the change order (the action taken on the change order was Rejected or Revise and Resubmit).
Late
Click to display expected change orders that are late.
All Closed
Click to display change orders that have had a response sent to the change order sender and there is no further action required.
Filter All Columns
You can filter by any text that appears in any of the columns in the log. For example, if you know the subject (or part of the subject) of the change order that you are searching for (or the ID, status, due date, etc.), enter at least part of the text in this field. The change orders list updates automatically as you type. For example, if the change order you are searching for has the number 30 somewhere in one of the columns, enter 30 in this field. The list will be narrowed down to only change orders that have the number 30 somewhere in one of the columns.

Click to clear all filters.
 > > 
Click to toggle between showing and hiding the column filter fields.
>  > >
Click to group by the any of the columns. For example, if you want to group the list of items by subject, select Subject from the drop-down list. The items will be grouped into separate sections alphabetically by subject. See Column Sorting, Filtering, and Grouping for more information.
Change Orders log
The change orders log displays the change orders for the category selected above. Click a change order for a list of tasks you can perform, which appear in the Tasks panel. Double-click a change order to open the Modify Change Order dialog box to view the change order's information and settings.
Change orders (and actions) are listed in red if the change order is overdue or if a review response is overdue.
You can drag and drop or copy and paste email messages from Microsoft Outlook and files from Windows Explorer into the Change Orders log to create a new change order. This also prevents Microsoft Outlook from opening multiple instances of Project Center.
Columns
Column headers are different for each category. The following list includes all column headers for all change order categories. Some categories may not include all headers, and they may not be in the order listed here. If you move and resize columns, they are saved in that position for each category. Column settings are reflected in change order reports. Right-click on any column header to list and de-list columns. Click the  icons for more filtering options. icons for more filtering options.
ID
The change order ID number.
Sender ID
The number the contractor gave to the change order.
Subject
The subject of the change order.
Approved Amount
The approved dollar amount of the change order, either + or -.
Approved Days
The approved number of days for the change order, either + or -.
Estimated Amount
Estimated dollar amount of the change order, either + or -.
Estimated Days
Estimated number of days for the change order, either + or -.
If this project contains any potential change orders, the Estimated fields are invalid.
Due Date
The date the change order is due back to the initiator of the change order.
Date Executed
The date the change order was signed off on and agreed to.
Change Order Date
The date the change order was issued to the subcontractor
Status
The status of the change order (Draft, Expected, Open, Closed).
To Contact
The contact the change order is going to.
To Company
The company the change order is going to.
From Contact
The contact the change order came from.
From Company
The company the change order came from.
Initiated By
The contact who requested or authorized the document change.
Reasons
The reasons the change order was created.
Responsible
The party responsible for the change resulting in the change order.
Discipline
Any disciplines applied to the change order.
Contract
The contract the change order is associated with.
Contract Type
The Contract Type value of the contract the change order is associated with.
Related Items
If the change order has any related items, the icons appear here.
Related Project Items
This column is a text version of the icons in the Related Items column. The text will appear in reports.
Keywords
Any keywordsIn Project Center, keywords are words you can add to items to use for filtering. When you add keywords, they appear in the Keywords column of the corresponding Project Center activity centers. You can then filter the list of items using the keywords to quickly find the items you are looking for. applied to the change order.
Supporting Documents
Any files attached to the change order.
From
The contact the change order came from.
Received
The date the change order was received by the contact the change order was sent to.
Last Action
The last completed workflow action for the change order. It displays the action and the purpose or type for that item. For example, if a change order was received and there was no action required selected for the Action field, the Last Action column would display Received – No Action Required. If you were looking at an entry in the Under Review category that had a Last Action of Received – No Action Required, that indicates that the item needs to be closed using the Close task.
Forwarded To
The contacts the change order was forwarded to.
Last Forwarded
The date the change order was last forwarded to a reviewer.
Last Reviewed
The date the most recent reviewer returned the change order. (The most recent review response date.)
Review Days
The total number of days the change order has been in the review cycle for all reviewers.
Review Due Back
The date the change order is due back from the contacts reviewing it, if it is not yet received. It is based on the oldest Forward for Review date.
Due Back From
Any contacts a response to the change order is due back from.
Current Reviewer
The contact who is currently reviewing the change order in a sequential workflow.
Total Days
The number of days to process the change order. The count starts from the start date, which is either when the item was created or the received date, and ends either now or when it was closed if a closed date was entered. If it is re-opened, it displays the count from when the change order was created. It is based on calendar days (not business days) and does not consider holidays in its calculations.
Expected Date
The date the change order or a resubmitted change order is expected (for Expected change orders only).
Internal Notes
Any personal notes added to the change order. These are also added to the Remarks Summary tab.
Closed Date
The date the change order was closed.
Actions
The actions drop-down displays a history of the actions taken on the selected change order, including when it was received, forwarded, closed, etc. Every action represents a communication between a sender and recipients and is linked to a transmittal, which you can print out. You can undo individual actions to revert the change order to its prior state. Selecting an action displays tasks you can perform on it, including displaying its transmittal form, modifying the action, or sending an email about the action. Double-click an action to open the Transmittal form to view the transmittal form for the change order action. An example of the action history is shown here:
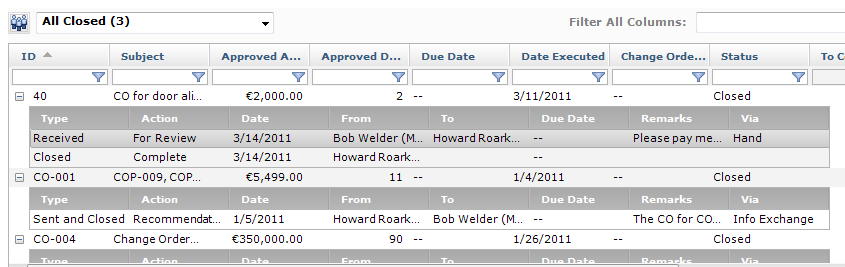
Type
The type of action performed. Each type can have multiple actions, which you can add, as described next.
Action
The action taken.
Date
The date of the action.
From
Who performed the action.
To
The recipient of the action taken.
Due Date
The due date is either the change order due date or the forward for review due date – depending on the action taken.
Remarks
Any remarks entered about the action taken.
Via
How the action was sent.
To delete a transmittal that is associated with a change order action, select the change order, then delete the corresponding action.
Actions are listed in red if the change order is overdue or if a review response is overdue.
See Modify Action in the Selected Action panel topic for an explanation of how modifying an action works.

Refer to the Create a Change Order dialog box for information about these tabs. The tabs that are not available in that dialog box or have additional features are explained here:
File Summary tab
This tab contains any electronic files that were included with the change order. Select a file to display file tasks you can perform, including opening, comparing, sending, and publishing the file. These files are stored in a compressed .ZIP file that is referenced by the change order. Each column in this tab is described here.
Name
The name of the file.
If the file is an email message, Project Center creates the file name with the date, a system generated ID, and the subject of the email.
Type
The file's type.
Workflow
The workflow step (Forwarded, Review Response, etc.) for the file.
Size
The file's size.
Modified
The date the file was last modified.
Zip Folder
The full path to the location of the .ZIP file.
Related Items
Any Project center items related to the file.
Related Items tab
This tab lists all related Project Center items for the selected change order.
Create Related > Action Item
Click to open the Identify an Action Item dialog box to create a new action item and link it to the current change order.
Create Related > Transfer > Via Info Exchange
Click to open the Transfer Files to a Newforma Info Exchange Server dialog box to transfer project files via your Newforma Info Exchange Server and link the transfer to the current change order.
Create Related > Transfer > Via Email
Click to open the Send Files to Email Recipients dialog box to send project files via email. Nothing is logged in this tab.
Create Related > Transmittal > Via Info Exchange
Click to open the Transfer Files and Create an Outgoing Transmittal dialog box to transfer project files via your Newforma Info Exchange Server, create a new outgoing transmittal for the file transfer, and link the transfer to the current change order.
Create Related > Transmittal > Via Email
Click to open the Send Files and Create an Outgoing Transmittal dialog box to send project files via email, file an outgoing transmittal for a file transfer, and link the transfer to the current change order.
Create Related > Contract Management > Contract Management Item
Click to open the Create Contract Management Item dialog box for the type of contract management item you selected to create a new contract management item and link it to the current change order.
Create Related > Web Link
Click to open the Create Web Link dialog box to enter a web link and automatically relate it to the selected Project Center item. After it is created, the Relation Type column will indicate Web Link, and users can double-click on it to open the website.
Relate to >
Click to select an existing project item and establish a relationship between it and the currently selected change order. This gives you the ability to link two items that are related together (for example, a markup session that is related to a change order). Select Another Project Item to open the Select Project Item dialog box to locate an item that is not in the list. When you create a relationship between two items, each item's icon is added to the other item's Related Items column and tab.
Share with External
Click and select Yes to allow the selected web link to be shared with external project team members through Info Exchange.
Share with External > Yes
Click to allow the selected item to be shared with external project team members through Info Exchange.
Remove
Click to unlink and remove the selected project item from the Related Items tab.
Removing a related item from the Related Items tab does not remove it from the database.
The Relation Type column has two icons to indicate the relationship type:
● The  icon indicates that the relationship was created by a user and can be deleted (such as an action item related to a change order). icon indicates that the relationship was created by a user and can be deleted (such as an action item related to a change order).
● The  icon indicates that the relationship was created by Project Center and cannot be deleted (such as a transmittal or record copy related to a change order). icon indicates that the relationship was created by Project Center and cannot be deleted (such as a transmittal or record copy related to a change order).
|


