


Digital Light Table
When drawing files that you are comparing are not iterative versions of the same CAD file, you can use the Digital Light Table to clarify differences by graphically isolating the changes that occurred between the two drawings. It enables you to compare any two raster, CAD, or PDF files electronically by performing a pixel-by-pixel analysis of each file.
-
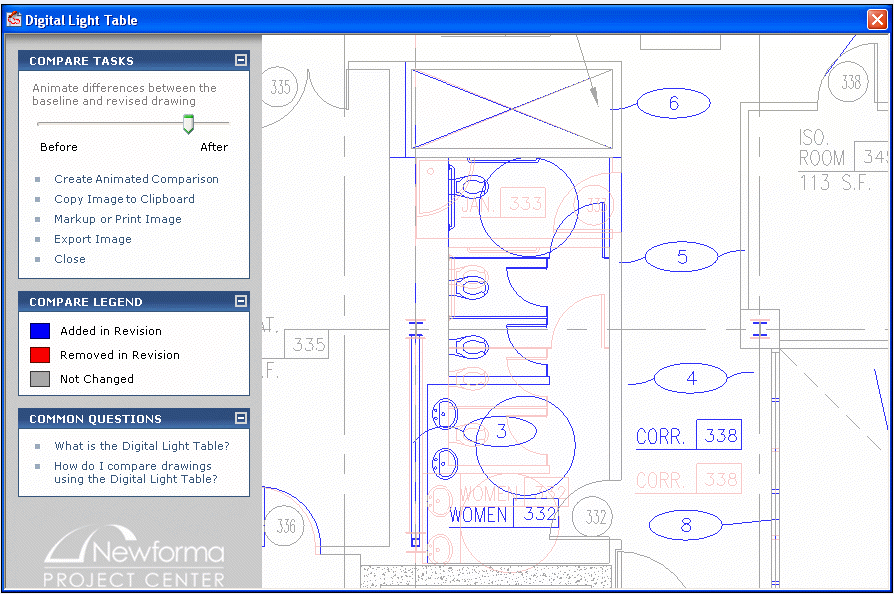
Pixels that exist in both drawings are dimmed and represented as gray.
-
Pixels that exist in the baseline drawing but were removed from the revised drawing are colored red.
-
Pixels that were added to the revised drawing but do not exist in the baseline drawing are colored blue.
When comparing raster or .PDF drawing files, you will likely need to align them in the Newforma Viewer before opening them in the Digital Light Table.
The Digital Light Table is crucial for the following compare scenarios:
-
When comparing two CAD files of separate origins, or where significant portions have been erased and redrawn in place, the normal Compare task cannot isolate changes because the object IDs associated with the revised entities do not match the object IDs of the baseline entities. However, by performing a pixel-by-pixel analysis of the two files, the Digital Light Table can isolate just those changes.
-
When comparing two .PDF files, there are no object IDs associated with the .PDF entities. Therefore, you must use the Digital Light Table to isolate just the changes that occurred.
-
When comparing two raster files, the Digital Light Table performs a pixel-by-pixel analysis of the two files to isolate the changes.
-
When comparing two different file formats, such as a .PDF to a .DWF, or a .DWG file to .PLT file, etc.
Another useful aspect of the Digital Light Table is its ability to generate an animated .GIF file that continually transitions from the baseline to the revised drawing. You can view the animated .GIF file in Windows, PowerPoint, or a Web site to clearly communicate proposed (or un-intended) changes between drawing revisions.
Refer to the following article for a good example on using the Digital Light Table: http://www.aecbytes.com/tipsandtricks/2007/issue16-newforma.html
|
Baseline-Revised SliderUse the Baseline-Revised slider to fade between the baseline (before) and revised (after) drawings. ● Create Animated Comparison Click to save the comparison as an animated GIF file. In the Save dialog box, select a location in which to save the file, enter a name for it, then click Save. ● Copy Image to Clipboard Click to copy the image to the Windows clipboard. You can then paste it in another application, such as Microsoft Paint. ● Markup or Print Image Click to open the image in the Newforma Viewer to mark it up. ● Export Image Click to open the Save dialog box to save the image in another file format (such as .BMP, .JPEG, .GIF, .PNG, or .TIFF). You can also choose the folder in which to save the file. ● Close Click to close the Digital Light Table.
This panel displays the color code representing which objects are unchanged, added, and removed. Added in RevisionBlue objects in the revised file are objects that were added since the baseline. Removed in RevisionRed objects in the baseline file are objects that were removed in the revised version. Not ChangedGray objects were not changed in the revised file since the baseline. |
Digital Light TableThe main window displays the before (baseline) and after (revised) drawings overlaid on each other. Use the slider to show the differences.
|


To access the Digital Light Table
Open a drawing in the Newforma Viewer and click Compare from the Viewer Tasks panel. Select a drawing to compare to the baseline, then click Digital Light Table from the Compare Tasks panel.
Table of Contents
Index
Search (English only)
Back