


Add a Project Team Member
After you create a project, you can add project team members to it. When you add new or existing contacts to the project team, Project Center automatically adds them to the internal project team if they are Project Center users, or to the external project team if they do not use Project Center.
To add a team member to a project
1. If you are not already there, open the Project Team activity center by clicking Project Team from the Project Home activity center or from the Activities list.
2. From the Tasks panel, click Add Team Members > From Contacts to open the Choose New Team Members from Global Contact List dialog box, as shown here: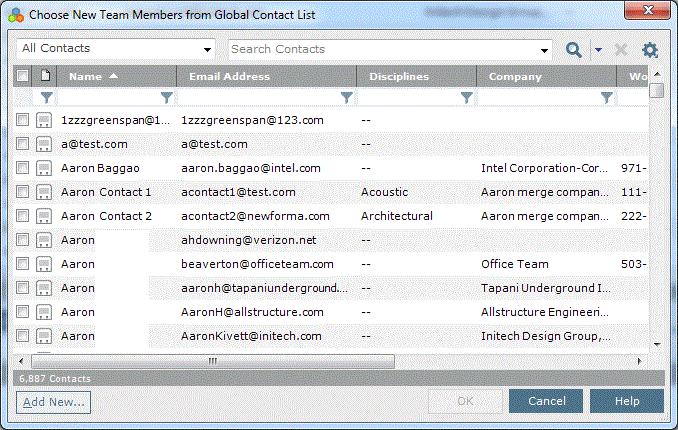
You can also add project team members based on their company. Click Add Team Members > From Company to open the Select Project Team Members from Companies dialog box. Mark the checkboxes of the company or companies from which you want to select team members and click Next. Mark the checkboxes of the contacts you want to add to the project team and click Finish to open the Add Project Team Members dialog box.
3. Mark the checkboxes of the existing contacts you want to add to the project team as shown here, then click OK.
You can add new contacts by clicking Add New to open the Add New Project Team Member dialog box. The new contacts are added to the project team, and are also automatically added to the Project Center contacts database. See Add Contacts to the Project Center Contacts Database for more information.
4. The Add Project Team Members dialog box opens (shown below). Mark the Primary Contact on this Project if you want the contact to be the primary contact for this project.
Each project can have multiple primary contacts. Each project can also have a main contact, which is set in the Edit Project Settings dialog box.
5. If your company has a Newforma Info Exchange Server, and you want this team member to be able to access the current project information through the internet, mark the Allow Web Access to This Project on Your Info Exchange Server checkbox as shown here:
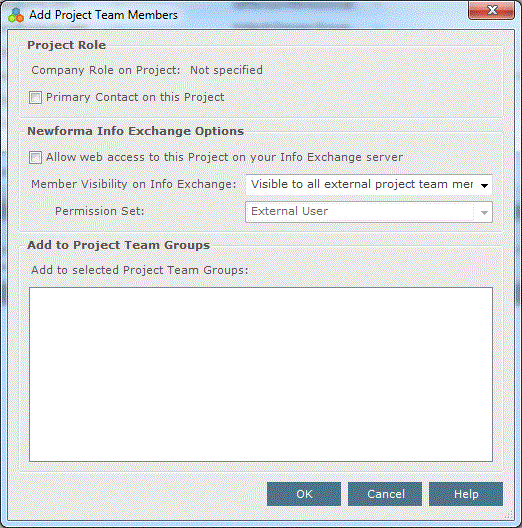
6. From the Member Visibility on Info Exchange drop-down list, select the Info Exchange visibility option to apply to this team member:
● Select Visible to All External Project Team Members (Show Name, Company, and Email) to allow all external project team members to interact with this team member on Info Exchange, but only display the team member's name, company, and email address.
● Select Visible to All External Project Team Members (Show All Information) to allow all external project team members to interact with this team member, and to display all information about the team member on Info Exchange.
● Select Visible to Fellow Company Members Only to allow only external team members with the same company in the Company Name field to interact with this team member via Info Exchange.
● Select Hide From All Other External Project Team Members to prevent all external team members from seeing this team member on Info Exchange.
7. Mark the checkboxes of the project team groups to which you want to add the contacts (if the project team has groups).
8. Select the permission set to apply to this team member. Permission sets determine which items are displayed for internal and external Project Center users for each Info Exchange activity center.
9. Click OK to add the contact to the project team.
Contacts who have logged into Project Center and are then added to the project team automatically become internal team members.
Contacts added to the project team who have never logged into Project Center are added as external team members. Project Center automatically changes them to internal team members the first time they use Project Center.
Table of Contents
Index
Search (English only)
Back