


Batch Compare Drawings
Overview
Each time an architectural firm issues a revised set of drawings to consultants, contractors, agencies or clients, the likelihood of mistakes associated with unintended or undocumented revisions is significant. This problem is compounded with the advent of parametric BIM tools like Revit where a change in one view of a model can trigger an undetected ripple effect of unintended changes in other areas of the project.
Over the course of a project, unintended or undocumented changes lead to cost and time escalation associated with RFIs, change orders, re-submittals, and other actions required to identify and correct the mistakes. At the very least, these mistakes adversely impact profitability, scheduling, and client relationships; in worst case scenarios, they lead to litigation.
Many firms use manual inspection methods on revised drawings. Versions of drawings are loaded in CAD programs or plotted and aligned on light tables. Either way, revisions are manually inspected to ensure that all design changes have been appropriately documented. However, with typical drawings sets numbering in the hundreds, these methods are both time-consuming and unreliable. Time and resource constraints often cause project teams to abandon these quality control measures, leaving the firm exposed to the risks and consequences of unintended and undocumented design changes.
To batch compare drawings
Use this procedure to batch compare revised drawings to baseline drawings before you transmit them.
On Revit projects, you must export drawing sheet sets to .DWF files and compare them in Project Center to previously transmitted .DWF files.
1. If you are not already there, open the Project Files activity center by clicking Project Files from the Activities list or the Project Home activity center.
2. Select the folder containing the baseline drawings you want to compare, then click Compare to > Folder from the Tasks panel.
3. From the Select Folder dialog box, select the revised drawings folder, then click OK to show the results in the Compare Results window.
4. The following example shows baseline and revised folders containing .DWG files: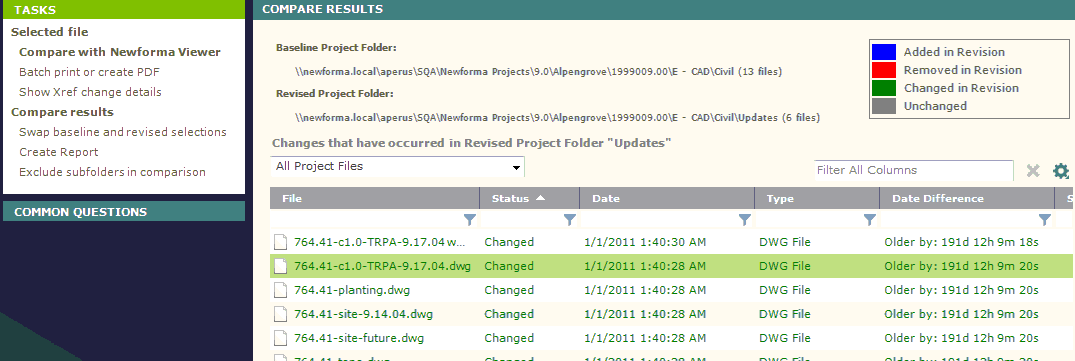
In the compare results above, Project Center displays the file changes, such as size and date differences, between the baseline and revised drawing sets. You can double-click on any changed drawing in the list above to view a color-coded analysis of the revisions in Newforma Viewer, as shown here: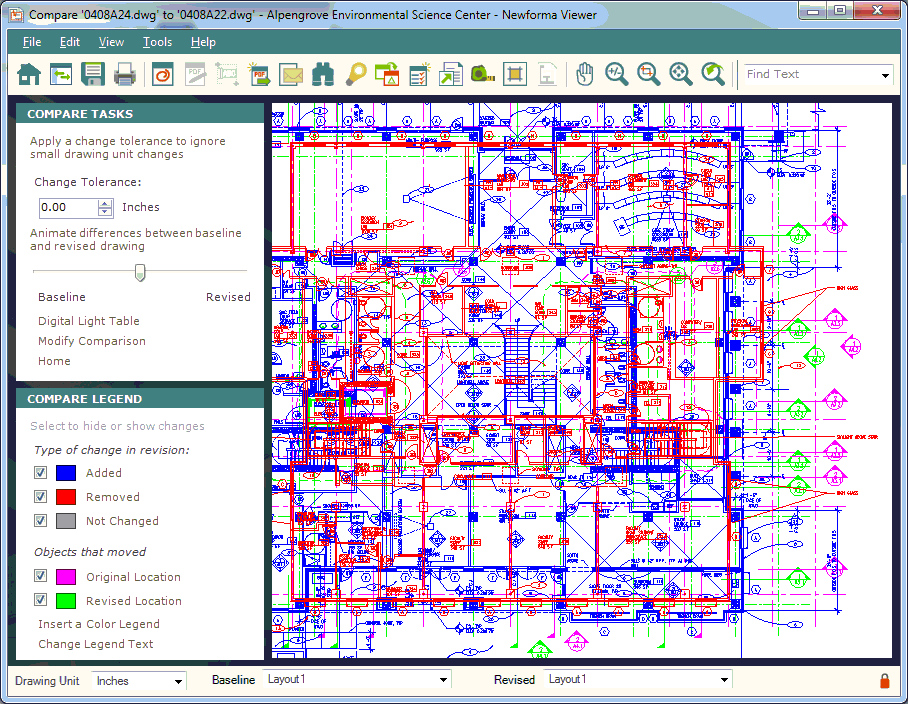
As the image above demonstrates, the color-coded additions, deletions, and changes visually stand out against the unchanged items in gray. Additionally, a change tolerance of 1 inch has been applied, causing small changes of less than an inch to be ignored. This allows you to focus on the larger more material changes. When there are many changes, you can use the change animator to fade interactively between the baseline and revised drawings.
When there are possibly hundreds of revised drawings, comparing them one at a time would be time-consuming. This is where the batch comparison is useful.
5. From the Compare Results window, select all of the changed files, then click Batch Print or Create PDF, as shown here, to open the Batch Print of Compare Results dialog box.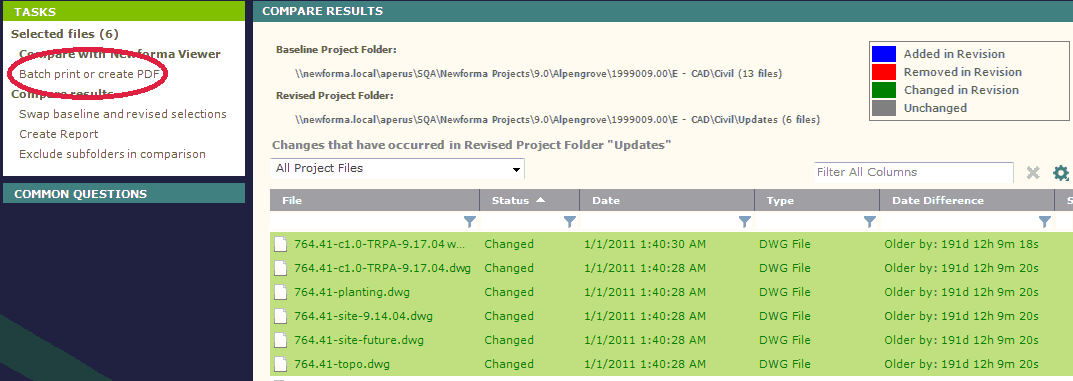
6. Choose the Output to PDF option, then click Start. (You can also output directly to a color printer.)
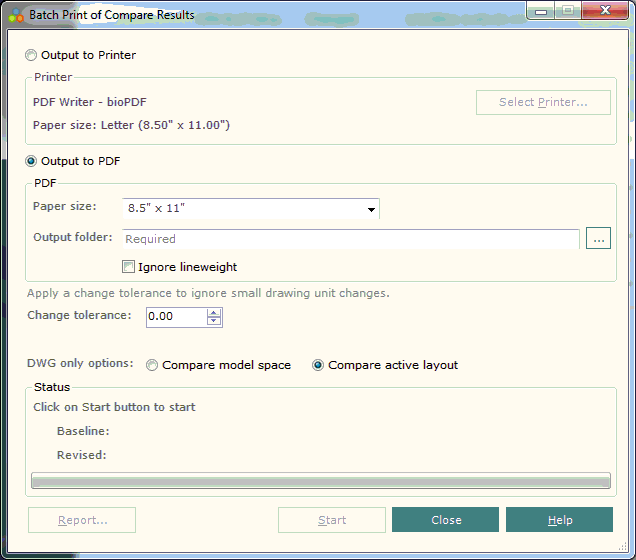
The batch compare process can run unattended and can be set to run over night or on a spare computer. Once it is finished, whether you print the output or generate PDF files, the color-coding causes any undocumented or unintended changes to stand out, enabling you to quickly review the changes.
If further inspection is required on certain drawings, you can review the revisions in higher detail in the Newforma Viewer, as described above. When any undocumented or unintended changes are encountered, you can either fix them in the Revit model or document them for others to fix using the integrated markup and action item capabilities of Project Center.
Once the drawing set revision review is complete and all unintended or undocumented changes have been addressed, the supplemental drawing set is ready to be issued. You should create a record copy of the .DWG or .DWF files associated with the final issued drawings to enable them to be easily compared to future revisions. If you transfer the drawings via Info Exchange or as a transmittal, Project Center will automatically create a record copy.
Additional information for Revit users
Project Center cannot directly compare Revit building models. However, as mentioned above, you can compare drawing sets that are exported to .DWF from Revit 9.1 or higher using Project Center. Use Revit 9.1 or higher in order for the Revit object IDs to be properly exported to .DWF. When comparing, this allows Project Center to filter out objects that have not changed between revisions. It also allows Project Center to distinguish objects that have moved from objects that have been removed or added.
To export .DWF files from Revit
Refer to the Export DWF Files from Revit topic for more information.
Table of Contents
Index
Search (English only)
Back