


Change the Info Exchange File Transfer Storage Location
Perform the following procedures to select a new folder location in which to store Info Exchange file transfers.
You must be a Project Center administrator to perform this procedure.
Important: The folder to which you are moving the transfers location must be shared and users must have read and written permissions to it. The files must be located on your network file server so that the Project Center Server has access to them and can search them. If you choose a path to a folder stored on your local machine, other users may not have access to it, and the Project Center Server may not have access to it. In this case, search may not work, because the Project Center Server needs to have access to the files.
To change the Info Exchange transfer location
1. If you are not already there, open the Project Center Administration activity center (shown below) by clicking Project Center Administration from the Tasks panel of the My Project Center activity center, or from the Activities list.
2. Click the Servers tab. From the Servers drop-down list, select the Project Center/Info Exchange.
3. Select the Info Exchange Server from the list.
The Type column lists the server types. Make sure the type is Info Exchange.
4. In the General tab (bottom section), enter the full path to the new storage location in the Transfer Root field, as shown here: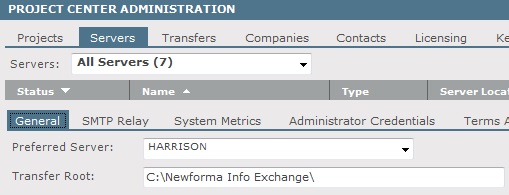
5. Click Save Changes. Future transfers will be stored in the new location.
6. You must manually move the existing transfers to the new location.
Table of Contents
Index
Search (English only)
Back