


Connect the Project Center Server to a Different Info Exchange Server
If you installed a new Newforma Info Exchange Server, perform the following steps to connect your Newforma Project Center Server to it.
This procedure is only necessary if the Project Center Server was already connected to an Info Exchange Server and you are connecting it to a different one, not if it is being connected to an Info Exchange Server for the first time.
You must be a Project Center administrator to perform this procedure.
To connect to a different Info Exchange Server
1. From the Info Exchange Server machine, copy the Transfers folder and its subfolders (which contain all of the original Info Exchange Server’s .ZIP files) to the new info Exchange Server’s installation directory. The Transfers folder is located under the installation folder (for example, C:\Newforma Info Exchange\Transfers). .

Info Exchange will automatically clean up any files it does not need during nightly maintenance. Do not clean up the folders manually. If the original Info Exchange Server is staying online, it will need some of the folders. Similarly, more files than necessary may be copied to the new Info Exchange Server but they will be removed during nightly maintenance.
2. If you are not already there, open the Project Center Administration activity center by clicking Project Center Administration from the Tasks panel of the My Project Center activity center, or from the Activities list.
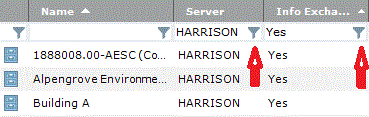
3. Click
the Projects tab and use the Server column filter to select only
the projects that are on the Project Center Server that is being connected
to the new Info Exchange Server. Then use the Info
Exchange column filter to select only the projects that are available
on Info Exchange (indicated by Yes).
4. Click Create Report > Project Summary Report from the Tasks panel to create and save a project summary report, which will contain the filtered list shown above that you can use as a reference.
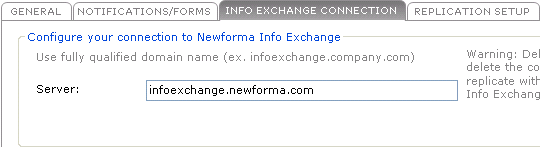
5. Click
the Servers tab, select the Project
Center Server you're making the change to, click the Info
Exchange Connection tab, and enter the full domain name of the
new Info Exchange Server in the Server
field, as shown here:
6. Click Save Changes. The Configuration Message dialog box opens. Click Yes to continue.
7. Restart the Project Center Server machine.
8. Return to the Projects tab, select the first project, and click Edit Settings from the Tasks panel to open the Edit Project Settings dialog box.
9. Click
the Info Exchange tab and mark
the Make this Project Available on Your
Newforma Info Exchange Server checkbox.

10. Repeat steps 8 and 9 for each of the other projects in the project summary report. Projects will synchronize to the new Info Exchange Server as their settings are updated.
Table of Contents
Index
Search (English only)
Back