


Create a Contract Management Item
Perform the following steps to create a new or expected contract management item to track its status and history of actions. You can create a contract management item from Project Center or Microsoft Outlook.
To create a contract management item
1. If you are not already there, open the relevant contract management activity center from the Project Home activity center or from the Activities list. (For this example, it will be the Change Orders activity center, so you would select Change Orders).
2. Click New Item > Create Item from the Tasks panel to open the corresponding contract management's Create Item dialog box (the change order version is shown here):
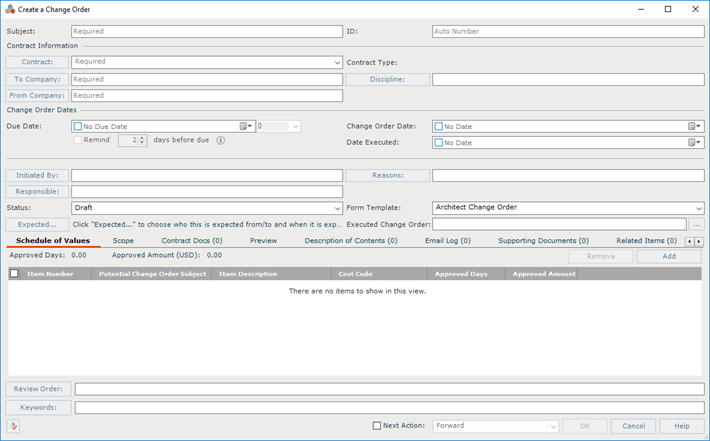
3. Enter a subject in the Subject field.
4. Click Contract to open the Choose Contract dialog box to select the item's associated contract.
5. If present, click To Company to open the Choose a Project Team Member dialog box to choose the project team member the item is being sent to.
6. If present, click From Company to open the Choose a Project Team Member dialog box to choose the project team member sending the item.
7. Select a due date for the item from the Due Date drop-down calendar.
8. Select the date the contract management is signed off on and agreed to from the Date Executed drop-down calendar.
9. Click Initiated By to open the Choose a Project Team Member dialog box to choose the project team member who requested or authorized the document change.
10. Click Responsible to open the Choose a Project Team Member dialog box to choose the project team member who (in the case of a change order) was responsible for the change resulting in the change order.
11. Click Status and select whether the item is a Draft or Expected. If it is expected, click Expected to select when it is expected and who it is from and to.
12. Click Initiated By to open the Choose a Project Team Member dialog box to choose the project team member who requested or authorized the document change.
13. Select the reason for on the contract management item by clicking Reasons.
14. Select the form template to use as the basis for the item.
15. Click the  button in the Executed Item field to browse to and select a copy of the scanned, fully signed executed item.
16. The Email Log tab lists all email messages associated with the selected contract management item. When you click File as, then select a project, then the Item type from the File as dialog box, or click File in Project (then choose the appropriate Item option) from Microsoft Outlook, the email message appears here. You can also add email messages by clicking Add from this tab, or by dragging and dropping from Microsoft Outlook.
17. To include any additional files that may be related to the contract management item, add them by clicking the Supporting Documents tab, then clicking Add Files. Navigate through the folders until you locate the file, then click Open. Repeat as necessary until you have added all the necessary files.
18. Click the Related Items tab to create a relationship with this item to other Project Center items.
19. If the item has multiple reviewers, you can set the review order by clicking Review Order to open the Set Review Order dialog box.
20. Click Keywords to open the Choose Keywords dialog box to apply keywords to the item.
21. Mark the Next Action checkbox (when available) if you want to forward the contract management item to another contact, respond to the contract management item sender, or close it after filing the contract management item.
● Choose Forward to open the item's Forward Contract Management Item for Review dialog box to forward the contract management item for review.
● Choose Close to open the item's Close Contract Management Item dialog box to close it.
● Choose Send and Close to open the item's Send and Close Contract Management Item dialog box to send the contract management item to other contacts and close it.
22. Click OK at the bottom of the dialog box. Project Center files the contract management item in the Under Review category of the item's activity center.
Other methods of filing contract management items
To file a contract management item from an email message in Microsoft Outlook
See Log a Project Center Item from Microsoft Outlook.
To file a contract management item from an Info Exchange file transfer
See Download Files from Info Exchange and Track Them with a Contract Management Item.
To file multiple attachments received in one email message as contract management items
See File Multiple Attachments Received in an Email Message as Contract Management Items.
Next steps in the contract management item workflow
Table of Contents
Index
Search (English only)
Back