


Create a Custom Field
Perform the following steps to create custom fields and custom layouts that you can apply to projects, project team members, global contacts, or global companies. This procedure contains the following two sections:
● To create a new custom field
● To apply the custom field to a layout
You must be a Project Center administrator to perform this procedure.
To create a new custom field
1. If you are not already there, open the Project Center Administration activity center (shown below) by clicking Project Center Administration from the Tasks panel of the My Project Center activity center, or from the Activities list.
2. Click the Custom Fields tab:

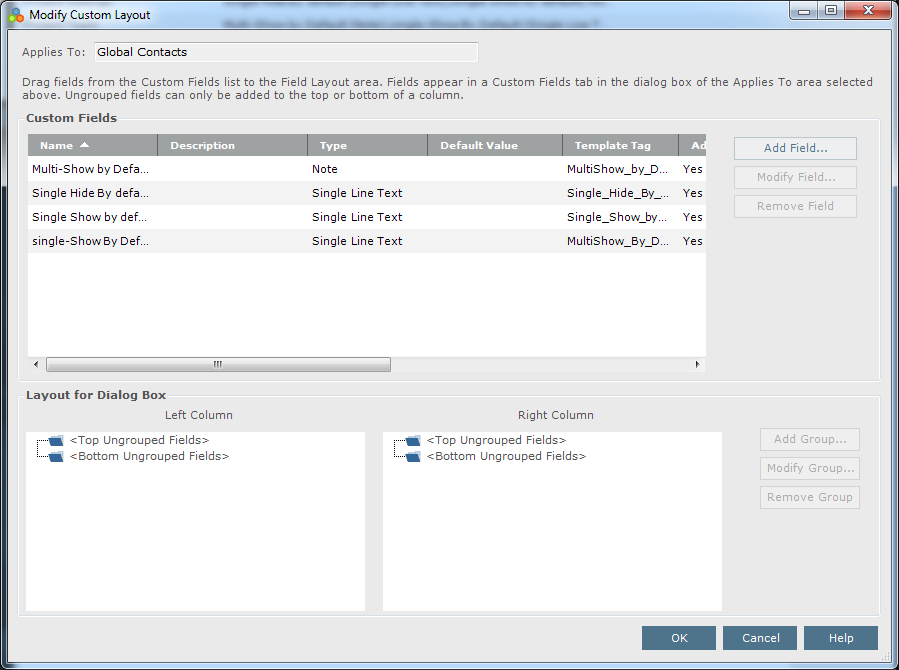
3. In the Custom Field Layouts section, select the area to which you want to add the new custom field (for this example, we will add a custom field to Global Contacts), then click Modify to open the Modify Custom Layout dialog box, as shown here:
For this example, we will add a custom field for Global Contacts. The custom field will appear as a column in the Project Center Administration Activity Center Contacts tab, in all related contact dialog boxes in the Custom Fields tab (Project Center automatically adds the Custom Fields tab when a custom field is created), as well as the Project Team activity center and the Custom Fields tab of all related project team dialog boxes.
4. In the Custom Fields section, click Add Field to open the Add Custom Field dialog box, as shown here: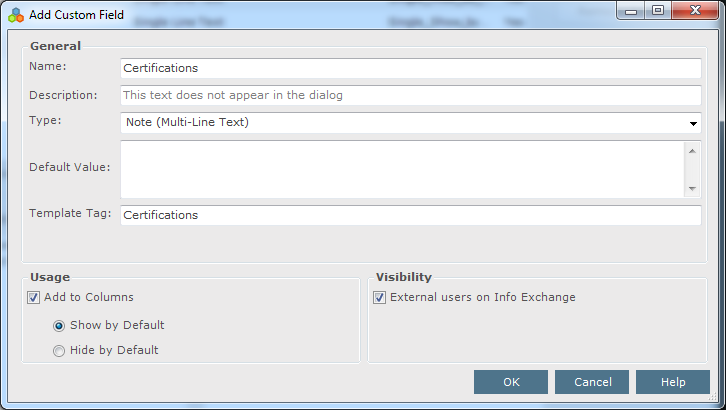
5. Enter a name and description for the custom field in the corresponding fields.
6. Select the input type from the Type drop-down list.
7. If you want the field to have a default value, enter it in the Default Value field.
8. Enter a template tag in the corresponding field. The template tag is the XML attribute name that corresponds to the mail merge field in the form template. It references the merge field in a Microsoft Word document. It must match the mail merge field name in the template (It is not case sensitive.). For example, if the mail merge field name is Degrees, you must enter Degrees (or degrees) in this field.
9. Mark the Add to Columns checkbox to add the field as a column in the related activity center.
● Select Show by Default to show the column by default. Users can then choose whether to hide it.
● Select Hide by Default to hide the column by default. Users can then choose whether to display it.
10. Mark the External Users on Info Exchange checkbox to make the field visible to external Info Exchange users.
11. Click OK to save the changes to the Project Center database. The field is now available to be assigned to a custom layout (continued below).
To apply the custom field to a layout
You can now apply the custom fields you created in the steps above to projects, project team members, global contacts, or global companies.
1. If you are not already there, open the Project Center Administration activity center (shown below) by clicking Project Center Administration from the Tasks panel of the My Project Center activity center, or from the Activities list.
2. Click the Custom Fields tab, as shown here:
3. For this example, we will add a custom field for global contacts. Select Global Contacts, then click Modify to open the Modify Custom Layout dialog box, as shown below.
Selecting Global Companies applies the custom fields to the Project Center Administration Activity Center Companies tab and any related company dialog boxes.
Selecting Global Contacts applies the custom fields to the Project Center Administration Activity Center Contacts tab, the Project Team activity center, and any related contact and project team dialog boxes.
Selecting Project Settings applies the custom fields to the Project Center Administration Activity Center Projects tab, the My Project Center activity center, and any related project dialog boxes.
Selecting Project Team applies the custom fields to the Project Team activity center and any related project team member dialog boxes (but not to contacts, unlike Global Contacts).
4. The area you selected appears in the Applies to field.
5. The custom fields are listed in the Custom Fields section, as shown above. Drag and drop the custom fields down to the Layout for Dialog Box section to the location in which you want them to appear in the Custom Fields tab of the related dialog boxes. You can place them so that they will appear in either the left or right columns, and the top or bottom of the columns in the dialog box layout.
6. Optional: If you want to group related custom fields together, select the location in which you want the group (such as under <Top Ungrouped Fields>), then click Add Group to add a new, unnamed group to the section and enter a name for the group.
7. Click OK to save the changes when you are finished.
8. Click Save Changes to save the changes to the Project Center database and add the fields to the activity center and the related dialog boxes.
Table of Contents
Index
Search (English only)
Back