


Customize Excel-Based Specialized Reports with Smart Markers
Specialized reports
Project Center allows you to run specialized reports from various activity centers. These specialized reports are defined by Excel 2007/2010 format files that have been designed by administrators using Excel native functionality and Smart Markers containing data from Project Center. Specialized reports are part of the Project Center Server template style.
Quick start – basic specialized report
1. Open a copy of the Newforma Basic Specialized Report.xlsx template.
2. Replace the column headers with the static column headings you wish to appear.
3. Replace the row fields with the corresponding column reference (for example &=Rows.[Subject]). Fields names correspond exactly to the names of the fields presented in Project Center.
4. Apply any additional formatting, calculations, or functionality required.
5. Save the report to the Report Template folder in the Form Template Style folder location on Project Center for the activity center(s) it’s being created for (see Report and Form Template Files and Sub-Folders Reference Guide to determine which Folder corresponds to each Activity Center).
6. Test the report by opening the activity center, selecting Create Report from the tasks pane, select Specialized Report and then selecting your specialized report from the drop-down list (it will be the name of the template file created in the previous steps.)
Smart Markers Basics
Smart markers in reports consist of the data source, field name and optional parameters. For Example:
|
&=Rows.[Subject](parameters) |
Rows is the data source, Subject is the field. |
|
&=Project.[ProjectName](parameters) |
Project is the data source, ProjectName is the field. |
The field name should be enclosed in brackets ( [ ] ) to ensure proper support for fields names containing a space.
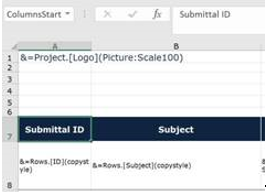
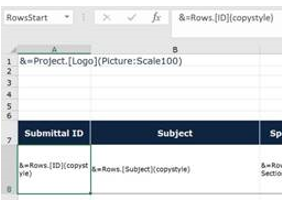
The data source will either be Project for project information, or Rows for report row data. The example below is from a customized Submittal template. In the top right, there are smart markers which will pull data from the Project data source (ProjectName, ProjectNumber etc.). In the Report section we have specified static column headers and are pulling specific data from the Rows data source - ID, Spec Section, Subject, etc.

If the data marker results in more than one item, for example, a complete row, then the following rows are moved down automatically to make room for all of the new information.
Smart Markers syntax
The following table shows the various syntax options for calling Smart Markers from Project Center.
|
&=DataSource.[Field Name] |
References a data source and field, e.g. Project.ProjectName.
|
|
&==DynamicFormula |
Insert a non-repeating formula into a cell. Note that the formula will not auto update the row specified for any inserted rows.
|
|
&=&=RepeatDynamicFormula |
Insert a repeating formula into a cell. The row specified in a formula will automatically update for each inserted row.
|
Smart Markers parameters
Parameters can be added to Smart Markers to enable specific functionality and behavior.
|
noadd
|
Do not add extra spreadsheet rows to fit data. |
|
skip:n
|
Skip n number of spreadsheet rows for each data row. |
|
ascending:n descending:n
|
Sort data in smart markers. If n is 1, then the column is the first key of the sorter. E.g &=Rows.Subject(ascending:1). |
|
horizontal
|
Write data left-to-right, instead of top-to-bottom. |
|
numeric
|
Convert text to number if possible. |
|
shift cells down shift cells right
|
Shift down or right, creating extra rows or columns to fit data. |
|
copystyle
|
Copy the base cell's style to all the cells in that column. |
|
group:normal group:merge group:repeat |
Group rows together based on the current column. normal – grouping field will not repeat for corresponding records merge – merge cells together and do not repeat for each group repeat – grouping field is repeated for each corresponding record Important: In order for grouping to work correctly, the report must be created from a log view that has been sorted on the column that is to be grouped.
|
RowsStart and ColumnsStart
It is necessary to indicate to Project Center where the Rows and Columns are to Start. This is done using Named Ranges. This is generally the first cell in the table header row set to a named range of ColumnsStart and the first cell in the first data row set to a named range of RowsStart.
Blank rows management
To keep your report looking clean when there are blank rows and your data spans multiple rows within the template and the noadd parameter is in use, use the &=NFDELETEBLANKROWS Smart Marker at the end of rows.
Dynamic formulas
Dynamic formulas allow you to insert Excel formulas using dynamic row references. Any Excel formula can be used with Dynamic Formulas.
&=&=B{r}/C{r}
Dynamic formulas allow the following additional options:
|
{r} |
Current row number. |
&=&=A{r}+B{r}
|
|
{[Number]} |
Offset to current row number. |
&=&=A{-1}+B{-1}
|
In the dynamic formula marker, here "-1" denotes the offset to the current row in B and C columns respectively which will be set for division operation, the skip parameter is one row. The "~" character is used as a separator character to apply further parameters in dynamic formulas.
The following screenshots illustrate a repeating dynamic formula and the resulting Excel worksheet/report.

becomes…

Subtotaling
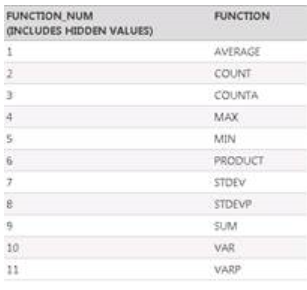
Smart Markers allow you to perform sub-totals on fields in a group. Note that sub-totals are not necessary unless you need to perform totals on grouped fields for each grouping.
|
&=subtotaln:[Grouping Row Data Field]
|
&=subtotal9:Rows.Contract |
The n represents the subtotaling function number. The chart below provides the possible sorting function numbers.
Logos
Your template style logo can be adjusted as necessary.
|
&=Project.Logo(Picture:[Function]) |
Functions: FitToCell – Fits the image into the cell the Smart Marker resides in. ScaleN – Scales width and Height to N percent. Width:{x}in&Height:{y}in – Render image to a specific size in Inches. |
Table of Contents
Index
Search (English only)
Back