


Create a Contract
Perform the following steps to create a contract in Project Center.
To create a contract
1. If you are not already there, open the Contracts activity center by clicking Contracts from the Activities list or the Project Home activity center.
2. Click New Contract > Create Contract from the Tasks panel to open the Create Contract dialog box, as shown here: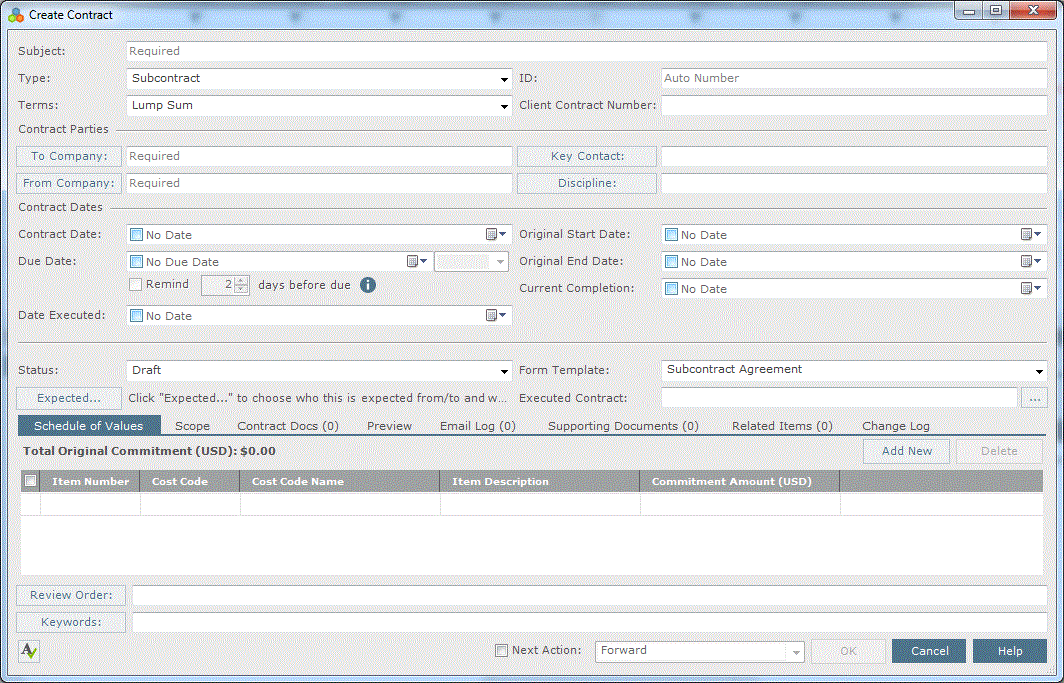
3. Enter a subject in the Subject field.
4. Select the contract type from the Type drop-down list.
5. Select the terms of the contract from the Terms drop-down list.
6. Enter the contract number in the ID field, and the number the client gave the contract in the Client Contract Number field.
7. Click To Company to open the Choose a Project Team Member dialog box to select the contacts and companies the contract is going to.
8. Click From Company to open the Choose a Project Team Member dialog box to select the contact and company the contact is from.
9. Click Key Contact to open the Choose a Project Team Member dialog box to identify the main person to contact regarding the contract.
10. Click Discipline to open the Choose Disciplines dialog box to apply disciplines to the contract.
11. Select the date the contract was issued to the subcontractor from the Contract Date drop-down calendar.
12. Select the date the contract is due from the Due Date drop-down calendar.
13. Select the date the contract was signed off on and agreed to from the Date Executed checkbox drop-down calendar.
14. Select the appropriate dates from the drop-down calendars for each of the following:
● Enter the original start date for the work to begin in the Original Start Date field.
● Enter the original end date for the work to end in the Original End Date field.
● Enter the revised work completion date based on approved changes in the Current Completion field.
15. Select the status of the contract from the Status drop-down list.
16. Click Expected to open the Expected Contract dialog box to select the date the contract is expected, and who it is expected to and from.
17. Select the template for the contract from the Form Template drop-down list.
18. Click the  button in the Executed Contract field to locate and select the file that is a scanned copy of the fully signed executed contract.
19. Click Review Order to open the Set Review Order dialog box to set the order in which the project team members review the contract.
20. Click Keywords to open the Choose Keywords dialog box to apply keywords to the contract.
21. Click  to spell check the fields in this window. If any mistakes are found, the Spelling Check dialog box opens with spelling suggestions.
22. Mark the Next Action checkbox to choose action to perform after clicking OK:
-
Choosing Forward opens the Forward Contract dialog box.
-
Choosing Link the Executed Contract File opens the Select File to Link to a Contract File dialog box.
-
Choosing Close opens the Close Contract dialog box.
-
Choosing Send and Close opens the Send and Close Contract dialog box.
-
Choosing View Form opens the contract form.
23. Click OK at the bottom of the dialog box. Project Center files the contract in the Draft category of the item's activity center.
24. Refer to the Create Contract dialog box for information on the tabs.
Table of Contents
Index
Search (English only)
Back