Log a Daily Report
This topic explains how to log a new daily report in Project Center. It also explains how to finalize a daily report.
To log a new daily report in Project Center
1. If you are not already there, open the Daily Reports activity center by clicking Daily Reports from the Activities list or the Project Home activity center.
2. From
the Tasks panel, click Create
Daily Report to open the Create
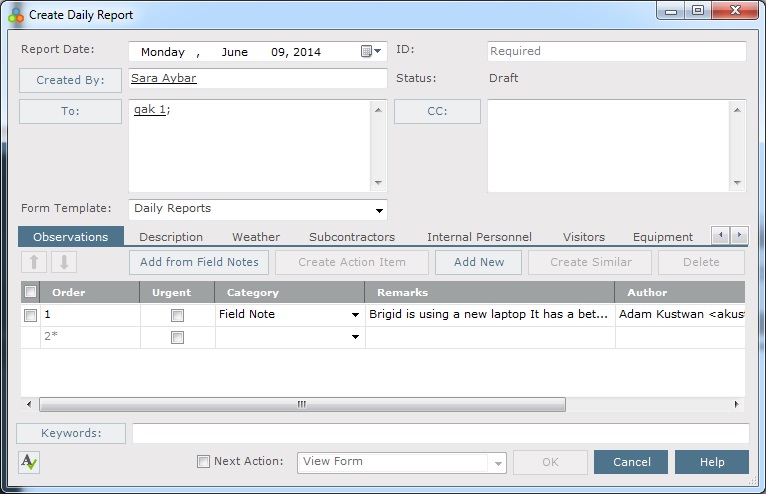
Daily Report dialog box, as shown here:

3. Select the report's date from the Report Date drop-down calendar for a date other than today. (Today's date is the default.)
4. Select the report's creator by clicking Created By to open the Choose a Project Team Member dialog box (the current user is the default).
5. Click the To button to open the Choose a Project Team Member dialog box to select the report recipients.
6. To log your observations, click the Observations tab.
See the Daily Reports activity center topic for information about each column in each of the tabs.
● Click Add From Field Notes to open the Choose Field Note dialog box to select field notes to add as observations.
● Click Add New to add a new observation row and then fill in the information.
● To create a similar observation without having to re-enter all the information, select the checkbox to the left of the observation and click Create Similar to add a new row containing the same information as the selected one.
● To delete an observation, mark the checkbox to the left of the observation and click Delete.
7. Enter the purpose of the daily report, any general project observations, and any other comments on the Description tab.
8. Enter the weather conditions for the day on the Weather tab.
● Click Add New to add a new row and then fill in the information.
● Click Create Similar to add an observation similar to the one selected without having to re-enter all the information. A new row containing the same information as the one selected is added.
● Click Delete to delete the selected row.
9. Use the Subcontractors tab to track the subcontractors at the site on this day.
● Click Add New to add a new subcontractor row and then fill in the information.
● Click Create Similar to add a subcontractor similar to the one selected without having to re-enter all the information. A new row containing the same information as the one selected is added.
● Click Delete to delete the selected subcontractor.
10. Use the Internal Personnel tab to track the internal personnel at the site on this day.
● Click Add New to add a new contact row and then fill in the information.
● Click Create Similar to add a contact similar to the one selected without having to re-enter all the information. A new row containing the same information as the one selected is added.
● Click Delete to delete the selected contact.
11. Use the Visitors tab to track the visitors at the site on this day.
● Click Add New to add a new visitor row and then fill in the information.
● Click Create Similar to add a visitor similar to the one selected without having to re-enter all the information. A new row containing the same information as the one selected is added.
● Click Delete to delete the selected visitor .
12. Use the Equipment tab to track the equipment at the site on this day.
● Click Add New to add a new equipment row and then fill in the information.
● Click Create Similar to add an equipment row similar to the one selected without having to re-enter all the information. A new row containing the same information as the one selected is added.
● Click Delete to delete the selected equipment row.
13. If you want to attach files to the daily report, click the Supporting Documents tab, then click Add Files > Another Project File to open the Add Supporting Documents dialog box to locate the files. Click Open to add the files.
14. The Email Log tab lists all email messages associated with the daily report. When a user clicks File as or File in Project (then chooses the daily reports option) from the legacy Project Center Add-in for Microsoft Outlook Ribbon Bar, the email message appears here. You can also add email messages by clicking Add or dragging and dropping from Microsoft Outlook.
15. Click the Related Items tab to relate (link) this daily report to another Project Center item.
16. Click OK when finished to create the daily report and log it in the Daily Reports activity center.
To finalize a daily report
1. If you want to finalize the daily report, mark the Next Action checkbox and select Finalize from the drop-down list. Doing so does the following:
● Changes the Status to Final.
● Creates a PDF file with the format Daily Report_Report Date_Report#_Rev#.pdf and saves it in the record copy folder set in the Edit Project Settings dialog box. For example: Daily Report_20130305_00156_R1.pdf
● Sets the daily report to read-only with the exception of the Supporting Documents/Email Log/Related Items/Change Log tabs.
If you want to revert the report back to a draft, mark the Next Action checkbox and select Revert to Draft from the drop-down list. Doing so does the following:
● Changes the Status to Draft.
● Sets the daily report to fully editable.
● When the report is finalized again, a new PDF file is created with a Rev# of +1.
2. Click OK when finished to create the daily report and log it in the Daily Reports activity center.
Table of Contents
Index
Search (English only)
Back


