


Log a Project Center Item from Microsoft Outlook
There are various ways you can log a Project Center item in Project Center from an email message in Microsoft Outlook. Perform any of the following procedures to log an item in Project Center from Microsoft Outlook to track its status and history of actions.
-
To log a response to a Project Center item from Microsoft Outlook
-
To log a Project Center item from Microsoft Outlook by dragging and dropping into Project Center
To log a Project Center item from Microsoft Outlook
1. From Microsoft Outlook, select the email message you want to file as a new Project Center item.
2. From the legacy Project Center Add-in for Microsoft Outlook Ribbon Bar, click File in Project > File As to open the Select Project dialog box.
3. Select
the project in which to file the item, then click OK
to open the File as dialog
box, as shown here:
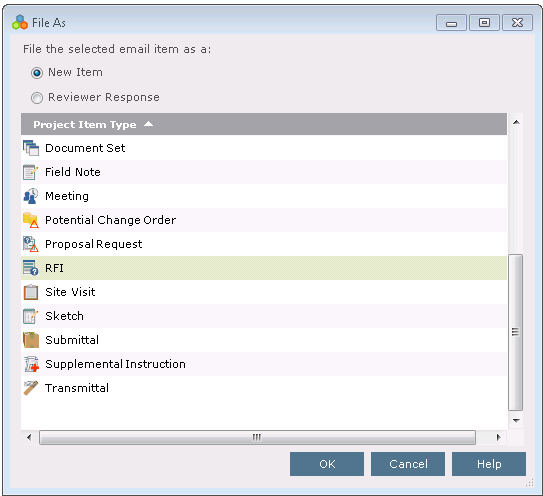
4. Choose
New Item, select the type of item
to create from the email message, then click OK.
For this example, we will log the email message as a received RFI:
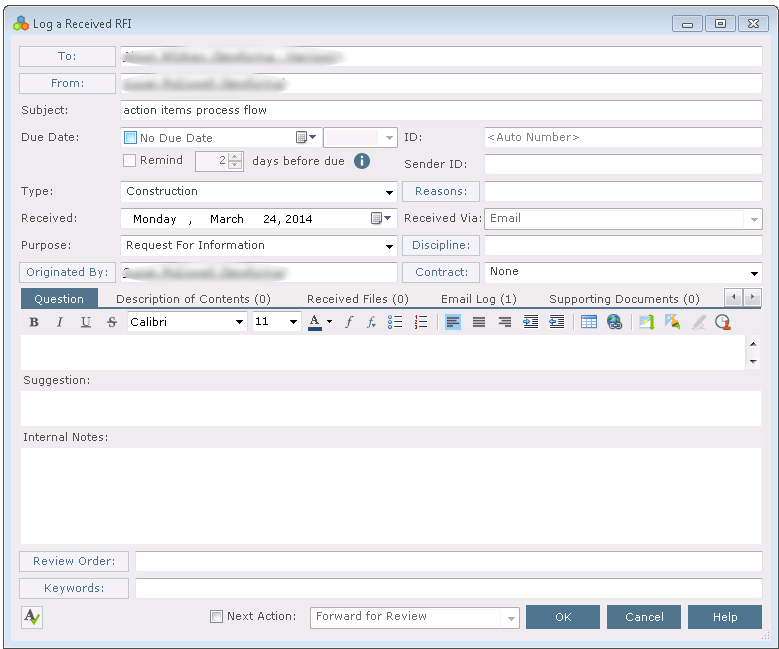
Project Center automatically enters the following information, which you
can edit:
-
The recipients of the email are added to the To field.
-
The sender of the email message is added to the From field.
-
The subject of the email message is added to the Subject field.
-
Email is entered in the Recieved Via field.
-
The body of the email message is added to the Question tab.
-
Any email attachments are added to the Received Files tab and the Description of Contents tab.
-
The email message file is added to the Email Log tab.
5. Mark the checkbox and enter the date a response is due back to the contact who sent you the item in the Due Date field.
6. Select the purpose or action required on the item from the Purpose drop-down list.
7. Enter a number for the item in the ID field.
8. Click Discipline to select a discipline, if applicable.
9. Describe the contents of the item in the Description of Contents tab. Add one line for each item. This information is used to fill in the Contents section of the Transmittal form.
10. To include any additional files with the item, add them by clicking the Supporting Documents tab, then clicking Add Files > Another Project File. Navigate through the folders until you locate the file, then click Open. Repeat as necessary until you have added all the necessary files.
11. Mark the Next Action checkbox if you want to assign the item to another contact, respond to the item author, or close it after filing the item.
-
Choose Forward for Review to open the item's forward for review dialog box to forward it to reviewers.
-
Choose Close to open the items' close item dialog box to close it.
-
Choose Respond and Close to open the item's respond to item and close dialog box to respond to the item and close it.
12. Click OK at the bottom of the dialog box. Project Center files the item in the activity center for the type of item selected.
To create multiple Project Center items from a single email message, select the item type from the File As dialog box for each item type that needs to be created. Project Center uses the To field to send reminders about the item. If you are logging an item that you received via email and it has multiple files that apply to multiple projects, make sure to only include project team members who are on the project for which you are logging the item. Otherwise, reminders will be sent to project team members on other projects. On the Received Files tab of the Log a Received Item dialog box, remove the attachments that do not apply to the item being filed.
To log a response to a Project Center item from Microsoft Outlook
1. From Microsoft Outlook, select the email message you want to file as a response to a Project Center item.
2. From the legacy Project Center Add-in for Microsoft Outlook Ribbon Bar, click File in Project > File As to open the Select a Project dialog box.
3. Select
the project in which to file the item, then click OK
to open the File as dialog
box, as shown here:
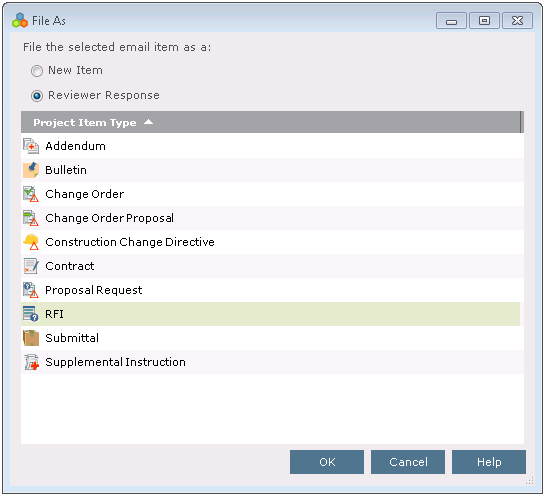
4. Choose Reviewer Response, select the type of item to respond to (in this example, we will log the email message as a response to an RFI), then click OK.
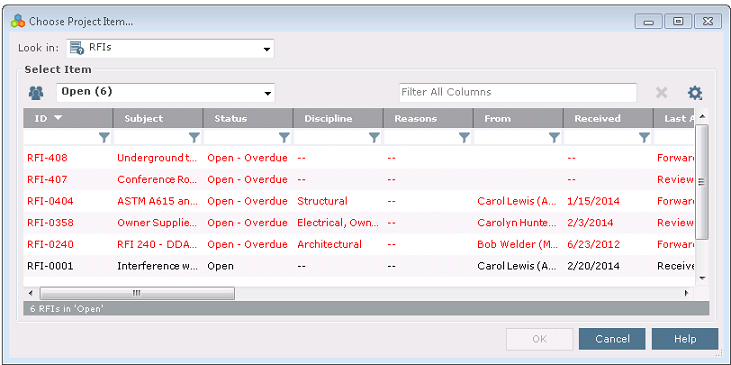
5. The Choose Project
Item dialog box opens, as show here. Select the item you want to file
the email message as a response to, then click OK.
The Record Reviewer Response for
Project Center
Item dialog box opens, as shown here:
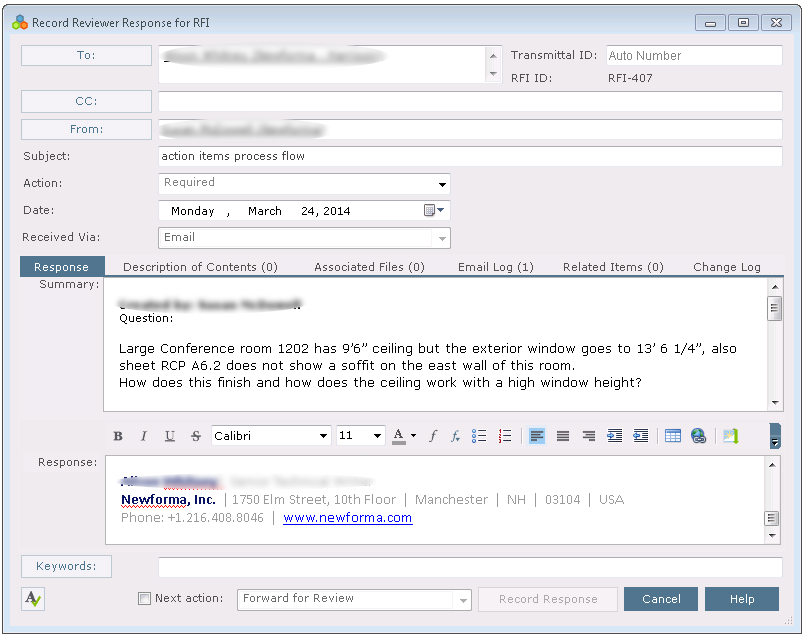
Project Center automatically enters the following information, which you
can edit (it will change based on the type of item selected):
-
The recipients of the email are added to the To field.
-
The sender of the email message is added to the From field.
-
The subject of the email message is added to the Subject field.
-
Email is entered in the Received Via field.
-
The body of the email message is added to the Response tab.
-
Any email attachments are added to the Received Files tab and the Description of Contents tab.
-
The email message file is added to the Email Log tab.
6. Select the action required on the item from the Action drop-down list.
7. Enter the response in the Response section.
8. Describe the contents of the item in the Description of Contents tab. Add one line for each item. This information is used to fill in the Contents section of the Transmittal form.
9. To include any additional files with the item, add them by clicking the Supporting Documents tab, then clicking Add Files > Another Project File. Navigate through the folders until you locate the file, then click Open. Repeat as necessary until you have added all the necessary files.
10. Mark the Next Action checkbox if you want to forward the item to another reviewer, send an email message to the contact who forwarded the item, respond to the item's author and close it, send it and close it, or just close it after filing the item.
11. Click Record response at the bottom of the dialog box to file the response to the item.
To log a Project Center item from Microsoft Outlook by dragging and dropping into Project Center
1. Open Project Center to the project in which to file the Outlook item, then open the Project Center item's activity center by clicking the item from the Activities list.
2. From Microsoft Outlook, select the email message you want to file as a new item.
3. Drag and drop the email message into the activity center's log. The appropriate item's dialog box opens.
4. Project Center automatically enters the information similar to that shown in step 4 from the first procedure above, which you can edit.
5. Fill in the rest of the information as required. Refer to the steps in the first procedure above as an example.
6. Click OK at the bottom of the dialog box. Project Center files the item in the appropriate category of the selected activity center.
Table of Contents
Index
Search (English only)
Back