This topic explains how to log a new site visit in Project Center. It also explains how to finalize a site visit.
1. If you are not already there, open the Site Visits activity center by clicking Site Visits from the Activities list or the Project Home activity center.
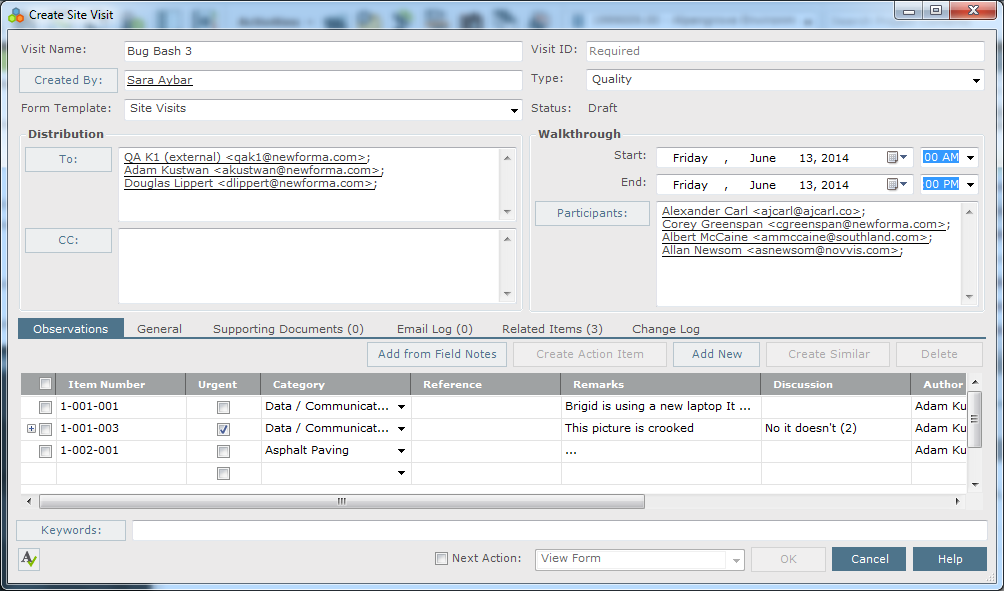
2. From
the Tasks panel, click Create
Site Visit to open the Create
Site Visit dialog box, as shown here:
3. Enter a name for the visit in the Visit Name field.
4. Select who created the site visit (if not you) by clicking Created By.
5. Select the form template to use as the basis for the Site Visit form and the PDF file that is created when the site visit is finalized.
6. Select the site visit's Type from the drop-down list.
7. If you want to distribute the site visit, click To and/or CC to open the Choose a Project Team Member dialog box to distribute the site visit to project team members (or type a contact's email address directly in the field).
8. In the Walkthrough section, select the Start and End time of the site visit, as well as the Participants of the visit.
9. To log your observations, click the Observations tab. Refer to the Create Site Visit dialog box topic for information about this tab.
● Click Add From Field Notes to open the Choose Field Note dialog box to select a field note item to add as observations.
● To create an action item from an observation, mark the checkbox of the observation and then click Create Action Item to add an action item row below the observation. Enter the required information in each field. After you click OK, the related action item will automatically be added to the Action Items activity center. Subsequent changes made here or in the action item are immediately reflected in both places.
● Click Add New to add a new observation row and then fill in the information.
● To create a similar observation without having to re-enter all the information, select the observation and then click Create Similar to add a new row containing the same information as the selected one.
● To delete an observation, mark the checkbox of the observation and click Delete.
10. Enter the purpose of the site visit, any general project observations, any weather-related comments, and any internal notes in the General tab.
11. The Email Log tab lists all email messages associated with the site visit. When a user clicks File as or File in Project (then chooses the Site Visits option) from the legacy Project Center Add-in for Microsoft Outlook Toolbar, the email message appears here. You can also add email messages by clicking Add or dragging and dropping from Microsoft Outlook.
12. If you want to attach files to the site visit, click the Supporting Documents tab, then click Add Files > Another Project File to open the Add Supporting Documents dialog box to locate the files. Click Open to add the files.
13. Click the Related Items tab to relate (link) this site visit to another Project Center item.
14. Click OK when finished to create the site visit and log it in the Site Visits activity center.
1. If you want to finalize the site visit or view the site visit form, mark the Next Action checkbox and do one of the following:
● Select Finalize to change the site visit's status to Final and make the site visit read-only.
● Select Finalize and Send to change the site visit's status to Final, make the site visit read-only, and open the Site Visit form, which you can print and/or send out.
● Select View Form to open the Site Visit form, which you can print and/or send out.
● Select Revert to Draft to change the site visit's status back to Draft.
Finalizing does the following:
● Changes the status to Final.
● Creates a PDF file with the format Site Visit_Visit Series_Visit #_Rev#.pdf and saves it in the record copy folder configured in the Edit Project Settings dialog box. For example: Site Visit_Monthly Safety Inspection_09_R1.pdf.
● Sets the site visit to read-only with the exception of the Supporting Documents/Email Log/Related Items tabs.
If you want to revert the report back to a draft, mark the Next Action checkbox and select Revert to Draft from the drop-down list. Doing so does the following:
● Changes the status back to Draft.
● Sets the site visit to fully editable.
● When the report is finalized again, a new PDF file is created with a Rev# of +1.
2. Click OK when finished to create the site visit and log it in the Site Visits activity center.