


Mark Up BIM Models and Other File Types
Project Center enables you to review, mark up, and resolve issues related to BIM model files, such as those created in Autodesk Revit or ArchiCAD from Graphisoft. While the Newforma Viewer cannot directly open BIM model files, you can use the Newforma Snapshot Tool and markup review workflow capabilities to create markup sessions associated with a BIM model file that can form the basis of a project team markup review cycle.
The markup process described in this topic is not limited to BIM model files. You can apply it to mark up any file type not directly supported by the Newforma Viewer, including, for example, files created by Microsoft Project, Microsoft Office, Adobe InDesign, etc.
To mark up BIM models
1. Open the BIM model in its native application.
If you open the BIM model from the Project Files activity center or the Project Document Sets activity center, the model file will appear in the list of recent files in the Set Snapshot Source list in the Related Items tab of the Save Markup Session as dialog box, which appears when saving markup sessions initiated from screen captures.
2. Use your BIM model tool to navigate to the spot you want to mark up.
3. Open the Snapshot Tool by right-clicking the  icon located in the Windows Taskbar at the bottom right corner of the screen. Select Snapshot from the pop-up menu. Click and drag the box to cover the area of the BIM model you want to mark up. Once you have the box positioned, release the mouse button. The screen capture opens in the Newforma Viewer and a markup is created.
4. At this point, you can annotate the markup view using the Markup Tools panel, and add comments to the view using the Markups panel (on the right side of the Newforma Viewer).
5. When you are finished marking it up, return to your BIM model file to continue your review. When you come across another spot to mark up, use the Snapshot Tool again to define the area you want to markup. Notice that a second markup view appears in the Markups panel.
If you annotate an existing markup view, you will notice that the preview in the Markups panel will not immediately show the annotations. That’s because the markup preview is a bitmap image that was created before the annotations were added. To show the annotations in the Markups panel, create another view and click it in the Markups panel to refresh the views. If you create another markup view to incorporate and refresh the annotations, you can delete the original view if it is no longer necessary.
6. Repeat this process, creating additional markup views until you are finished with your markups.
To save the markup session
1. To complete the markup workflow, you need to save the markup session. Click File, Save As in the Newforma Viewer to open the Select a Project dialog box.
2. Select the project in which to save the markup session and click OK to open the Save Markup Session as dialog box, as shown here: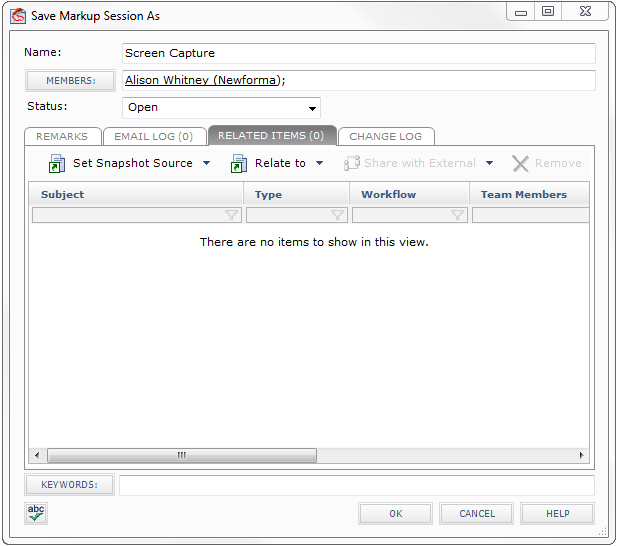
3. Enter a name for the markup session in the Name field, and select a status from the Status drop-down list.
4. Apply keywords to the markup session, if applicable.
5. The Related Items tab contains the following two important options:
-
Set Snapshot Source: This option allows you to associate the snapshot to a file, making it a related item to that file. In this case, it enables you to associate the markup session with the underlying BIM model file, enabling the team to locate this markup session using the procedure below.
The Set Snapshot Source option only appears in the Save Markup Session as dialog box for markup sessions initiated using the Snapshot Tool.
-
Relate to: Select this option to add the markup session's source file selected above as a supporting document to a project item. Linking the markups to a project item dramatically simplifies the review process.
If the BIM Model file was the last file opened from Project Center, it will be the default file in the list. If not, you can still browse to locate it.
6. Click OK to save the markup session.
To review markups associated with a BIM model
1. After you save the markup session, you can review it as well as any other markup sessions related to the BIM model file in either of the following two ways:
-
Select the BIM model file or its folder (or any other file or folder with associated markup sessions, which are indicated by the
 icon) in the Project Files activity center or any other file list in Project Center. Click Review Related Markup Sessions from the File Tasks panel. All markup sessions in the project that are related to the selected file are displayed in the Related Markup Sessions activity center.
-
From the Project Document Sets activity center, highlight the document set containing files (or the files themselves) that have related markup sessions (which are indicated by the
icon), and click Review Related Markup Sessions. All markup sessions related to files in the selected document set, as well as any of the sub-document sets, are displayed in the Related Markup Sessions activity center.
Table of Contents
Index
Search (English only)
Back