


Publish Sheets to DWG from Revit
Sheets published to DWG as part of the record document sync process that are co-located with the PDF sheets can be included in Document Control transmittals. For details, please see Include Co-Located Files in Document Control Transmittals.
You can use Newforma Project Information Link to publish single or multiple sheets from Autodesk Revit to DWG. The DWGs are published alongside the PDFs, saving time and effort in preparing multiple file types for transmittal/issue.
This topic covers the following DWG publishing options:
● Publish a single sheet from Revit to DWG
● Batch publish multiple sheets from Revit to DWG
To publish a single sheet from Revit to DWG
Perform the following steps to publish a single sheet from Revit to DWG.
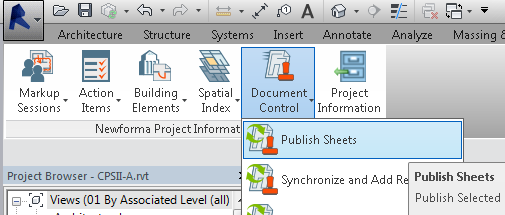
1. From the Newforma toolbar in Revit, click Document Control > Publish Sheets, as shown here:
You can publish sheets without connecting Newforma Project Information Link.
2. In the Publish Sheets dialog box, shown below, select the checkbox for the sheet you want to publish in the Select the Sheets to Publish section of the dialog box.
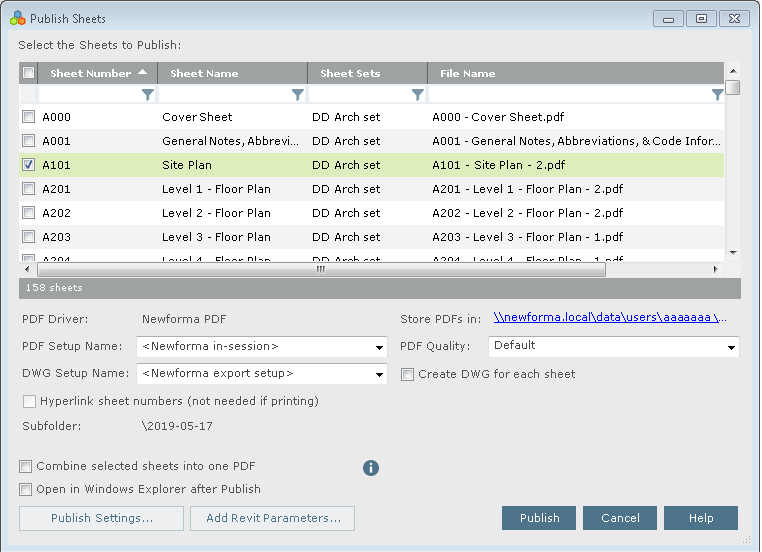
The File Name column shows the name that will be given to the generated DWG. You can change the name format by clicking Publish Settings and updating the Filename format on the Options tab of the Publish Settings dialog box.
3. Select the Create DWG for Each Sheet checkbox.
4. Review the publishing settings at the bottom of the dialog box. Select the Open in Windows Explorer after Publish checkbox to open the folder location of the published DWG in Windows Explorer when publishing is complete.
For more information on the available publishing settings, please see the Publish Settings dialog box.
5. Click Publish to publish the DWG.
To batch publish multiple sheets from Revit to DWG
Perform the following steps to publish multiple sheets as DWGs from Revit.
1. From the Newforma toolbar in Revit, click Document Control > Publish Sheets, as shown here:
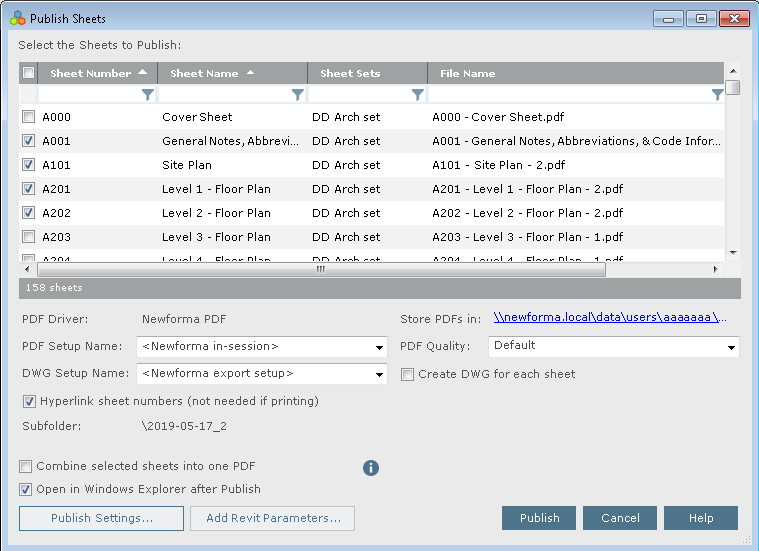
2. In the Publish Sheets dialog box, shown below, use the column headers to sort the sheets into the desired publishing order. You can use up to three levels to sort the sheets. The DWGs will be generated based on the sort order.
For more information on sorting, please refer to Sorting Sheets for Publication.
If there is a parameter you want to use for sorting that is not in the grid, click the Add Revit Parameters button to open the Revit Parameters dialog box and select the parameter you want to add to the grid. If it does not automatically appear at the far right of the grid, right click on any column header and select it from the list of available parameters.
The File Name column shows the name that will be given to the generated DWG. You can change the name format by clicking Publish Settings and updating the Filename format on the Options tab of the Publish Settings dialog box.
3. Select the checkboxes for the sheets you want to publish in the Select the Sheets to Publish section of the dialog box.
4. Select the Create DWG for Each Sheet checkbox.
5. Review the publishing settings at the bottom of the dialog box. Select the Open in Windows Explorer after Publish checkbox to open the folder location of the published DWGs in Windows Explorer when publishing is complete.
For more information on the available publishing settings, please see the Publish Settings dialog box.
6. Click Publish to publish the DWGs.
Table of Contents
Index
Search (English only)
Back