


Welcome to Newforma Plans for iPad
This topic contains the following sections:
● Overview
● To locate and open PDF plan documents
● To mark up a plan document and save it
● To email (or copy or print) a markup
● To add links to other plans documents
● To add a new space when creating project items
● To edit existing project items
● To filter project items displayed on a plan
Overview
Newforma Plans gives you access to PDF files in the Document Control Activity Center of Newforma Project Center projects or quality control items in Newforma ConstructEx wherever you go with your iPad. Each project’s most current project plan documents are delivered automatically to your iPad. Use this app to:
● Download plan documents as you need them.
● Zoom and pan documents quickly.
● Mark up documents while in the field.
● Add action items, field notes, and punch list items directly to plan documents.
● Link areas in plan documents to other plan documents.
● Filter the list of your favorite plan documents for quick access.
● Automatically upload all of your new project items and links to Newforma Project Center and Info Exchange so that the rest of the project team can access them immediately.
● Automatically upload your new punch list and non-compliance items to the Quality Control activity center in Newforma ConstructEx so that the rest of the project team can access them immediately.
Use the information in this Help system as a guideline for using the Newforma Plans app.
To use Newforma Plans, you must be using Project Center 10.2 or later. Twelfth Edition is highly recommended.
Requirements
Project Center's Document Control Activity Center must be set up and configured and you must have access to it to be able to use the Newforma Plans app, as the app interacts with the PDF files from that activity center. Record documents must be visible on Newforma Info Exchange and team members must have permission to view these documents on Info Exchange to view them on the Plans app. Refer to the Set up Document Control and Newforma Plans topic to set up and configure Document Control and to set up projects so that internal and external Project Center users can access it in Project Center and Info Exchange, as well as with the Newforma Plans app. Refer to the following two sections in particular at the bottom of that topic to set up Newforma Plans:
● Set up user permissions for the Plans app
● Enable record documents for the Plans app
To add a project
Newforma Plans automatically adds projects for you. Free accounts can only use one project at a time. Upgrade Newforma Plans or remove the current project to add another project. Tap Upgrade to acquire unlimited project usage in all Newforma mobile apps.
If the company is not available as a connection, contact the Newforma administrator for the company hosting the projects on Newforma Info Exchange to install a Twelfth Edition license that enables Newforma ID access. If a single project is missing for a specific company, you may not have Info Exchange access to the specific project.
If you work with other companies and projects on different Info Exchange sites, you will be prompted to provide your credentials for your other Info Exchange accounts at the time you add the project.
1. Tap the
 button
to locate and add a project, as shown here:
button
to locate and add a project, as shown here:

2. In the Find Projects by Company panel, shown below, enter the name of the company hosting the project on their Info Exchange site. The list updates automatically as you type. (Tap Done to stop the search.) You can also search Newforma ConstructEx to add projects.
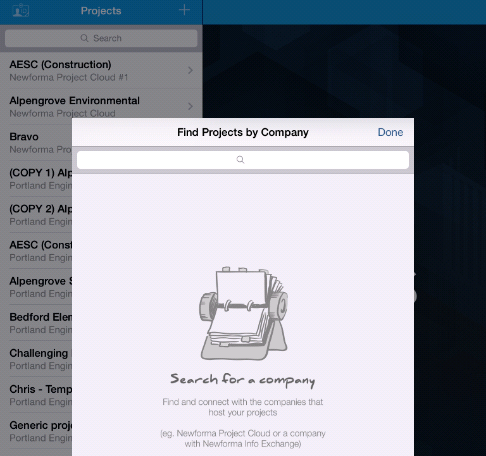
3. Tap the company in the Search Results list to connect to that company.
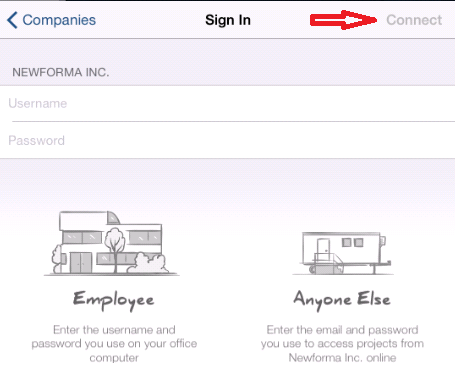
4. When prompted to sign in, enter your Info Exchange credentials to link your Newforma ID to your Info Exchange account for this company. Tap Connect, as shown below:
When you add projects from different Info Exchange sites, you will be prompted to login to the other Info Exchange accounts.
To locate and open PDF plan documents
Perform the following steps to open a PDF document in Plans:
1. Tap a project in the Projects list on the left to open and sync it and view all the plan documents available to you.
External Project Center users only see record documents with an Issued revision state.
Your ability to view documents is determined by your permission set assignment.
2. Locate the plan document you want to work with. Use the following tools to help:
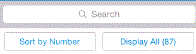
Search
Enter a portion of the plan name to quickly locate it. The list updates as you type.
Sort by...
Tap to select how to sort the plan documents.
Display...
Tap to apply filters for displaying plan documents. The default is All, but you can filter by Plans with Located items by switching it on, or you can filter by a Discipline or Type. After you select a filter, tap outside the filter panel to apply it.

All Plans
Tap to display all available plan documents.
Downloaded
Tap to display only the plan documents that have been downloaded to your iPad.
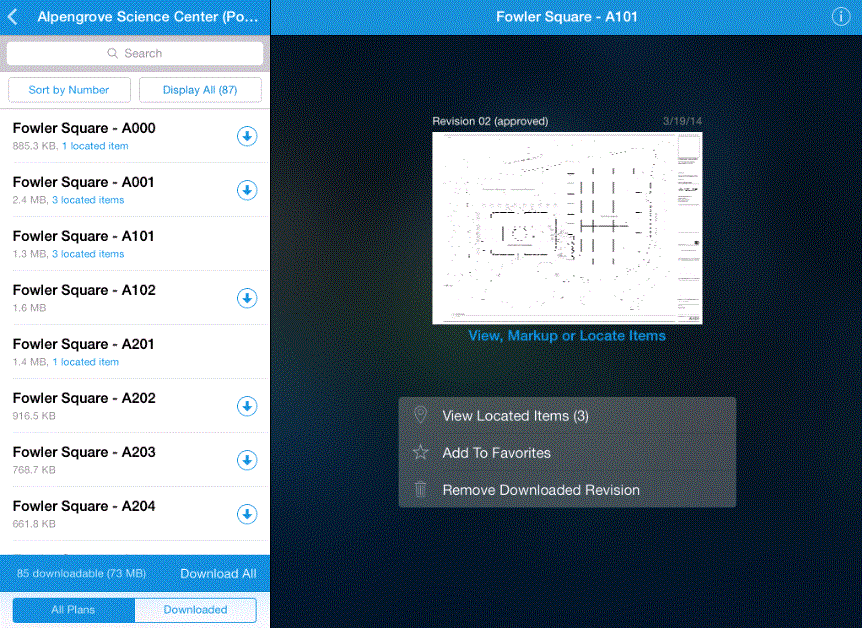
3. Tap a plan document from the list to select and view it (if it has already been downloaded).
4. To download
a document, tap it's  icon to download and view the
document, as shown below.
icon to download and view the
document, as shown below.
Document plans that do not
have an
icon have been downloaded and are the latest revisions.
5. Optional:
To download all documents, tap Download
All. The following three options will appear:
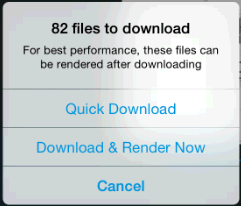
If you
tap Quick Download,
the drawings will only be downloaded. If you select Download & Render Now,
the app will download all documents and process (render) them for thumbnails.
As this occurs, you will see the progress of the operation. If you decide
you do not have time to wait for the process to complete, you can tap
Cancel
to stop
the process at any time. It is important to note that if you choose to
download all of your drawings, the app will be unusable until the process
completes.
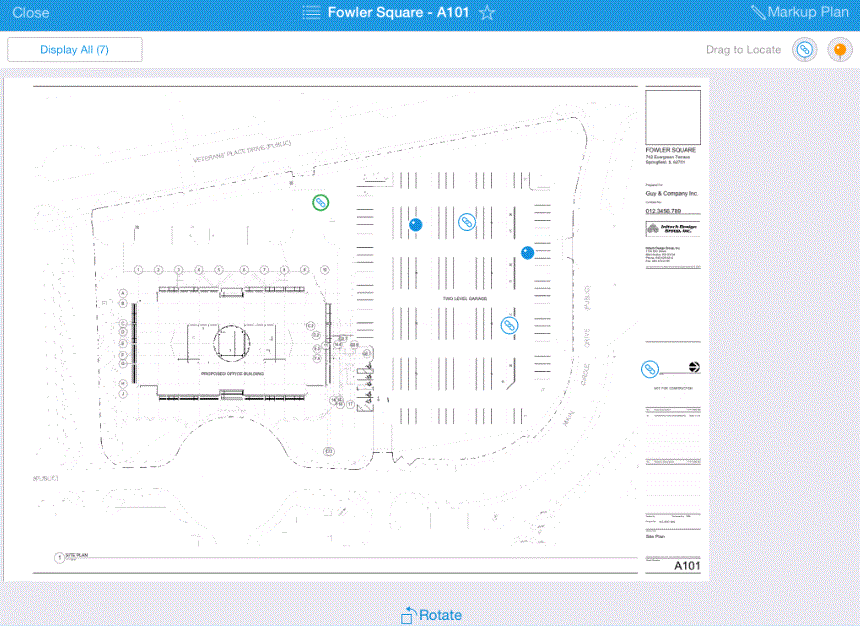
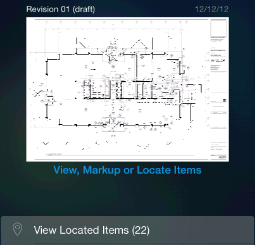
6. Tap the thumbnail on the right to open the plan document in the Markup panel, as shown here:
7. Continue with the next section.
To mark up a plan document and save it
This section continues from the previous section.
You cannot mark up multi-page PDFs. Multi-page PDFs are read-only in Plans.
1. Tap  to access the Markup Plan panel
to mark up the document.
to access the Markup Plan panel
to mark up the document.
2. Mark up the document using the following tools:
Pan and zoom
To pan around the image, tap anywhere and drag to the desired location. Zoom in or out on an image using the common iPad pinch techniques.
Markup tools
Mark up the image using the tools found in the Markup Toolbar, shown here:

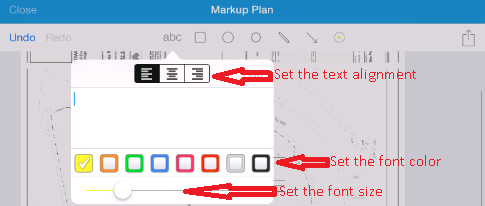
● Tap the  button
to open the text box, as shown here. Enter the desired text, then tap
the color boxes to set the text color and use the slider to set the size.
Tap Add to add the text to your
markup.
button
to open the text box, as shown here. Enter the desired text, then tap
the color boxes to set the text color and use the slider to set the size.
Tap Add to add the text to your
markup.
● Tap the other
markup tools  to add rectangle, oval, cloud, shaped line, and arrow objects.
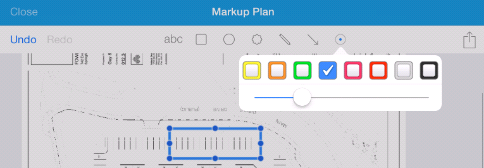
● Tap the  button,
as shown below, to change the color and size of the subsequent markups:
button,
as shown below, to change the color and size of the subsequent markups:
● Tap the  buttons
to undo and redo your last actions.
buttons
to undo and redo your last actions.
To resize an object
Tap the object to select it and drag its handles to resize and reshape it.
To move an object
Tap the object to select it and drag from its center to move it to the desired location.
To change the color and size of an object
Tap anywhere on the object to display Remove | Edit. Tap Edit to display the Ink Well, as shown above.
To remove an object
Tap anywhere on the object to display Remove | Edit, then tap Remove.
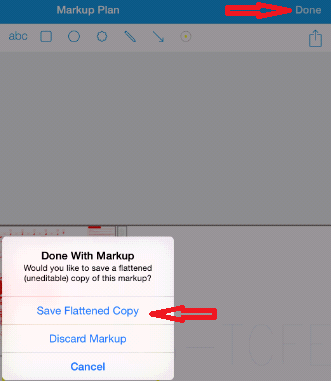
3. Tap Done when finished, and then tap Save Flattened Copy, as shown here, to save the markup as an uneditable .PDF copy.
Markups made in this app are not synced back to Project Center, Info Exchange, or Newforma ConstructEx.
To email (or copy or print) a markup
Perform the following steps to share your markups with other project team members.
This section continues from the previous section.
You can only email markups to your contacts. Markups are not synced back to Project Center, Info Exchange, or Newforma ConstructEx.
1. Tap  to close the document.
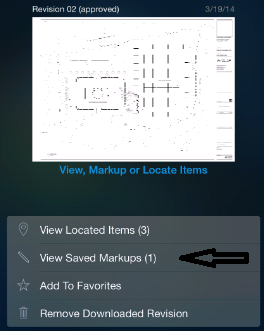
2. Re-open saved markups by tapping View Saved Markups, as shown here, and then tapping the markup from the Saved Markups panel.
3. To email
(or copy or print) the markup's PDF file, tap  in the
upper right corner to open the list of options.
in the
upper right corner to open the list of options.
4. Tap your mail method, fill in the email message, and tap Send to send the email message. The PDF is sent as an attachment in the message.
To add new project items
You can add punch list items, field notes, action items, and spaces to record documents from Newforma Plans. After you add these items, they will be uploaded to the corresponding project and activity centers in Project Center and Info Exchange, or Newforma ConstructEx.
1. Select the project you want to use from the list on the left side, as explained previously.
2. Tap the document you want to add project items to from list of documents on the left side to view its thumbnail.
3. Tap the thumbnail on the right side to open the document.
4. Pan and zoom to the location where you want to add project items.
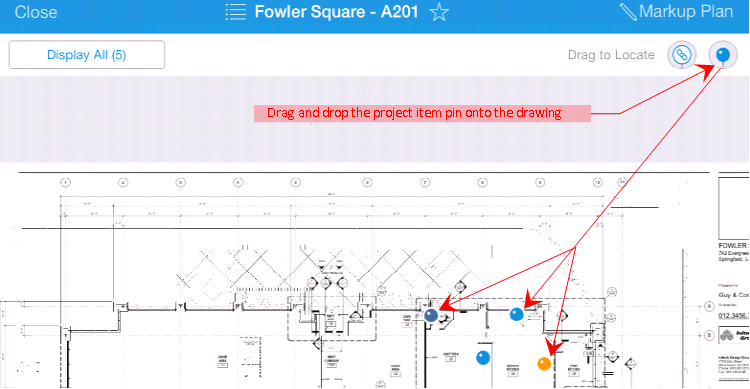
5. Drag and drop the solid pin (next to Drag to Locate as shown below) to the location you want to add the project item. The New Item panel opens.
The pin color changes depending on the type of item created. Each item type is represented by a different color.
6. In the New Item panel, shown below, select the type of project item you want to add (Action Item, Field Note, Non-compliance, or Punch List) by tapping type to change it. (If you want to add the same item type, do not tap it.)
7. Tap the various fields to set their values. The fields change based on the item type selected.
8. Set the space for the project item as needed. If the space does not exist, you can create a new one directly in Newforma Plans. See To add a new space when creating project items below for more information.
9. Assign project team members and a due date to the item as needed.
The Assigned To and Due Date fields are not available for field notes.
10. To add a photo, tap the camera icon at the bottom of the New Item panel to activate the mobile device's camera. Take the picture. The picture is added as a supporting document to the project item.
11. If desired, you can mark up the plan as explained in the section above.
12. Tap Save to save the new project item.
When you save the project item, a screen shot of the plan indicating the location of the item is automatically captured and added as a supporting document for the project item.
To add links to other plan documents
You can add links to other record documents from Newforma Plans. After you add links, they will be uploaded to the corresponding project and activity centers and become related items in Project Center and Info Exchange, or Newforma ConstructEx.
1. Select the project you want to use from the list on the left side, as explained previously.
2. Tap the document you want to add links to from list of documents on the left side to view its thumbnail.
3. Tap the thumbnail on the right side to open the document.
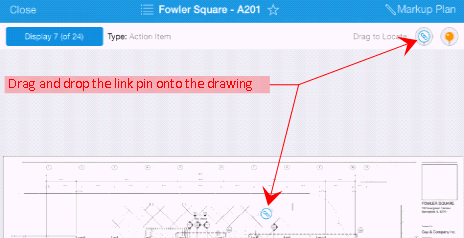
4. Pan and zoom to the location where you want to add the link.
5. Drag and drop the link pin (next to Drag to Locate as shown below) to the specific location (such as a room) to which you want to add the link. The Link to panel opens.
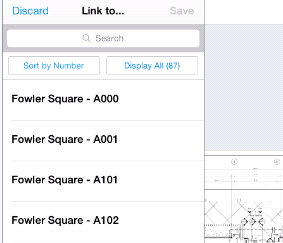
6. In the Link to panel, shown below, select the plan document you want to link to by tapping the document to select it. The link is automatically added and uploaded.
7. Optional: Open the plan document you just linked to and create a link from a specific location in it back to the original plan document so that the two documents (and the specific areas of the documents) reference each other.
To add a new space when creating project items
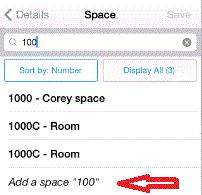
1. Tap the Space field from a new project item (as explained in the To add new project items section above) to access the Space panel.
2. Begin typing the name for the new space in the Search field, then tap Add a Space "space", from the list of available spaces, as shown here:
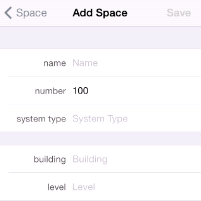
3. In the
Add Space panel, shown below,
enter the name, number, and system type for the space and tap Save
to save it. The space is added to the list of available spaces and is
automatically associated with the current item. The space is also added
to the Spatial Index activity center
in Project Center and Info Exchange.
To edit existing project items
1. Open the plan document whose items you want to edit, as explained previously.
2. Locate and tap on the item you wish to edit, as shown here:
Solid pins indicate a single item. Numbered pins indicate the number of items located in that area. The colors of the numbered pin indicate the types of the project items. If there are different types of project items in the same area, the colors of the circle are split to display all item colors.
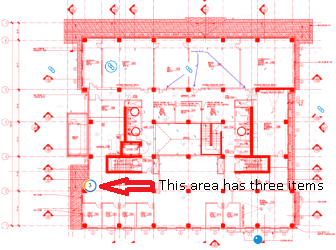
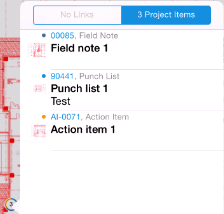
For this example, the list of items would open first, as it has three items in the selected area. Tap the item from the list, as shown here, to edit it.
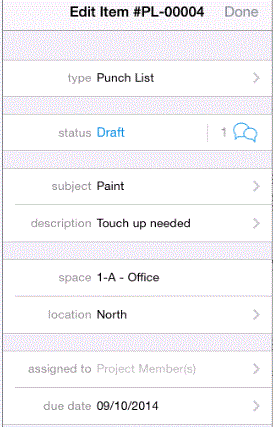
The Edit Item panel opens, as
shown here:
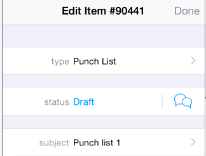
3. Edit any fields as needed, then tap Done to save your changes.
To filter project items displayed on a plan
1. Open the desired plan document as explained previously.
2. Tap Display to open the Filters
panel, as shown here:
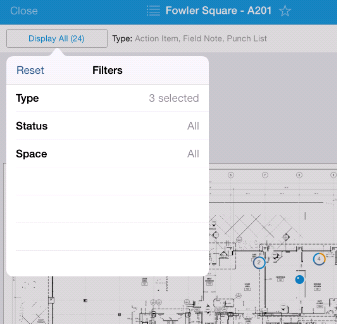
3. Tap any of the filter options to select them. Tap outside the panel to close the Filters panel.
You can use multiple filter values at the same time (such as Status and Space) to further narrow your results.
The total number of project items on the plan document is listed on the Display button, as shown above.
4. You can also filter by project item type from the thumbnail view. Tap the View Located Items button below the thumbnail, as shown below, then select the item type you want to view from the Located Items panel. The plan opens with only that project item type displayed.
Common questions
Refer to Common Questions.
Newforma Customer Support
If you cannot find the information you need in this Help system, use the following links for more information:
● Click https://customercommunity.newforma.com/ to access the Newforma Customer Community.
● Click here to access Newforma video tutorials.
● For technical questions or problems, please contact Newforma Customer Support or go the Contact Support section of the Customer Community.
Revised 5/14/20
Table of Contents
Index
-Search-
Back