


Create an Action Item
This topic explains how to create a new action item. You can create action items in Project Center, or from an Outlook item in the Project Center Add-in for Microsoft Outlook, as explained in the second procedure below.
To create a new action item from Project Center
1. If you are not already there, open the Action Items activity center by clicking Action Items from the Activities list or the Project Home activity center.
2. From the Tasks panel, click Identify an Action Item to open the Identify an Action Item dialog box, as shown here:

3. Enter a subject for the action item in the Subject field.
4. Select the action item's Type, which enables you to restart action item ID numbering based on the type (if an administrator has selected the new Auto-Generate IDs with a Prefix Based on Type option for action items in the Edit Project Settings dialog box Activity Center Setup tab).
5. Select the Status, Priority, Disciplines, Due Date, and Keywords as necessary. The Action Item ID is an automatically incremented number that is editable (it must remain unique).
To enter a due date, mark the checkbox in the Due Date field, then select a date.
6. If you want to assign the action item, click Assigned To to open the Choose a Project Team Member dialog box to assign the action item to a project team member (or type a contact's email address directly in the field).
7. Enter a description of the action item in the Description tab.
8. Use the Discussion tab to add and edit the actions taken toward resolving the action item.
9. If you want to attach files to the action item, click the Supporting Documents tab, then click Add Files > Another project File to open the Add Supporting Documents dialog box to locate the files. Click Open to add the files.
10. Click Create when finished to create the action item and add it to the Action Items activity center. If you marked the Send Change Notification Email checkbox, an email message opens in Microsoft Outlook. Edit the message as necessary, then click Send and File in Action Item to send an email message notifying the contacts in the Assigned To, Assigned By, and CC fields, and to file the message in the action item's Email Log.
To create an action item from the Project Center Add-in for Microsoft Outlook
1. From Microsoft Outlook, select the Outlook item that you want to create the action item from.
2. Click File in Project > File as from the Project Center Add-in for Microsoft Outlook Ribbon Bar to open the Select a Project dialog box. Select the project you want to file the action item in, then click OK to open the File as dialog box, as shown below.
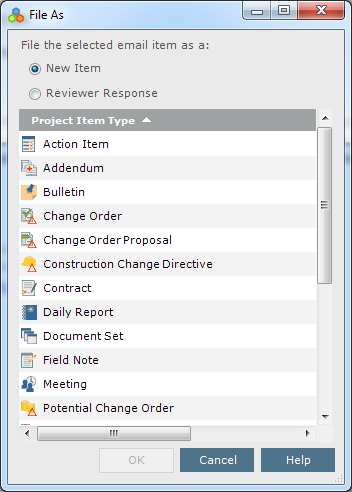
3. Choose the New Item option and then select Action Item from the list. Click OK to open the Identify an Action Item dialog box, as shown in the procedure above.
4. The Subject field contains the subject of the message, and the Description tab contains the body of the message. You can edit these fields.
If the email message you are using had attachments, they are not included with the action item. However, the email message itself will be copied into the Email Log of the action item (it will appear after it is created in the Action Items activity center), and can be later forwarded to other contacts as necessary.
5. Fill in the fields as described above.
6. Mark the Select in Project Center After Creation checkbox to open the action item in the Action Items activity center after it is created.
7. Click Create when finished to create the action item. If the Send Change Notification Email checkbox was marked, an email message opens in Outlook with the Assigned To, Assigned By, and CC contacts in the To field. Edit the message as necessary, then click Send and File in Action Item to send the email notification message and file the message in the action item's Email Log.
Table of Contents
Index
Search (English only)
Back