

Newforma Indexing Service Administration Utility
Use this utility to manage and configure the indexing and filtering settings for Project Center Servers.
-
This utility is only available to Project Center administrators. Administrators are listed in the Project Center Administration Activity Center Project Center Users tab. If no administrators are listed, all Project Center users have administrative privileges until the first administrator is added.
-
Switching tabs does not update the information in this utility. Click the
 button to get the latest information.
![]()
Scopes tab
Configure Scopes
This section lists all of the scopes being indexed by the Project Center Server currently selected in the Indexing Server field above.
-
If a project is deleted, its scopes are automatically deleted.
-
If you add scopes that are not part of any project, be aware that Project Center automatically removes those scopes during the nightly maintenance tasks. For example, scopes added during the day to test something outside of a project will be removed that night and will no longer appear the next day.
Path
This column lists the full UNC paths to the project folders that are being indexed.
Scan Mode
This column indicates the scan mode being performed.
-
Full indicates that all file system changes are reflected in the index (all files that are added, deleted, and modified).
-
Additive indicates all added or modified files are updated in the index, but not deleted files.
-
NoScan indicates that no changes to the file system are updated in the index. The index will remain static once the indexing is completed until this value is changed.
Shared Index Data
This column indicates whether the index data is shared.
-
True indicates that the index data in the database is share between two or more scopes.
-
False indicates that the index data in the database is used by only one scope and is not shared.
Add
Click to open the Add a New Scope dialog box to add a new scope. This path must be a UNC path.
Remove
Click to remove the selected scope.
Change Scan Mode
Click to open the Change the Scan Mode for a Scope dialog box to modify the settings for the selected scope, as explained under Scan Mode above.
Filter Servers tab
Filtering services perform the work for the indexing server. They are the processes that open all of the files and extract text from them. The indexing server then takes the extracted text and puts it into the database. You can install filtering services on as many machines as you want (one filtering service per machine). Each indexing server can have multiple filtering services performing work for it.
Select the Filter Server and Set Configuration Options Below
Select the filter server configuration from the list that you want to configure.
Add
Click to open the Add a Filter Server Configuration dialog box to add a new filter server configuration. The name of the filtering server configuration must match the name of the machine the filtering service is running on.
-
-
The servers running filtering services will automatically be added to this list as soon as the filtering services contact the indexing server. They will be added with the default settings. You can use the Add a Filter Server Configuration dialog box to add servers to the list before the filtering services have been installed on them, which enables you to configure the filter service settings ahead of time. You can also use the dialog box to configure the filter service settings based on an existing server.
-
Remove
Click to delete the currently selected filter service from the indexing server.
Columns
Server Name
The name of the filter server.
Window Start
When the filtering process starts.
Window End
When the filtering process ends.
Last Contacted
The last time the filtering server contacted the indexing server.
Concurrent Operations
The number of filtering operations that are allowed to run at the same time.
Filter Timeout
The number of seconds allowed to filter a single file.
Files Before Restart
The number of files the filtering process filters until it stops running and is restarted.
Ignore Null IFilter
True indicates that the filtering server is ignoring the built-in NULL IFilter provided by Microsoft.
Ignore the NullFilter IFilter on this Server
Mark this checkbox to force the filtering service to ignore the built-in NULL IFilter provided by Microsoft.
Concurrent Filtering Operations Allowed
Enter the number of concurrent filtering operations that can run at the same time on the selected filtering server.
Seconds Allowed to Filter a Single File
Enter the number of seconds the filtering server filters a file before it times out and moves on the next one.
Files to Filter Before Restarting a Filter Process
Enter the number of files a filtering process filters until it stops running. A new one is started immediately after one stops running. The number of filtering processes running is indicated in the Number of Concurrent Filtering Operations Allowed field indicated above.
Filtering Window
Enter the time range you want the filtering processes to run. Use this setting to control when the filtering service on the selected indexing server is operating (extracting text from files). Enter the same time in both fields to run the filtering operations continuously.
Limit File Filtering to the Following Namespaces
Mark this checkbox and enter the UNC namespaces for the folders that you want the filtering server to filter (extract text) from. A namespace is just the first token in the UNC path. For example, \\server is the namespace for the UNC path \\server\share\folder. The filtering server will only extract text from files in scopes that appear within these namespaces as defined in the Scopes tab. Folders that are listed under Path in the Scopes tab but do not fall under one of the listed namespaces will not be filtered by this filtering server.
Ignore Files that Match the Following Regex Patterns
This section contains a list of regular expressions used to identify text files that you do not want filtered. Project Center comes with two default entries - one for Windows Registry Editor files, and one for AutoDesk Revit log files.
-
This section applies only to text files. You must know how to write regular expressions to use this section.
Lines to Test
The number of lines the filtering service will attempt to match against the regular expression. For example, if the value entered is 2, the first two lines of the file will be checked to see if a match is found against the regular expression.
Regular Expressions to Match
The regular expression used to perform the match.
Add
Click to open the Add a Text Exclusion dialog box to add a new regular expression text exclusion to the list.
Remove
Click to remove the selected regular expression text exclusion from the list.
Apply Changes to All
Click to apply the changes for only the fields that have been changed (the changed fields are highlighted). Important: When saved, the changes made to the highlighted fields are applied to all filter servers, not just the currently selected one.
Save Settings
Click to save the settings entered for the selected filter server. If the filter server does not yet exist, an entry is created for those settings.
Reprocessing Requests tab
Use this tab to re-index or re-scan files and folders in the project. For example, if you just installed a new IFilter for opening files that were not filtered previously, you would want to re-index those file types. All requests from this tab are executed with the highest priority and preempt all other indexing work.
Select the Type of Request
-
Choose Reindex Particular Files to re-index the selected files immediately. Re-indexing opens the files and extracts the text whether or not they have changed.
Selected Files
This field lists the files that have been selected to be re-indexed.
Add Files to List
Click to open the Select Files to Add to the Reindexing Request dialog box to locate and select the files to re-index.
Remove Selected Files
Click to remove the selected files from the list.
-
Choose Reindex Particular Directories to re-index all files in the selected folders immediately. Re-indexing opens the files and extracts the text whether or not they have changed. Mark the Process All Subdirectories checkbox to re-index all files in all of the selected folder's subfolders.
Directory
Click Browse to locate the folder you want to re-index.
Selected Directories
This field lists the folders that have been selected to be re-indexed.
Add Directory to List
Click to add the folder in the Directory field to this list so that it will be re-indexed.
Remove Selected Directory
Click to remove the selected folder from the list.
Process All Subdirectories
Mark this checkbox to re-index all files in all subfolders under the selected folder.
-
Choose Reindex Particular File Types to re-index all files of the selected type immediately. Re-indexing opens the files and extracts the text whether or not they have changed.
-
When re-indexing particular file types, be aware that all files of that type will be re-indexed, which could take significant time depending on the number of files being re-indexed.
All Files of This Type Will be Reindexed
Enter the extensions of the file types you want re-indexed. Enter them in the following format: .doc .xls .dwg. dgn
-
Choose Rescan Particular Directories to re-scan the selected folders for any changes immediately instead of waiting for the next scan. The scan mode is set in the Configuration tab. Mark the Process All Subdirectories checkbox to re-scan all files in all of the selected folder's subfolders.
Directory
Click Browse to locate the folder you want to re-scan.
Selected Directories
This field lists the folders that have been selected to be re-scanned.
Add Directory to List
Click to add the folder in the Directory field to this list so that it will be re-scanned.
Remove Selected Directory
Click to remove the selected folder from the list.
Process All Subdirectories
Mark this checkbox to re-index all files in all subfolders under the selected folder.
Submit Request
Click to start the process.
Index Statistics tab
Show Statistics for the Entire Index
Choose this option to show the statistics for the entire index on the selected Indexing Server, which includes every project the indexing server manages. After you choose this option, you must click the Get Statistics button to view the statistics.
Show Statistics for a Specific Scope
Choose this option to show the statistics for a particular scope on the selected Indexing Server. After you choose this option, you must click the Get Statistics button to view the statistics.
Path
This column lists the full UNC paths to the project folders that are being indexed.
Scan Mode
This column indicates the scan mode being performed.
-
Full indicates that all file system changes are reflected in the index (all files that are added, deleted, and modified).
-
Additive indicates all added or modified files are updated in the index, but not deleted files.
-
NoScan indicates that no changes to the file system are updated in the index. The index will remain static once the indexing is completed until this value is changed.
Shared Index Data
This column indicates whether the index data is shared.
-
True indicates that the index data in the database is share between two or more scopes.
-
False indicates that the index data in the database is used by only one scope and is not shared.
Get Statistics
Click to view the statistics for the entire index or a specific scope, depending on the option selected above.
Percent Indexed
The percentage of the files that are up to date in the index.
Percent of Failures
The percentage of files that failed to index properly.
Space Used in the Index
An estimate of the amount of disk space needed to store the indexed data for the entire index or a specific scope, depending on the option selected above.
Total Number of Files
The total number of files in the index or scope.
Number of Files to Index
The number of files that have not yet been updated.
Number of Files that Failed to Index
The number of files that failed to index properly.
Total Size of Files on Disk
The total size of the files in the index.
Index Size to File Size Ration
The ratio of the size of the index to the size of the files the index was produced from.
-
The following three fields appear only for the entire index, not per scope.
Documents Filtered Since Service Start
The number of documents that have been filtered since the Indexing Server was last started.
Documents Processed Per Minute
The number of files the Indexing Server processes per minute based on the last minute.
Documents Processed Per Hour
The number of files the Indexing Server processes per hour based on the last hour.
Characters Processed Per Minute
The number of indexable text characters the Indexing Server processes per minute based on the last minute.
Characters Processed Per Hour
The number of indexable text characters the Indexing Server processes per hour based on the last hour.
Search Query tab
Use this tab to run sample queries against scopes in the index to diagnose any problems related to indexing.
Search Type
Select the type of search to perform.
-
Choose Contents to perform a normal search of all the files that were indexed. Enter the search phrase in the Search Phrase field.
-
Choose Enumerate Files to list every file in the index for the selected scopes.
-
Choose File Names to perform a search against the file names of the files in the index, not their contents.
-
Choose File System Statistics to list the total file size, total number of files, and the last write time for the selected scopes.
-
Choose Files by Last Write Time to search for files that were last modified within the selected time range.
-
Choose Files by Type to locate files by their extensions. Enter the extensions in the Extensions to Search field, such as .doc and .dwg.
-
Choose Files that Failed to Filter to list all files that failed to filter for any reason.
-
Choose Files Using the Most Index Space to list the top 1000 files taking up the most space in the index for the selected scopes. Be aware that his query can take considerable time.
-
Choose Files with a Property to locate files with a particular Project Center property. This is used only by Newforma Support.
-
Choose Folder Names to perform a search against the folder names of the files in the index, not their contents.
-
Choose Folders Containing File Types to locate folders that contain one or more of the selected file types.
Scopes
Mark the checkboxes of the scopes you want to include in the search query.
Path
This column lists the full UNC paths to the project folders that are being indexed.
Scan Mode
This column indicates the scan mode being performed.
-
Full indicates that all file system changes are reflected in the index (all files that are added, deleted, and modified).
-
Additive indicates all added or modified files are updated in the index, but not deleted files.
-
NoScan indicates that no changes to the file system are updated in the index. The index will remain static once the indexing is completed until this value is changed.
Shared Index Data
This column indicates whether the index data is shared.
-
True indicates that the index data in the database is share between two or more scopes.
-
False indicates that the index data in the database is used by only one scope and is not shared.
Search Phrase
Enter the phrase to search for in this field.
Submit Search Query
Click to execute the search query. The results appear in the Search Results field.
Choose Properties
Click to open the Choose Result Properties dialog box to select the properties you want this search query to return.
Search Results
The results of the search appear in this field. You can right-click on the selected files to copy them to the clipboard, copy them to the clipboard with quotes, locate them in File Explorer, or reindex them immediately.
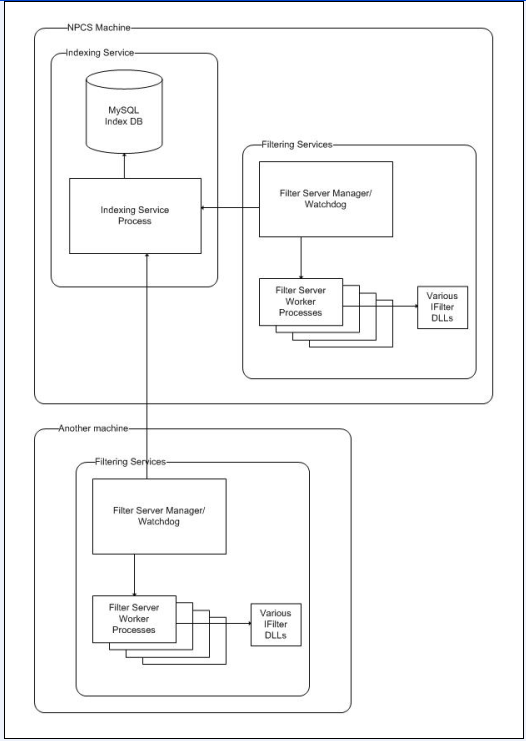
Indexing diagram
The following diagram shows how the indexing and filter servers interact with each other.
To access this utility
From the Project Center Server machine, click Start, All Programs, Newforma, Newforma Indexing Administrator.