


Create Potential Change Order dialog box
Use this dialog box to create a new potential change order (PCO).
Subject
Enter the subject of the PCO.
Type
Select the PCO's type: Cost or Budget. Budget PCOs are sent to the owner.
Due Date
To enter a date the paperwork is due, mark the checkbox, then select a date.
Remind
Mark the checkbox to add this item to the email notification message sent out by Project Center reminding the responsible contact to respond back to the contact who initiated the PCO. Select the number of business days before a response is due, which appears in the email message and in the Open Items tab of the My Project Center activity center.
Reminders can be sent to both internal and external project team members. The frequency at which reminders are sent is set in the General tab of the Project Center Administration activity center Servers tab. Reminders can disabled per project in the Edit Project Settings dialog box.
Remind is not available if the option is disabled for the project or in the Project Center Administration activity center.
Status
Select the PCO's status from the drop-down list:
● Draft - The default value when the PCO is logged.
● Pricing Requested - The open status, when pricing is needed.
● Pricing Completed - Indicates the pricing has been received from the subcontractors.
● Closed - Indicates change orders have been issued; changes the PCO to read-only.
● Void - Indicates the PCO was cancelled. The PCO is excluded from the PCO Scoreboard.
ID
Enter an ID number for the PCO.
Actual Completion
To enter the actual completion date of the PCO paperwork, mark the checkbox, then select a date.
Reasons
Click to open the Choose Reasons dialog box to select the reasons for the PCO.

Pricing tab
Use this tab to enter and edit the pricing data for the PCO. Add a separate row for each major piece of work that needs to be included in the PCO estimate, and link each row item to its related contract.
Estimated
The sum of the Estimated Amount column.
Proposed
The sum of the Proposed Amount column.
Approved
The sum of the Approved Amount column.
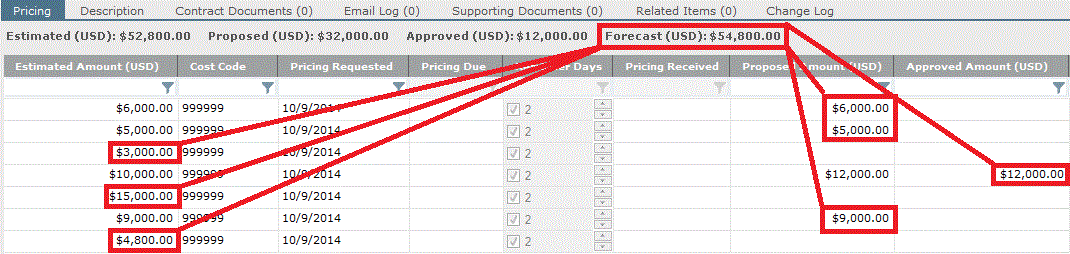
Forecast
The sum of the values of each row that are farthest to the right, as shown in this example:
Add New
Click to add item rows to the tab.
Create Similar
Select a row and click to add a new pricing row based on the one selected. The new row contains the same information as the one selected.
Delete
Click to delete the selected rows. Mark the checkboxes of the rows you want to delete.
Item Number
The ID number of the PCO item.
Item Description
Enter a brief description of the item to be priced.
Contract
Select the contract this item is related to.
Company
The company doing the work.
Contact
Click to select the contact associated with this item. By default this is the To Contact associated with the selected contract.
Cost Code
● If a contract has been selected, only cost codes assigned to that contract are available here.
● If no contract has been selected, the Choose Cost Code dialog box opens from which you can select any project cost code to assign to this item.
Estimated Amount
Enter the estimate of how much the item will cost.
Pricing Requested
Select the date the pricing was requested.
Pricing Due
Select the date the pricing request is due. The default is ten days from the requested date.
Reminder Days
Select the number of days for Project Center to start sending reminder notifications before pricing is due. Two days is the default.
Pricing Received
Select the date the pricing was received from the subcontractor. Notifications stop being sent when this date is entered.
Proposed Amount
Enter the pricing amount proposed by the subcontractor.
Approved Amount
Enter the amount approved by the general contractor. The resulting change order will be based on this amount.
Proposed Days
Enter the number of days proposed by the subcontractor.
Approved Days
Enter the number of days approved to be added to the contract.
Change Order
After a change order is created from this PCO, it can be linked to a line item. The related change order is listed here.
Internal Notes
Enter any internal notes about the line item. This information is not displayed on Info Exchange.
Supporting Docs
Click to locate and assign supporting files to this line item.
Description tab
Enter any detailed information about the PCO in the top section. Enter any internal notes in the Internal Notes section. Internal notes are not included in forms or on Info Exchange.
Contract Docs tab
Use this tab to track record documents related to the PCO. Refer to the Document Control activity center topic for a description of the columns.
Add
Click to open the Choose Record Document Revision dialog box to locate and select a record document to include with the PCO.
Remove
Click to remove the selected record document from the PCO.
Email Log tab
This tab lists all email messages associated with this PCO. When a user clicks File in Project (then chooses the Potential Change Order option) from the legacy Project Center Add-in for Microsoft Outlook Toolbar, the email message appears here.
|
Previews |
Click to select a preview option for the emails. Options include None, Right, Bottom and Auto Preview. |
|
Add |
Click to select an email message to add to the Email Log. |
|
Remove |
Click to remove the selected email message from the Email Log. |
The number in parentheses indicates the number of email
messages filed in the PCO.
You can copy and paste email messages from Microsoft Outlook and Windows
Explorer into this tab.
Double-click an email message to open it in Microsoft Outlook. From there,
you can reply to or forward the message.
Supporting Documents tab
Use this tab to attach files to the selected PCO, and to view attached files. For example, if you receive a PCO and a particular drawing is related to it, you can use this tab to attach the drawing file to the PCO. Another example is if you receive a file with a PCO, mark it up, and want to send the marked up file to a reviewer.
The number in parentheses indicates the number of files that are attached to the PCO.
You can copy and paste and drag and drop files from Windows Explorer into this tab.
|
Set Order |
Click to open the Set Document Order dialog box to set the order of the documents. |
|
Views |
Click to select how you want to view the list of files. Options include Large Thumbnails, Thumbnails, Icons, List and Details. |
|
Add Files > Another Project File |
Click open the Add Supporting Documents dialog box to locate and attach a file to the PCO. |
|
Share with External > Yes |
Click to allow the selected files to be shared with external project team members through Info Exchange. |
|
Remove |
Click to remove the selected supporting file from the PCO. |
Preview tab
A preview of the selected file appears here.
Related Items tab
This tab lists all related Project Center items for the selected file.
Related Items tab
This tab lists all related Project Center items for the selected PCO.
Relate to >
Click to select an existing project item and establish a relationship between it and this PCO. This gives you the ability to link two items that are related together. (For example, a markup session that is related to a PCO.) Select Another Project Item to open the Select Project Item dialog box to locate an item that is not in the list.
Share with External
Click and select Yes to allow the selected web link to be shared with external project team members through Info Exchange.
Remove
Click to unlink and remove the selected project item from the Related Items tab.
Removing a related item from the Related Items tab does not remove it from the database.
The Relation Type column has two icons to indicate the relationship type:
● The  icon indicates that the relationship was created by a user and can be
deleted (such as an action item related to a field note).
icon indicates that the relationship was created by a user and can be
deleted (such as an action item related to a field note).
● The  icon indicates that the relationship was created by Project Center and
cannot be deleted (such as a transmittal or record copy related to a field
note).
icon indicates that the relationship was created by Project Center and
cannot be deleted (such as a transmittal or record copy related to a field
note).
Change Log tab
This tab displays a history of the actions taken on this PCO, including when it was created, modified, who was involved, and any details.
Keywords
Click to open the Choose Keywords dialog box to apply keywords to the potential change order.
Click  to spell check the fields in
this window. If any mistakes are found, the Spelling
Check dialog box opens with spelling suggestions.
to spell check the fields in
this window. If any mistakes are found, the Spelling
Check dialog box opens with spelling suggestions.
Next Action
Mark this checkbox to choose whether to create a change order proposal or generate a letter.
● Choose Create Change Order Proposal to open the Create a Change Order Proposal dialog box to create a change order proposal for the selected PCO. The change order proposal will contain information from the PCO, and they will be related to each other.
● Choose Generate Letter to open the Generate Letter dialog box to generate a form letter containing information about the selected PCO and then send off to your contacts.
OK
Click to log the PCO.
To access this dialog box
Click Create Potential Change Order from the Tasks panel of the Potential Change Orders activity center.
Table of Contents
Index
Search (English only)
Back