


Log an RFI
Perform the following steps to log an RFI you have received to track its status and history of actions. You can file an RFI from within Project Center, or from an Outlook item in Microsoft Outlook.
To file an RFI from Project Center
1. If you are not already there, open the RFIs activity center (shown below) by clicking RFIs from the Project Home activity center or from the Activities list.
2. Click
New RFI > Log a Received RFI
from the Tasks panel to open the Log a Received
RFI dialog box, as shown here: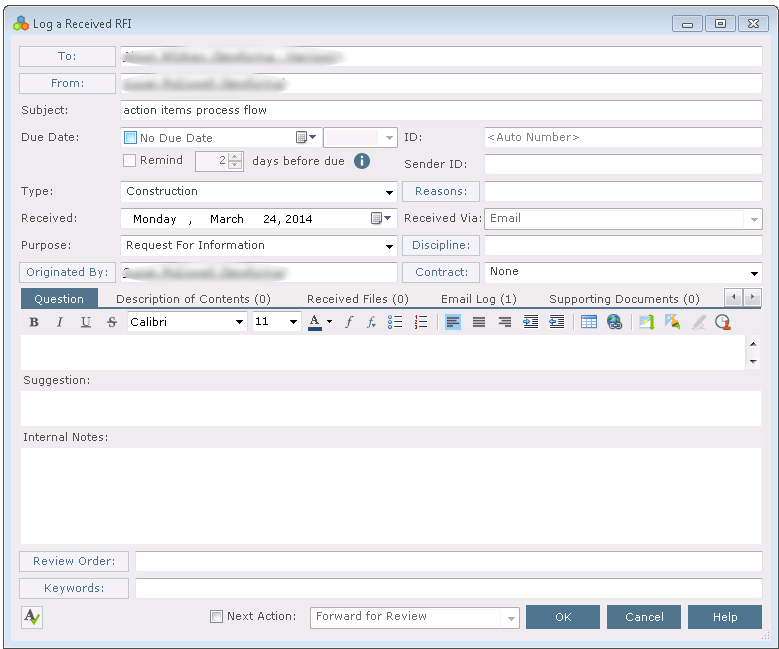
Your name is entered in the To field, and today's date is entered in the Received field. You can edit these fields.
3. Click From to open the Choose a Project Team Member dialog box to choose the project team member who sent the RFI.
4. Enter a subject in the Subject field.
5. Mark the checkbox and enter the date a response is due back to the contact who sent you the RFI in the Due Date field.
6. Select the purpose of the RFI from the Purpose drop-down list.
7. Click Disciplines to open the Choose Disciplines dialog box to apply disciplines.
8. Enter the number the contractor gave the RFI in the Sender ID field.
9. Select the method in which the RFI was received in the Received Via drop-down list.
10. Enter the question and any suggestions or notes in the Question tab.
11. Describe the contents of the RFI in the Description of Contents tab. Add one line for each item. This information is used to fill in the Contents section of the Transmittal form.
12. Add any electronic files that were sent with the RFI in the Received Files tab. The files may be on a CD, DVD, or other media. You can also use this information to populate the Description of Contents tab.
13. The Email Log tab lists all email messages associated with the selected RFI. When a user clicks File as or File in Project (then chooses the RFI option) from the legacy Project Center Add-in for Microsoft Outlook Ribbon Bar, the email message appears here. You can also add email messages by clicking Add or dragging and dropping from Microsoft Outlook.
14. To include any additional files that may be related to the RFI, add them by clicking the Supporting Documents tab, then clicking Add Files > Another Project File. Navigate through the folders until you locate the file, then click Open. Repeat as necessary until you have added all the necessary files.
15. Mark the Next Action checkbox if you want to assign the RFI to another contact, respond to the RFI author, or close it after filing the RFI.
-
Choose Forward for Review to open the Forward RFI for Review dialog box to forward it.
-
Choose Close to open the Close RFI dialog box to close it.
-
Choose Respond and Close to open the Respond to RFI and Close dialog box to respond to the RFI Author.
16. Click OK. Project Center files the RFI in the Open category of the RFIs activity center.
To file an RFI from a Microsoft Outlook item
See Log a Project Center Item from Microsoft Outlook.
To file an RFI from an Info Exchange file transfer
See Download Files from Info Exchange and Track Them with an RFI.
Next steps in the RFI workflow

Table of Contents
Index
Search (English only)
Back