


New and Improved Administration Features in Project Center Version 11.9
See New and Improved Features in Newforma Project Center for new features that apply to all Project Center users.
Document Control
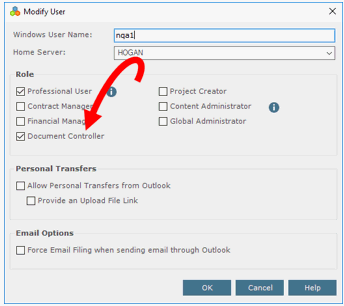
● New Document Controller
role: If you have had problems with team members creating, modifying,
or deleting record documents when they are not supposed to, you now have
the ability to remove these capabilities. From the Project
Center Administration Activity Center Licensing tab, open the Modify
User dialog box and clear the Document
Controller checkbox for the selected user, as shown below. The
user will still be able to view record documents and report on them, but
will not be able to create, modify, delete, or issue record documents.
Email filing
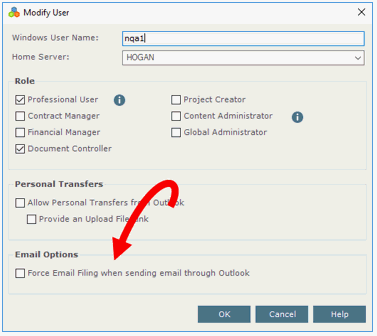
● New option to force
file email messages: Sometimes users don't file email messages
even when it's company policy. There is a new option to automatically
make users file all email messages they send. In the Project
Center Administration activity center Licensing tab, select the user(s)
you want to apply this option to, click Modify
User(s) to open the Modify
User dialog box, and mark the Force
Email Filing When Sending Email Through Outlook checkbox, as shown
below. When this option is selected, the File
in Project dialog box opens requiring the users to select a project
to file their messages to.
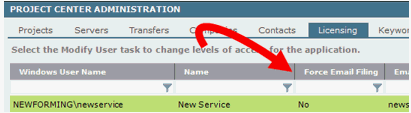
● There
is also a new related Force Email Filing
column in the Licensing tab so
you can see who this option is applied to:
MaxPath violation notifications
● As you know, Microsoft unfortunately imposes path limitations of 256 characters. Project Center has identified the projects with these violations for a long time, but the notifications you receive now contain a link to a helpful Knowledgebase article that explains how to download the MaxPath utility, what it does, and how to use it.
Microsoft compatibility
● Windows Server 2016: The Project Center Server is now compatible with Windows Server 2016!
● Outlook 2016 support: The Project Center Server is now compatible with Outlook 2016 (the 32-bit version is required). The Project Center clients have been compatible since version 11.7.
Miscellaneous
● Newly added Info Exchange Servers: When you add an additional Info Exchange Server to your environment and move projects to the new Info Exchange Server, there is no longer an issue accessing the projects from the original server.
● Slow nightly maintenance: Slow nightly maintenance for projects containing large numbers of DWGs/PDFs is now much faster.
● Licensing tab error: The Licensing tab once again displays the number of users.
New and Improved Administration Features in Project Center Version 11.8
● Project Center license notification: Project Center Administrators will now receive a notification 60 days from term end date with weekly notifications and then 15 days from term end date with daily notifications. This will help to make sure Project Center stays running for your users!
● Project migration: When merging Project Center Servers from two companies, some projects failed because there were contacts with the same addresses. This has been resolved.
● Project templates: We’ve fixed a problem when editing subfolders for a new project template – crashes have been resolved.
● Re-pathing projects: Fixed a problem where files in folders weren’t matching when the project was re-pathed.
● Pre-deployment tool: We were showing unknown when running the pre-deployment tool, but we did not share the information. We do now! This only affects new deployments.
● Project Center projects shortcuts: When modifying users' My Projects from the Licensing tab, My Projects lists for administrators were changed too. We’ve fixed this so you can keep your projects list.
New and Improved Administration Features in Project Center Version 11.7
Refer to the following document for an overview of what's new in Project Center 11.7: Project Center 11.7 and Cloud Services Release Notes.pdf
New and Improved Administration Features in Project Center Version 11.5
This topic applies to Project Center administrators only. To see what's new in Project Center for non-administrative users, see New and Improved Features in Newforma Project Center.
Newforma is pleased to announce the release of Newforma Project Center 11.5. Version 11.5 introduces several new features, including:
● Personal file transfers
● Improved workflow when interacting with project extranets
● Newforma to Newforma enhancements
● Reporting enhancements
● Internal user automatic permissions for easier mobile setup
● Autosave in the Newforma Viewer
● Consolidation of projects after mergers and acquisitions
What's New Videos

Reference Guides
● What's New in Newforma Project Center 11.5.pdf
● What's New in Newforma Mobile Apps.pdf
Detailed information
Information about each of the new features is included below.
● To see what was new in version 11.0, go to the New and improved features in Project Center Eleventh Edition section below.
● To see what was new in previous versions of Project Center, see New and improved features in previous versions of Project Center.
Field notes
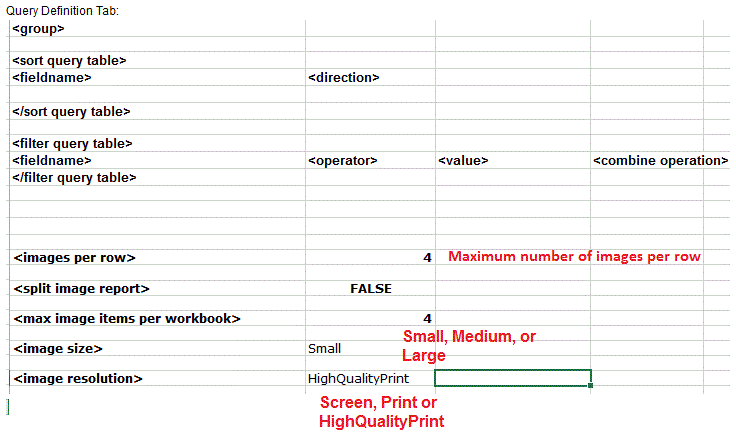
● You can now
add images to field note report
templates. To add images, you must add a tab called Query
Definition to your Excel template, and then add the new <images
per row>, <split image report>,
<max image items per workbook>
<image size> and <image
resolution> fields. The following example shows the image fields
added to the Query Definition
tab:
If <split image report> is set to TRUE, the report can be split up into multiple reports. The report will be split according to the <max image items per workbook> setting.
<max image items per workbook> is a numeric value indicating the maximum number of items with images to put into a workbook/report. It is the number of items with images, not the number of images. For example, if you set it to 10 and you have 40 field note items but only nine of them have images, only one workbook/report will be generated.
The image files called up by the report must be located
in the field note's Supporting Documents
tab, as shown here:
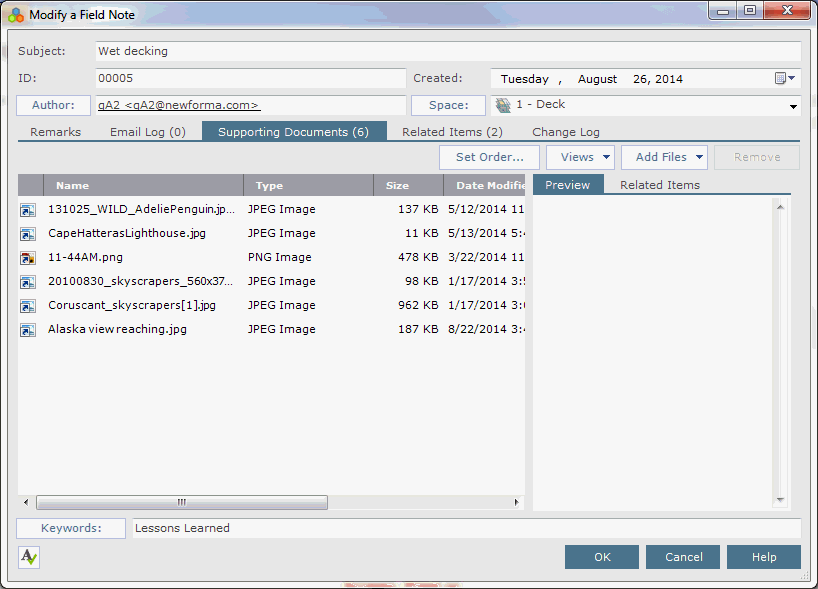
The output would look similar to the following example. Since there are
six images but only four are allowed per row in this example, the other
two are added to the next row:

File transfers
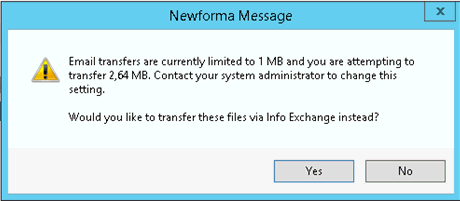
● You can now
set the threshold at which file transfers must be sent via Info
Exchange instead of via email from Project Center. In the Project
Center Administration Activity Center Servers tab, mark the Do Not Allow Transfers Larger Than
nn MB
checkbox, shown here

to specify a file size limit for users sending files from Project Center
via email. If checked, the files will be transferred via Info Exchange
if a user tries to send files via email that are larger than the value
indicated in this field. A message similar to the following will appear
(the numbers used are examples):
● The Project
Center Administration Activity Center Licensing tab has two new columns:
Allow Personal Transfers and Upload File Link, as shown below.
These columns are part of the new Send
Personal Email Messages Outside of a Project (Workflow) feature.

● The Project
Center Administration Activity Center Transfers tab has a new option
called All Personal Projects under
the Project drop-down. Use this
option to view all personal transfers sent and received by Project Center
users. This is also part of the new Send
Personal Email Messages Outside of a Project (Workflow) feature.

● You can now
send
email personal email messages with attachments via Info
Exchange that are not related to any Project Center project using
the Project Center Add-in
for Microsoft Outlook. To use this feature, a Project Center administrator
must first enable it for you by marking the Allow
Personal Transfer from Outlook checkbox in the Modify
User dialog box. To send project-independent email messages, click
Send and File in Project > Send Via
Info Exchange, as shown above, and then select Personal
Transfer from the Project
drop-down list in the Send
File Transfer dialog box, as shown here:

● You can now create a URL and add it to your Outlook signature to receive personal email messages outside of a project. To use this feature, a Project Center administrator must first enable it for you by marking the Provide an Upload File Link checkbox in the Modify User dialog box. Once selected, Project Center sends you a URL that you can add to your email signature. When you send an email message, the recipients can click the link to upload files to you. You are then notified about the uploaded files and can download them from the email notification or from the View Personal Transfers dialog box.
Form templates
● You can now view a list of available merge fields that can be used when creating a template for a particular form. Click your mouse on the form viewer and press Ctrl-Shift-f. A Word document containing all of the available merge fields for the form template opens. You can copy and paste these merge fields into your template. See https://customercommunity.newforma.com/s/article/Advanced-Word-Form-Template-References for more information.
● For site visits, observation rows that do not contain images are no longer included in the form when it is viewed (using the Site Visits Large Photos template).
Mobile apps
You can now use the Set Up Mobile Apps dialog box to simplify enabling activity centers for each project on Newforma Info Exchange so that Newforma mobile apps users can access them.
Project teams
● The following fields are now available to add to customized reports for project teams:
● Type
● Group
● Roles
● Contact Address
● Contact City (used to be City)
● Contact State (used to be State)
● Contact Zip (used to be Zip)
● Contact Country (used to be Country)
● Assigned Project Name (used to be Project)
● Assigned Project Number (used to be Project Number)
● Primary Contact (Yes/No)
● Use the new Select a Project Culture dialog box to set the language for any notifications that are sent to the project team member that are not project-specific, such as Info Exchange account notifications and password reset instructions.
Projects
Use the new Select a Project Culture dialog box to set the language and date/time format for the notifications that are sent out by Project Center as well as for the forms that are generated for the project.
Punch lists
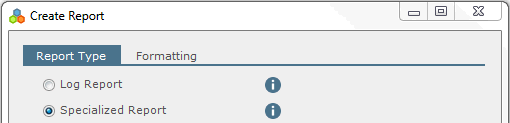
● The following new punch list report templates are available from the Create Report dialog box by choosing the Specialized Report option, as shown below:
● Punchlist By Space with Images
● Punchlist By Assignment with Images
● Punchlist with Images
● Punchlist
Contractor Report
● You can now
add images to punch list report templates. To add images, you must add
a tab called Query Definition
to your Excel template, and then add the new <images
per row>, <split image report>,
<max image items per workbook>
<image size> and <image
resolution> fields. The following example shows the image fields
added to the Query Definition
tab:
If <split image report> is set to TRUE, the report can be split up into multiple reports. The report will be split according to the <max image items per workbook> setting.
<max image items per workbook> is a numeric value indicating the maximum number of items with images to put into a workbook/report. It is the number of items with images, not the number of images. For example, if you set it to 10 and you have 40 punch list items but only nine of them have images, only one workbook/report will be generated.
The image files called up by the report must be located
in the punch list's Supporting Documents
tab, as shown here:
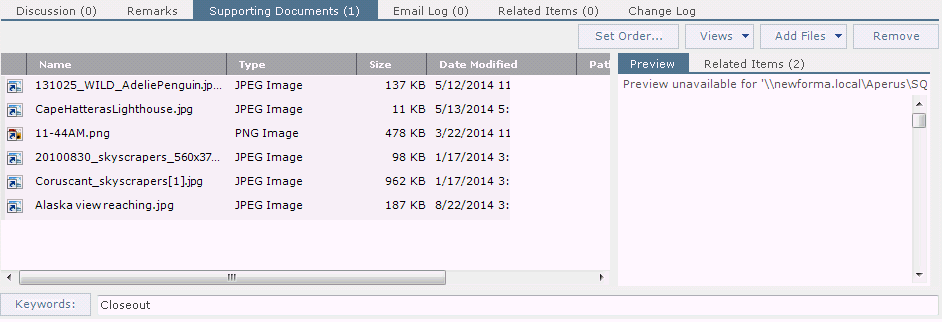
The output would look similar to the following example. Since there are
six images but only four are allowed per row in this example, the other
two are added to the next row:
● Punch list images are now inline on the same page instead of links to another page.
Reports
● Administrators
can now create a custom report
template for any contract
management workflow item that includes only the latest Description
of Contents. To create this report template, add the Contents
Current Parameter
Smart Markers for the fields you want to include in the report. the available
options are shown here:
Contents Current Parameter fields:
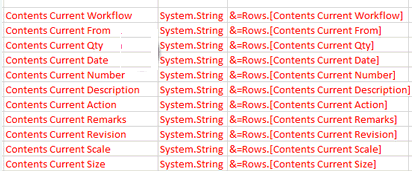
For example, to add the latest workflow, date, quantity, and description,
you would add the following Smart Markers to your report template:
● Smart Marker reference guides for creating custom reports are now available for most activity centers. See Smart Marker Field Reference Guides for Creating Custom Reports in Each Activity Center for a list of Microsoft Excel custom report spreadsheets containing available Smart Marker fields, as well as Smart Marker Report Query Definition Tab to add a Query Definition tab to your Excel spreadsheet report templates to specify how data is displayed in your custom reports.
● See field notes, project teams, and punch lists above for report improvements in those activities. See also Reports in the Eleventh Edition section below.
New and improved administration features in Project Center Eleventh Edition
Action items
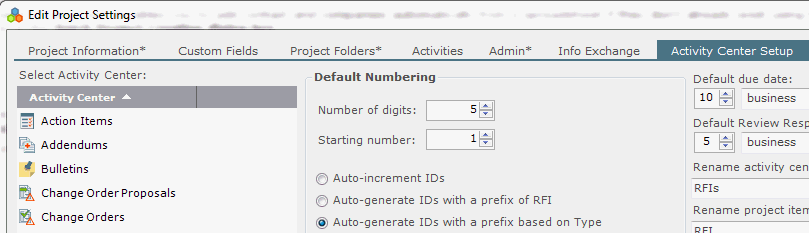
● You can now restart action item ID numbering based on the action item's Type by selecting the new Auto-Generate IDs with a Prefix Based on Type option for action items in the Activity Center Setup tab of the Edit Project Settings dialog box, as shown below. The type will be used as a prefix in the ID number, as shown in the next example below.
The Type column in the Action Items activity center is populated by the Name field from the Project Keyword List dialog box. The characters added to the ID field are populated from the Description field of the same dialog box.
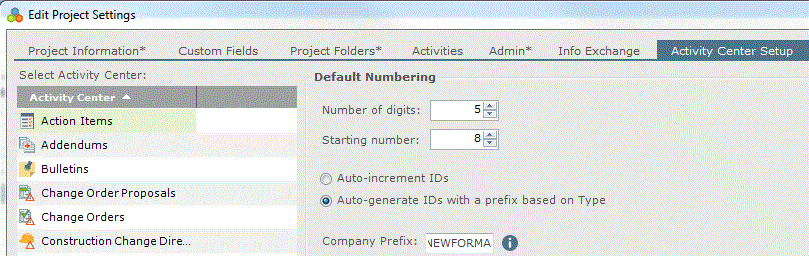
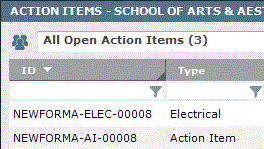
● If both the Auto-Generate IDs with a Prefix Based on Type option is selected and the Company Prefix field is filled in in the Edit Project Settings dialog box for action items (as shown above), the ID will look similar to the following (in this example, NEWFORMA is the company prefix and ELEC and AI are the descriptions of the types):
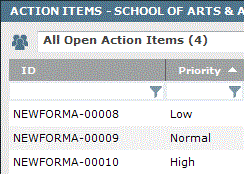
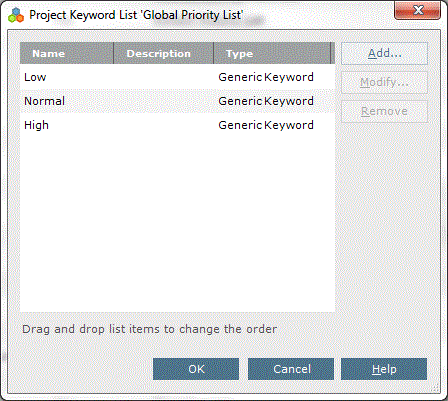
● The Priority column in the Action
Items activity center is now sorted by the order an administrator
sets it to appear in the Global Priority
List in the Project
Keyword List dialog box, as shown here. (It was prevciously done alphabetically.)
● The following new custom action item Excel report templates are available in the Action Item/Report Templates folder:
● Action Item Log - By Responsibility.xlsx: This report focuses on who is responsible for action items.
● Action Item Log - By Status.xlsx: This report focuses on the open, closed, and in-progress statuses of action items.
● Action Item Log - Open Items.xlsx: This report focuses on open action items.
● Action Item Log Report.xlsx: This report gives a general overview of action items and their statuses.
Building Information Management
Three new custom report templates have been added for BIM under the Report Templates folder on the Project Center Server: Building Elements Schedule.xlsx, Door Schedule.xlsx, and Window Schedule.xlsx, as shown here:
Daily reports
● You can now create report templates for daily reports that include data from the Observations, Description, Weather, Subcontractors, Internal Personnel, Visitors, and Equipment tabs. Click here to open a .TXT file containing all of the new SmartMarkers.
● Users no longer need a Contract Manager role to use daily reports.
Document Control
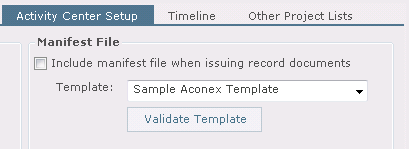
● Manifest files. Document control can now be configured to package the record documents (files) being issued and create a manifest file containing the metadata (title, number, revision, etc.) required to batch upload project documents to a third party project extranet. Additionally, the specified extranet can be automatically opened in your browser ready for you to upload the files. There are several steps to configuring the system to generate manifest files:
-
Set up manifest file templates. Manifest files use a template to generate their content. Newforma provides sample manifest files for some of the more familiar extranet sites, but you can create additional templates as needed.
-
Create a drag and drop transfer method for the extranet site. Part of the manifest file workflow is automatically displaying the extranet site users will be uploading files to. The extranet location can be defined in Project Center as a drag and drop destination. Once defined, the extranet site automatically appears on the desktop when users issue record documents.
-
Select the manifest file template. The final step is to configure the Document Control activity center to generate the manifest file. A new Manifest File section has been added to the Activity Center Setup tab in the Edit Project Settings dialog box when Document Control is selected. Select the appropriate template from the dropdown list.
Electronic Document Management Systems (EDMS)
Project Center now supports the following Electronic Document Management Systems: FileNet, ProjectWise, and SharePoint. Newforma's EDMS plug-in enables your EDMS to integrate seamlessly with Project Center. The new plug-in enables the files in your EDMS to show up in the Project Files activity center just like any other files, as well as any other areas that access files.
Form templates
● A Job
Title field for project managers is now available for form
templates. To add this field to a form template, add the following
merge fields:
«NFSectionStart:Project»
«NFField:ProjectManager:jobTitle»
«NFSectionEnd:Project»
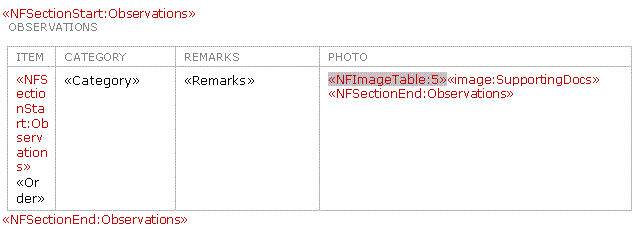
● You can now
set the number of columns in which to display image files in daily report,
site visit, and punch list forms. To configure the number of images
you want to display, add the new NFImageTable:n merge field
(where n is
the number of columns) to your form template, as shown in the following
example. In this case, five columns would be added to display five images
side-by-side:
● You can now
view the XML for an open form (accessed by clicking View
Form from most Tasks panels)
to see which fields are available in the form by pressing Ctrl-Shift-L.
To enable Ctrl-Shift-L, you must
set the SaveXmlForFormViewer registry
setting on your Project Center client machine to True,
as shown here:

Be aware that if you set it to Yes,
an XML file is created and saved to your Temp
folder every time a form is open.
● If you use the Send task for an RFI, the answer is now included in the form.
Miscellaneous
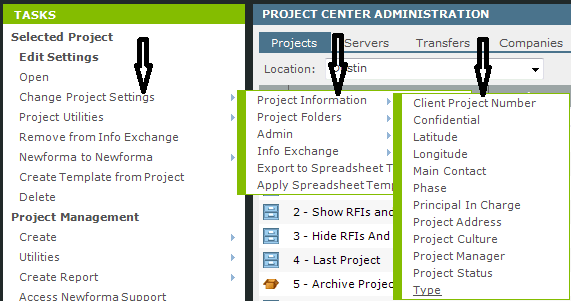
● Several new
tasks are available that enable you to change project settings quickly.
Select one or more projects, then click Change
Project Settings > Project Information > Task
from the Tasks panel of the Project
Center Administration activity center Projects tab, as shown here:
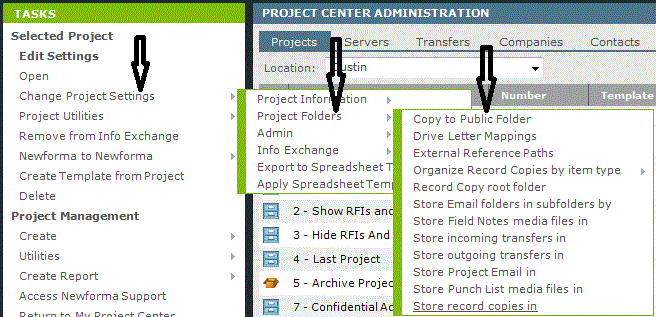
● Several new
tasks are available that enable you to modify project folder locations
quickly. Select one or more projects, then click Change
Project Settings > Project Folders > Task
from the Tasks panel of the Project
Center Administration activity center Projects tab, as shown here:
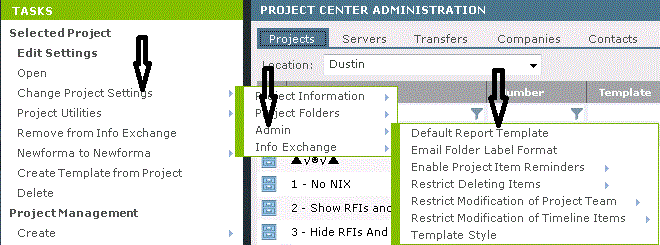
● Several new
tasks are available that enable you to modify project administration settings
quickly. Select one or more projects, then click Change
Project Settings > Admin > Task
from the Tasks panel of the Project
Center Administration activity center Projects tab, as shown here:
● In Project
Center, a new project-level setting has been added to the Info
Exchange tab of the Edit Project
Settings dialog box to allow global administrators to decide whether
or not user credentials are required for shared folder synchronization
schedules, as shown below. The option is selected by default. When enabled,
users are requred to enter their Windows domain username and password
when setting up synchronization schedules. If disabled, the Newforma Service
account is used for sychronization schedule updates.
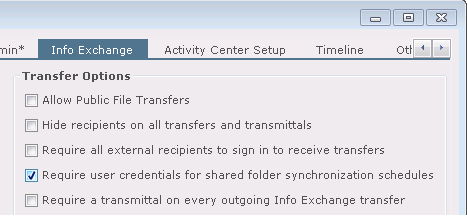
Require User Credentials for Shared Folder Synchronization Schedules is selected by default on all new and upgraded projects.
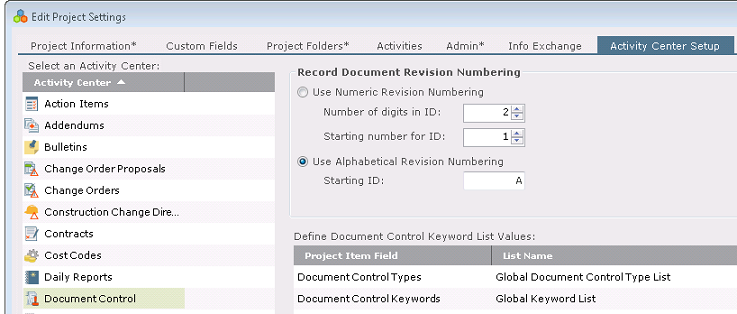
● A new project-level
setting is now available that allows administrators to set the record
document revision numbering to either a numeric or alphabetical scheme.
The new option is located on the Activity
Center Setup tab of the Edit
Project Settings dialog box when Document
Control is selected, as shown below. If you switch revision numbering
schemes after several record document revisions exist, the revision numbering
will restart. For example, the numeric revision numbering scheme is in
use and a record document has a revision number of 3. The revision numbering
scheme is then changed to alphabetical revision numbering. The next revision
number for the same record document will be A.
● Administrators can define custom record document package statuses using the new Global Record Document Package Status list.
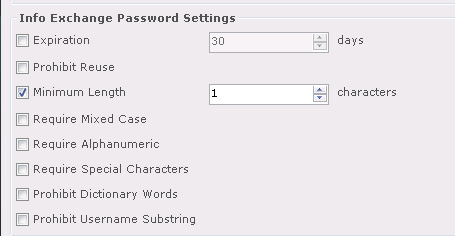
● The Project Center Administration activity
center Permission Sets tab has
been renamed the Security
tab. An Info Exchange Password Settings
section, shown below, has been added to allow global administrators
to configure password requirements.
● A Send Password Reset Instructions task has been added to the Project Center Administration activity center Contacts tab. Click to send password reset instructions to the selected Info Exchange contact. An email message is sent to the contact. This option is only available when an external contact is selected.
Newforma Work Services
Newforma Work Services (NWS) are a brand new feature designed to remove the need to have a Newforma Project Center Server in each remote office. These servers are a more powerful version of the existing light-weight Filter Servers that can be deployed on machines in remote offices without having to have multiple Project Center Servers installed across the company. Administrators can configure and monitor the NWSs from the Project Center Administration Activity Center Servers tab. Newforma Work Services perform the following tasks:
● Filtering (just like the Filtering Servers they replace)
● Scanning file systems for any file changes
● Rendering .DWG files
● OCRing .PDF files
● Summarizing email messages
Password Security
● Password security for Newforma Info Exchange has been enhanced to allow flexible definition of password requirements by global administrators for all users accessing Info Exchange. You can now set he following password requirements in any combination desired:
● Expiration dates
● Prevent users from reusing previous passwords
● Minimum character length
● Require a mix of upper and lowercase letters
● Require both numbers and letters
● Require at least one symbolic character
● Prevent users from creating passwords that are words in the English dictionary
● Prevent users from creating passwords that contain their username
● The Project Center Administration activity
center Permission Sets tab has
been renamed the Security
tab. An Info Exchange Password Settings
section, shown below, has been added to allow global administrators to
configure password requirements.
● If password requirements have changed since the last login, users are automatically directed to a Change Password page to reset their password to one that meets the new requirements. The requirements are listed on the page.
● When a password expires, users are sent an email with password reset instructions.
● Users no longer see their password in notification emails. Both the initial notification and the password reminder contain direct links to change their passwords. The link is only valid for two hours and can only be used once.
● The Remember Me option on the Info Exchange login screen has been changed to Remember Username. Passwords are no longer remembered and users must enter their password each time.
● A Send Password Reset Instructions task has been added to the Project Center Administration activity center Contacts tab. Click to send password reset instructions to the selected Info Exchange contact. An email message is sent to the contact. This option is only available when an external contact is selected.
Project Center Server
● A folder called
Report Templates is now automatically
added to all activity center folders on the Project
Center Server under Templates\Eleventh
Edition, as shown in the following example. A readme.txt file explaining
how to add your custom report
templates to the folder has been added to each folder. After you create
your custom reports, you can Configure
Project Center to Use Specialized Report Templates in Activity Centers.
After doing so, you can access the new report templates by opening the
appropriate activity center and clicking the Create
a Report task to open the Create
a Report dialog box. The new template will be listed in the Specialized Report drop-down list.
Project templates
Project templates are now stored and maintained in the Project Center Server database, which enables easier access and administration to the project templates, and ensures they are upgraded along with projects whenever Project Center is updated to the latest version.
● Project templates are now SQL-based and stored in the database.
● Project templates
are now listed and accessible from the Project
Center Administration activity center Projects tab, and they have
their own tasks, as shown here:
● You can now create SQL-based project templates in the following ways:
● Manually, using
the Create > Create Template
task from the Project
Center Administration activity center Projects tab, which opens the
Create Template
dialog box, and choosing the By Manually
Entering Template Information, as shown here:
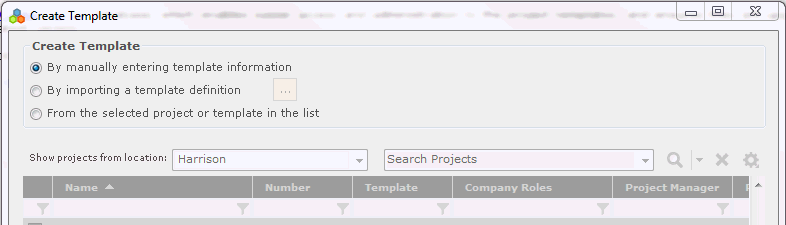
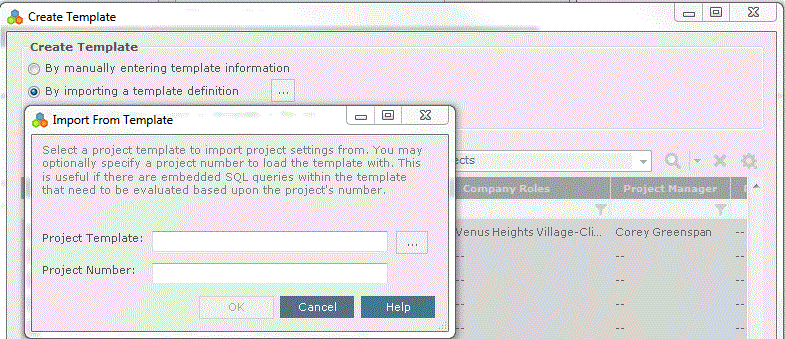
● By
importing from a Microsoft Excel spreadsheet by clicking the Create
> Create Template task from the Project
Center Administration activity center Projects tab, which opens the
Create Template dialog box, and
choosing the By Importing a Template
Definition option, as shown here:
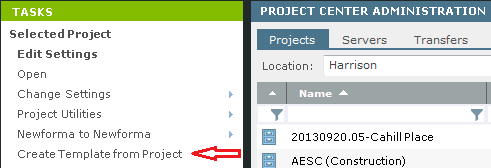
● From
an existing project using the Create
Template from Project task from the Project
Center Administration activity center Projects tab (shown below),
which opens the Create
Template dialog box. Most of the data from the project is copied over
to the new template except for the name, description, and project folders.
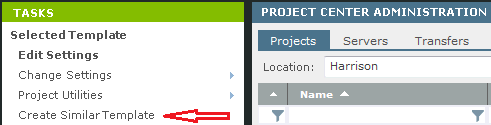
● From
another project template using the Create
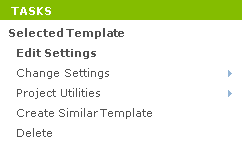
Similar Template task in the Project
Center Administration activity center Projects tab (shown below),
which opens the Create
Template dialog box. Most of the data from the selected template is
copied over to the new template except for the name and description.
● You can convert
your existing Excel templates to the new SQL-based format to the new format
and use them from then on to create your new projects directly in the
Project Center Administration activity
center Projects tab. You can convert them by clicking the Create > Create Template task
from the Project
Center Administration activity center Projects tab, which opens the
Create Template dialog box, and
choosing the By Importing a Template
Definition option. Locate and import the Excel template using the
Import from
Spreadsheet Template dialog box, as shown here:
● New fields added to the template:
● Project folder subfolder structure creation - This applies to Project Folders tab of a project's settings. The value can be set to True or False. The value is set to False by default. This setting allows for the creation of subfolders inside the primary project folder. This setting is only used for batch project creation imports.
● Require credentials on synchronization schedule - This applies to the Info Exchange tab of a project's settings. The value can be set to True or False. It requires the Windows username and password to be entered when defining a shared folder synchronization schedule.
● Action Item Type -This applies to the Activity Center tab of a project's settings. This has been added to accommodate the new Global Action Item Type keyword list.
● Record Document Package Status - This applies to the Activity Center tab of a project's settings. This has been added to accommodate the new Global Record Document Package Status keyword list.
● Your existing Excel templates are still supported, but will not be upgraded automatically. Once you upgrade them, they will be updated automatically in future Project Center releases.
● Templates are pinned to a specific Project Center Server; they are replicated across servers, and you can back them up and restore them like projects.
Projects
● Batch project creation has been vastly improved and simplified. You can now batch create projects using the Batch Project Creation dialog box to define, modify, import, and create large numbers of Project Center projects using project numbers to link them to their respective project folders.
● The new batch project creation also enables you to add contact and companies automatically from a spreadsheet if they don't already exist using the Auto Create: Contacts and Companies options in the Batch Project Creation dialog box.
Punch lists
● You can now
set the number of columns in which to display image files in daily report,
site visit, and punch list forms.
To configure form templates to display the number of images you
want, add the new NFImageTable:n merge field
(where n is
the number of columns), as shown in this example, in which five columns
would be added to display five images side-by-side:
● You can now restart punch list ID numbering based on the Type field by selecting the new Auto-Generate IDs with a Prefix Based on Type option for punch lists in the Activity Center Setup tab of the Edit Project Settings dialog box). The type will be used as a prefix in the ID number.
● You can now restart punch list ID numbering based on the punch list's Type by selecting the new Auto-Generate IDs with a Prefix Based on Type option for punch lists in the Activity Center Setup tab of the Edit Project Settings dialog box, as shown here. The type will be used as a prefix in the ID number, as shown in the next example below.
The Type column in the Punch List activity center is populated by the Name field from the Project Keyword List dialog box. The characters added to the ID field are populated from the Description field of the same dialog box.

Reports
● A folder called
Report Templates is now automatically
added to all activity center folders on the Project
Center Server under Templates/Eleventh Edition, as shown
below. A readme.txt file explaining how to add your custom report
templates to the folder has been added to each folder. After you create
your custom reports, you can Configure
Project Center to Use Specialized Report Templates in Activity Centers.
After doing so, you can access the new report templates by opening the
appropriate activity center and clicking the Create
a Report task to open the Create
a Report dialog box. The new template will be listed in the Specialized Report drop-down list.
● Related to the feature above, the following five new custom submittal Excel report templates are available in the Submitttal/Report Templates folder:
● Submittal Log Report.xlsx: This report focuses on managing subcontractors' initial submissions and final responses, not the design review cycle.
● Submittal Log Report - By Status.xlsx: This report focuses on managing subcontractors' initial submissions and final responses; it gives a quick view by submittal status to see what is owed, in review, and closed.
● Submittal Log Report - By Resp Company.xlsx: This report focuses on what items specific subcontractors owe.
● Submittal Log Report with Design.xlsx: This report focuses on subcontractors' responsibilities, including a summary of design review.
● Submittal Design Review Report.xlsx: This report focuses on detailed tracking of submittals currently in the review cycle to measure the responsiveness of the design team. Accountability is based on the full review cycle, from the first forward to the final review response.
● Related to the feature above, the following new custom RFI Excel report templates are available in the RFI/Report Templates folder:
● RFI Log Report.xlsx: This report focuses on making sure RFIs are answered in a timely manner.
● RFI Log Report QA - By Status.xlsx: This report shows the text of the questions and answers.
● RFI Design Review Report.xlsx: This report focuses on the turnaround time of the design team for items in the design cycle.
● Related to the feature above, the following new custom action item Excel report templates are available in the Action Item/Report Templates folder:
● Action Item Log - By Responsibility.xlsx: This report focuses on who is responsible for action items.
● Action Item Log - By Status.xlsx: This report focuses on the open, closed, and in-progress statuses of action items.
● Action Item Log - Open Items.xlsx: This report focuses on open action items.
● Action Item Log Report.xlsx: This report gives a general overview of action items and their statuses.
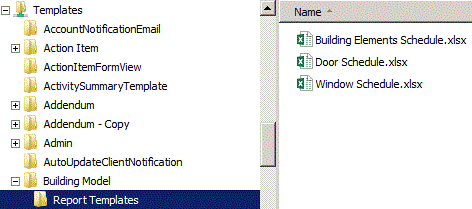
● Related to the feature above, the following new custom BIM Excel report templates are available in the Building Model/Report Templates folder:
● Building Elements Schedule.xlsx: This report is a general BIM report.
● Door Schedule.xlsx: This report focuses on doors.
● Window Schedule.xlsx: This report focuses on windows.
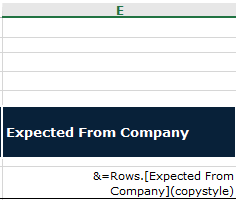
● An Expected
From Company field, which enables you to track the company a submittal
is expected from, is now available for custom reports. To add this field
to an Excel report template, add the SmartMarker as shown in this example:
● Two new reports
have been added and are accessible from the Tasks
panel of the Project
Center Administration Activity Center Servers tab:
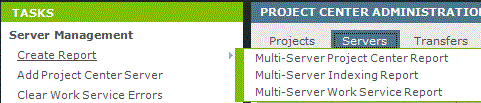
● The Multi-Server Indexing Report provides statistics on the selected indexing servers.
● The Multi-Server Work Service Report provides statistics on the selected work services.
The Multi-Server Project Center Report is still available.
● Four new fields are available that you can add to custom contract management reports: All Forwarded To Company, All Forwarded To Name, First Forward To Name, and First Forward To Company.
● All Forwarded to Company contains a list of all company names that the contract management item has been forwarded to.
● All Forwarded To Name contains a list of all of the names of contacts that the contract management item has been forwarded to.
● First Forward To Name contains a list of the names of contacts that the contract management item was first forwarded to.
● First Forward To Company contains a list of company names that the contract management item was first forwarded to.
● Formatting:

● Last
Action Type and Last Action Action
are now available as separate fields for custom reports
for contract management
items (they were previously appended together in reports). To add these
fields to an Excel report template, add the SmartMarkers as shown here:
Last Action Type &=Rows.[Last
Action Type]
Last Action Action &=Rows.[Last Action Action]
● Last
Review Action, Last Review Response
Action, Last Review Response
Company, Last Review Response
Date, and Last Review Response
Name are now available for custom reports
for contract management items. To add these fields to an Excel report
template, add the SmartMarkers as shown here:
Last Review Action &=Rows.[Last
Review Action]
Last Review Response Action &=Rows.[Last
Review Response Action]
Last Review Response Company &=Rows.[Last
Review Response Company]
Last Review Response Date &=Rows.[Last Review Response Date]
Last Review Response Name &=Rows.[Last
Review Response Name]
● You can now create report templates for site visits that include the data from the Observations tab. Click here to open a .TXT file containing all of the new SmartMarkers.
● You can now create report templates for daily reports that include data from the Observations, Description, Weather, Subcontractors, Internal Personnel, Visitors, and Equipment tabs. Click here to open a .TXT file containing all of the new SmartMarkers.
● You can now
add filtering, sorting, and grouping fields to report templates. To filter,
sort, or group, you must add a tab called Query
Definition to your Excel template, and then add the <group>,
<sort query table>, and
<filter query table> fields.
You can group by one field, but can filter and sort by multiple fields.
You can apply these features to any activity center that uses custom reports.
The following example shows grouping, filtering, and sorting added to
the new Query Defintion tab:

The following shows an example using filtering, sorting, and grouping:
RFIs
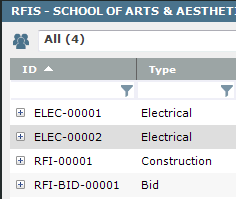
● You can now restart RFI ID numbering based on the RFI's Type by selecting the new Auto-Generate IDs with a Prefix Based on Type option for RFIs in the Activity Center Setup tab of the Edit Project Settings dialog box, as shown here. The type will be used as a prefix in the ID number, as shown in the next example below.
The Type column in the RFIs activity center is populated by the Name field from the Project Keyword List dialog box. The characters added to the ID field are populated from the Description field of the same dialog box.
● The following new custom RFI Excel report templates are available in the RFI/Report Templates folder on the Project Center Server:
● RFI Log Report.xlsx: This report focuses on making sure RFIs are answered in a timely manner.
● RFI Log Report QA - By Status.xlsx: This report shows the text of the questions and answers.
● RFI Design Review Report.xlsx: This report focuses on the turnaround time of the design team for items in the design cycle.
Site visits
● You can now
set the number of columns in which to display image files in daily report,
site visit, and punch list forms.
To configure form templates to display the number of images you
want, add the new NFImageTable:n merge field
(where n is
the number of columns), as shown in this example, in which five columns
would be added to display five images side-by-side:
● You can now create report templates for site visits that include the data from the Observations tab. Click here to open a .TXT file containing all of the new SmartMarkers.
● Users no longer need a Contract Manager role to use site visits.
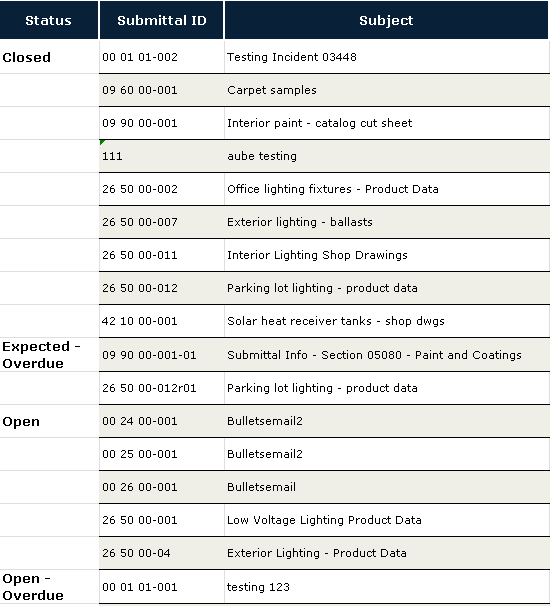
Submittals
● An Expected
From Company field, which enables you to track the company a submittal
is expected from, is now available for custom reports.
To add this field to an Excel report template, add the SmartMarker as
shown in this example:
● The following five new custom submittal Excel are available in the Submitttal/Report Templates folder on the Project Center Server:
● Submittal Log Report.xlsx: This report focuses on managing subcontractors' initial submissions and final responses, not the design review cycle.
● Submittal Log Report - By Status.xlsx: This report focuses on managing subcontractors' initial submissions and final responses; it gives a quick view by submittal status to see what is owed, in review, and closed.
● Submittal Log Report - By Resp Company.xlsx: This report focuses on what items specific subcontractors owe.
● Submittal Log Report with Design.xlsx: This report focuses on subcontractors' responsibilities, including a summary of design review.
● Submittal Design Review Report.xlsx: This report focuses on detailed tracking of submittals currently in the review cycle to measure the responsiveness of the design team. Accountability is based on the full review cycle, from the first forward to the final review response.
Templates
See Form templates, Reports, or Project Templates above.
Table of Contents
Index
Search (English only)
Back