


Newforma Contact Directory Quick Reference Guide
This topic provides a reference for the Newforma Contact Directory.
Click here to download a PDF of the reference guide.
Purpose
The Newforma Contact Directory gives users access to the central list of companies and contacts in the Project Center Server database outside of any project team. Users can also access and send mail merged form letters or emails to any contact from the Contact Directory.
Content or Global Administrator permission is needed to modify or add contacts and companies in the directory, add or update form letters, and modify keyword lists.
Audience
Internal project team members.
Key Features
● View company and contact information in Newforma Project Center, from Outlook via the legacy Project Center Add-in for Microsoft Outlook, as a stand-alone application on your desktop, and via the Info Exchange website.
● Track notes and project assignments on contacts and companies.
● Use form letters to produce general mailings by merging contact information into your own customized Word merge templates.
● Generate emails to selected contacts.
● Allow Content and Global Administrators to modify keyword lists from the Contact Directory.
Tasks covered
● Access the Newforma Contact Directory
● Generate form letters or emails
To access the Newforma Contact Directory
1. From
within Project Center, click the Newforma
Contact Directory button on the toolbar.
![]()
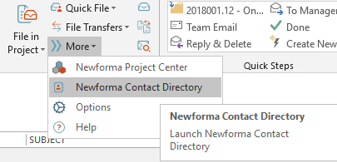
2. From
Outlook, select Newforma Contact Directory
under More in the legacy Outlook
Add-in..
To add a company
You must be a Content or Global Administrator to add a company.
1. Before adding a new company, use the column filters to make sure the company does not already exist. If it does not exist, proceed to the next step.
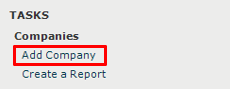
2. To add
a company to the Newforma Contact Directory,
click on the Companies tab and click Add Company from the
Tasks panel.
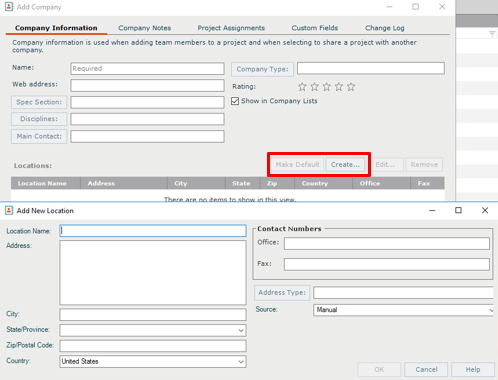
3. Enter the company Name and other information you want to track in the Add Company dialog box.
4. Click
Create in the Locations
section to add at least one address location. Multiple locations can be
added if needed. If there is more than one location, the default location
is shown in bold. To change the default location, select the location
and click Make Default.
5. On the Company Notes tab click Add to add notes and relate them to a project, if desired.
6. The Project Assignments tab displays any projects on which the company has project team members or is assigned a role. This tab is empty for a new company.
7. Click OK to create the company.
To add a contact
You must be a Content or Global Administrator to add a contact. If you are adding multiple contacts for a company, it is best to add the company record first, then add the contacts.
1. Before adding a new contact, use the column filters to make sure the contact does not already exist. If it does not exist, proceed to the next step.
2. To add
a contact to the Newforma Contact Directory,
select the Contacts tab and click Add Contact from the Tasks panel.

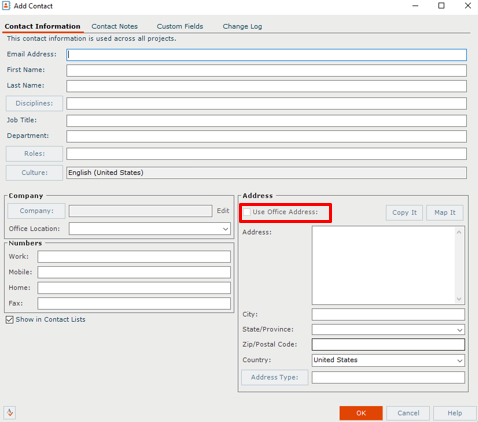
3. Enter the Email Address, First Name, Last Name, and other information you want to track in the Add Contact dialog box.
4. In the
Company section, click Company
to associate the contact with an existing company. Select the location
for the contact from the Office Location
dropdown. Select the Use Office Address checkbox if you want the
address from the selected office location to be used. Otherwise, you can
type in an address.
5. Select the Show in Contact Lists checkbox if you want this contact to be visible in contact dialog boxes and lists through Project Center.
6. Click OK to create the contact.
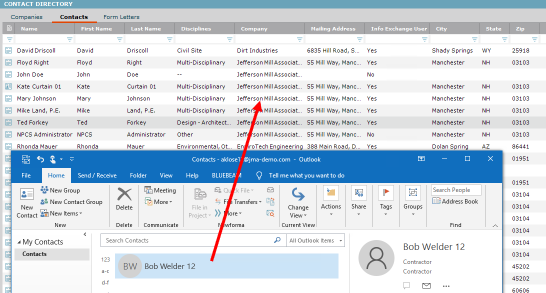
To add contacts from Outlook
Another way to add contacts is to drag and drop them from Outlook (one
at a time or multiples). Once added, click Modify Contact
from the Tasks panel to edit the
information if needed (example: edit the company with which they are associated).
You can also select Add to Outlook Contacts from the Tasks
panel if you want to copy a contact from Newforma back to Outlook.
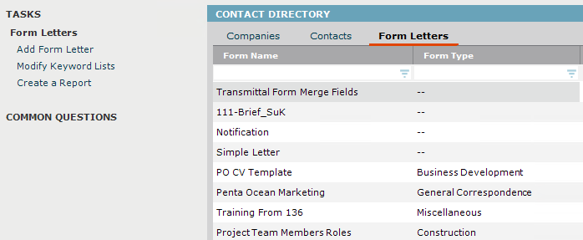
To generate form letters or emails
Use the Form Letters tab to generate form letters or emails to one or multiple contacts listed in the directory.
If you have a Content Administrator’s permissions you can also add,
modify or remove form letters. Form letters are global, so forms that
are added on a Project Center Server are replicated to all other Project
Center servers in the enterprise, which allows for standardized form letters.
Newforma uses Microsoft Word as the editor for forms used within Project
Center and utilizes the mail merge engine to produce a completely customized
look and feel for all Project Center forms. Please refer to Modify
the Supplied Microsoft Word Templates or Create a New Word Template
for adding or modifying form letter templates. Refer to Newforma Help
for detailed instructions on adding
new form letters to this tab.
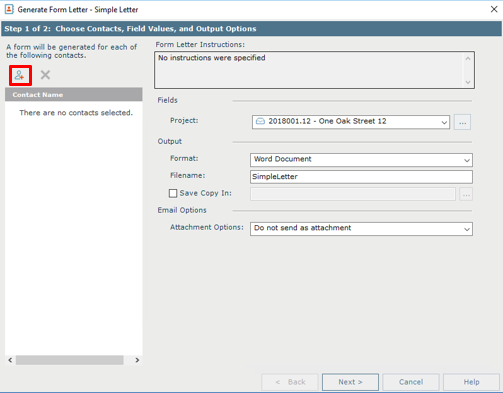
1. To generate
form letters or send email messages, select the form letter you want to
generate. Click Generate Form Letter from the Tasks panel.
The Generate
Form Letter dialog box opens. Click the Contacts icon
to select which contact(s) you want to send the form letter or email message
to.
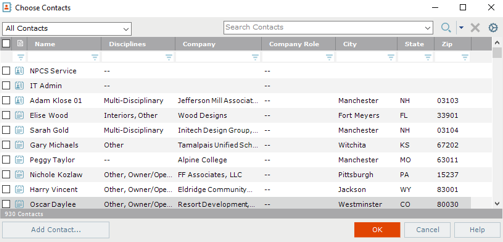
2. The Choose
Contacts dialog box opens. Choose from All Contacts or
click the dropdown to select from only internal or external contacts.
Continue to filter the list using any of the columns to find the contacts
you want, then select them all by filling in the checkbox at the top or
select each contact’s checkbox as needed. Click OK.
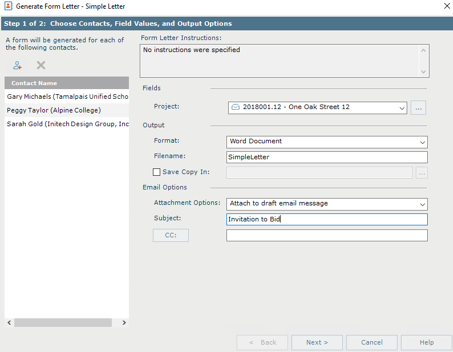
3. Continue
to fill out the information needed on the Step 1 dialog box, including
specific information under the Fields section for project information,
company logo and dates if needed. In the Output section, choose
the letter format by selecting either Word Document, PDF Document
or Email Message from the Format dropdown. See below for
additional details on each of the output options.
Create a Word Document or PDF
If you select Word
Document or PDF Document, modify the default Filename
as desired and indicate if and where you want to save a copy of the output.
If you are not emailing the document, be sure to select Do Not Send
as Attachment in the Attachment Options field, located under
the Email Options section. Click Next.
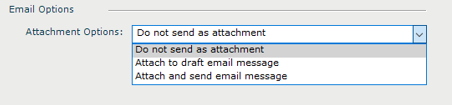
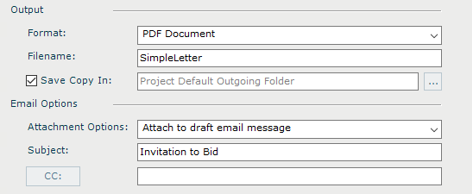
Emai with Attachment
If you want to send an email with an attachment, in the Output section, choose either the PDF Document or Word Document format. In the Email Options section select either Attach to Draft Email Message or Attach and Send Email Message. Add a subject and optionally indicate who to CC. Click Next.
Recommendation:
Choose Attach to Draft Email Message if you want to add text to
the body of the email before sending. The body of the email will be blank
by default with the document attached. Note that choosing Attach and
Send Email Message will not allow you to edit the email before it
is sent.
Email without Attachment
If you are sending
only an email with no attachment, the body of the form letter is put into
the email. Select the Email Message as the format in the Output
section, then select the Email Options as desired. Click Next.
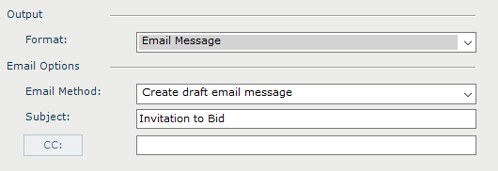
Recommendation: Choose Create Draft Email Message if you want to see the email before sending. Note that choosing Send Email Message will not allow you to edit the email before it is sent.
4. On the
Step 2 dialog select one of the actions then click the Preview
Action button to see a preview.

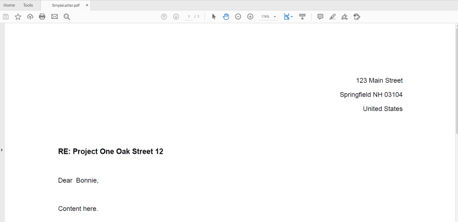
5. For example,
selecting Create PDF Document shows a preview of the PDF document
as shown below. Selecting Attach to Draft Email Message shows a
preview of the email.
6. Click Finish to finish the process. If Word documents or PDFs are created, they appear before you decide to print and/or save. If you chose to generate draft emails (recommended), they are created and you can edit before sending each one.
Important: If you choose Send Email Message or Attach and Send Email from the Email Options, for each email created you will need to click Confirm Send and also click Allow when the Microsoft Outlook dialog appears asking you to confirm that you want to send each email message.
To modify keyword lists
If you have a Content Administrator’s permissions you can also modify keyword lists from the Newforma Contacts Directory.
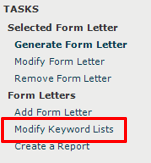
1. Click
on the Form Letters tab and select Modify Keyword Lists
from the Tasks panel.
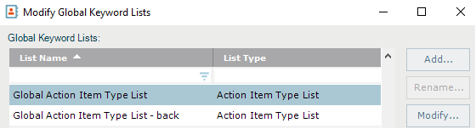
2. In the
Modify
Global Keyword Lists dialog box, select the global keyword list you
want to edit and click Modify to open the list.
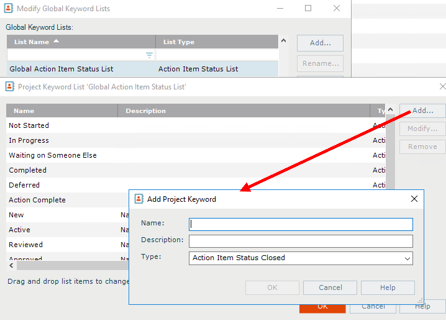
3. In the Project Keyword List dialog box, click Add to add new keywords. Enter a Name, Description, and other information in the Add a Project Keyword dialog box as needed and click OK. Click and drag list items to reorder, or sort by clicking on a column heading if desired. Click OK when done.
4. To modify an existing keyword, select the keyword and then click Modify. Click OK in the Modify Project Keyword dialog box when done.
5. To delete
an existing keyword, select the keyword and then click Remove.
Click OK when done.
6. When you are done modifying the selected keyword list, click OK in the Modify Global Keyword Lists dialog box to exit.
Table of Contents
Index
Search (English only)
Back