

Use the Newforma Model Viewer
Use the Newforma Model Viewer Powered by VEO to view building information models associated with project items.
Newforma Model Viewer provides view-only access to models and linked views for external users. External users cannot create linked model views.
If you do not have Newforma Model Viewer installed, please refer to Newforma Model Viewer Setup and Workflow for more information.
If you are looking for Help on the Newforma Web Viewer, which enables you to view and mark up image files, please click here.
Click the following links to go to information on the Newforma Model Viewer action you want to perform (or scroll down the page).
The following actions are available to all users:
● View a model or linked view from a project item
● Navigate in the Newforma Model Viewer
● Customize mouse and keyboard settings
● Set measurement units for the Newforma Model Viewer
● Measure distances between objects in the model
● Utilize sectioning to isolate objects in the model
● Newforma Model Viewer panel help
In addition, Project Center (internal) users can perform the following tasks:
● Create view to link to a master preset
● Link master presets to Project Center items
To view a model or linked view from a project item
1. To view
a model or linked view click the ![]() icon from any of the following locations:
icon from any of the following locations:
● The Model Views log
● The Related Items popup window
● The Related Items tab
Alternately you can click the  button from any page on which it appears to view a model or linked view.
2. The Model View dialog
box, shown here, appears:
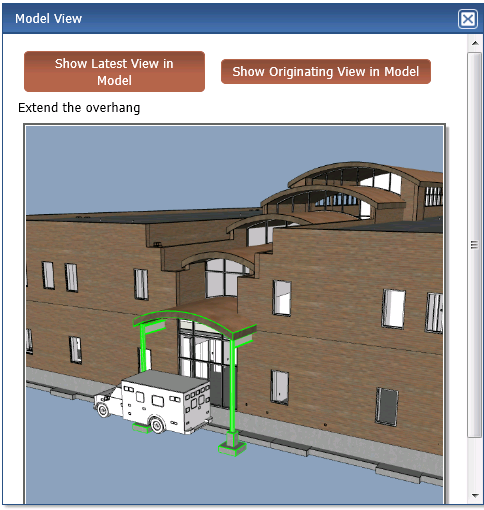
3. Select the version of the model you wish to view in Newforma Model Viewer:
● To see the latest view of the specified model, click Show Latest View in Model.
● To see the view that was used to originate this model view, click Show Originating View in Model.
To select the latest or originating view using the
button, click the arrow on the right side of the button to select Show Latest View in Model or Show Originating View in Model.
Clicking Show in Model defaults
to the last view selection.
4. The Starting Newforma Model Viewer popup,
shown below, appears. Click Continue
to continue to launch the viewer.
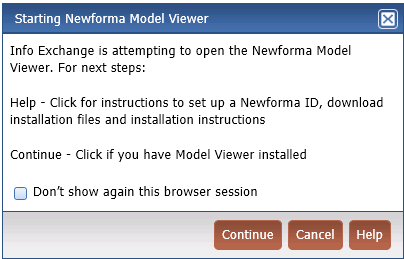
If you have not yet installed the Newforma Model Viewer, click the Help button in the popup to install and set up the viewer.
If you do not want to see the popup each time you view a model, select the Don't show again this browser session check box.
5. A warning message appears asking if you want to allow this website to open a program on your computer. Click Allow to continue.
If you do not want to see the message again, clear the Always ask before opening this type of address checkbox.
6. A security message appears asking if you want to allow the Model Viewer to open web content on your computer. Click Allow to continue to the Model Viewer login screen.
If you do not want to see the message again, select the Do not show me the warning for this program again checkbox.
7. If this
is the first time you have launched the model viewer in the current session,
the VEO login screen, shown here,
appears. Your Newforma ID user name appears in the User
field. The selected company's name appears in the Account
field.

8. Enter your Newforma ID password in the Password field and click Login to continue.
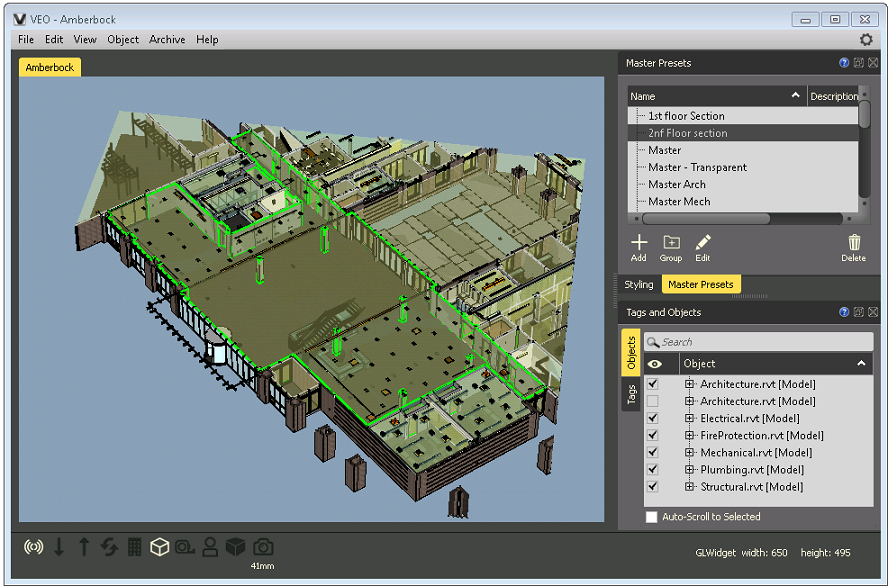
9. The viewer
launches and displays the selected model.
To view spaces in model
1. To view
a space click the ![]() icon from any of the following locations:
icon from any of the following locations:
● The Space Name column in the Punch Lists log
● The Space field in the Punch List Item page
● The Name column in the Spatial Index log
Alternately you can click the  button from any page on which it appears to view a space.
When launching Newforma Model Viewer for spaces, the viewer automatically displays the originating view.
2. The Starting Newforma Model Viewer popup,
shown below, appears. Click Continue
to continue to launch the viewer.
If you have not yet installed the Newforma Model Viewer, click the Help button in the popup to install and set up the viewer.
If you do not want to see the popup each time you view a model, select the Don't show again this browser session check box.
3. A warning message appears asking if you want to allow this website to open a program on your computer. Click Allow to continue.
If you do not want to see the message again, clear the Always ask before opening this type of address checkbox.
4. A security message appears asking if you want to allow the Model Viewer to open web content on your computer. Click Allow to continue to the Model Viewer login screen.
If you do not want to see the message again, select the Do not show me the warning for this program again checkbox.
5. If this
is the first time you have launched the model viewer in the current session,
the VEO login screen, shown here,
appears. Your Newforma ID user name appears in the User
field. The selected company's name appears in the Account
field.
6. Enter your Newforma ID password in the Password field and click Login to continue.
7. The viewer
launches and displays the selected space.
To navigate in the Newforma Model Viewer
Use the following commands to navigate in the Newforma Model Viewer:
● Rotate the view by pressing and holding the left mouse button.
● Pan the view by pressing and holding the middle mouse button.
● Zoom in / out by pressing and holding the right mouse button and dragging the mouse. Alternately, you can use the mouse wheel to zoom in / out.
● Double-click on an object to zoom into it and center it in the view.
When you double-click on an object to zoom into it, a new center of rotation is set based on the object.
● Select by holding down the ALT key while picking or using a selection window.
Objects located beyond transparent objects cannot be selected in this manner.
● Hold ALT and Shift to pick multiple objects.
● Turn off selected object visibility by pressing F8.
● Turn on selected object visibility by pressing F7.
● Deselect all currently selected objects by pressing F6 or Object > Selection > Deselect All.
● Temporarily Isolate a section by toggling the Tab key.
● Press H to go to the home or initial model view. This is helpful if you become disoriented in the model.
When working in first person mode, hold down the Ctrl key to use the mouse navigation commands.
You can customize the Newforma Model Viewer mouse and keyboard settings to better fit your needs. For more information, view the To customize mouse and keyboard settings section below.
To customize mouse and keyboard settings
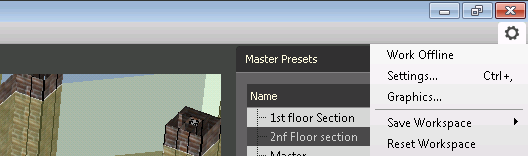
1. Click
the ![]() icon in the upper right corner of the viewer
window, shown here, to access the drop-down menu, and click Settings.
icon in the upper right corner of the viewer
window, shown here, to access the drop-down menu, and click Settings.
2. In the
Settings dialog, shown below,
click on the Mouse/Keyboard Mappings
tab.
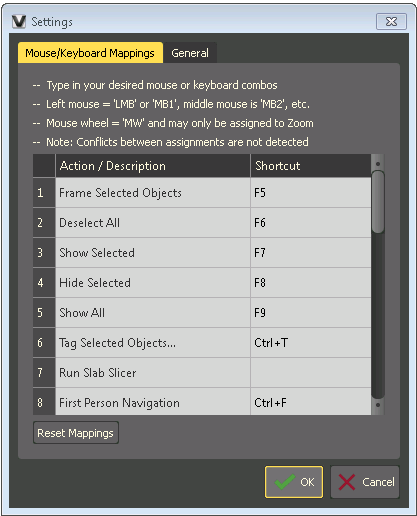
3. Click in the Shortcut field of the action you want to change the mouse or keyboard settings for. Type the new command combination in the Shortcut field. When you are finished, click OK to save your changes.
To improve navigation with a wheel mouse, it is recommended that users familiar with Revit change the mappings for the following actions:
● 21 - Rotate Camera: change to Shift+RMB
● 22 - Select Object: change to LMB
● 25 - Zoom Camera: change to MW
To set measurement units for the Newforma Model Viewer
1. Click
the ![]() icon in the upper right corner of the viewer
window, shown here, to access the drop-down menu, and click Settings.
icon in the upper right corner of the viewer
window, shown here, to access the drop-down menu, and click Settings.
2. In the
Settings dialog, shown below,
click on the General tab.
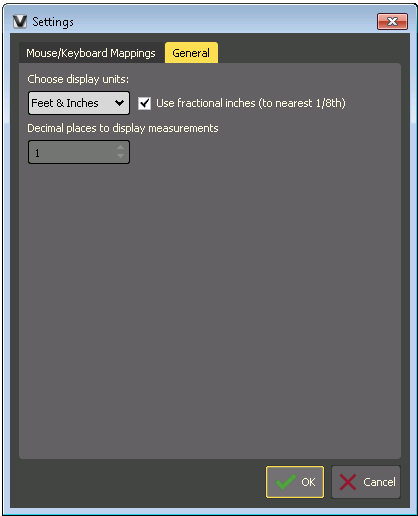
3. Select Meters or Feet and Inches from the Choose Display Units drop-down list.
You can control the precision of the measurement information displayed. When Feet and Inches is selected, select the Use Fractional Inches (to Nearest 1/8th) to display measurements to an eighth of an inch. When Meters is selected, set the number of decimal places to display in the Decimal Places to Display Measurements field.
4. Click OK to save your changes.
The selected units are displayed in the Sectioning and Measurements panels.
To measure distances between objects in the model
1. If you
do not already have the Measurements
panel, shown below, open, click View>Measurement
to access it.
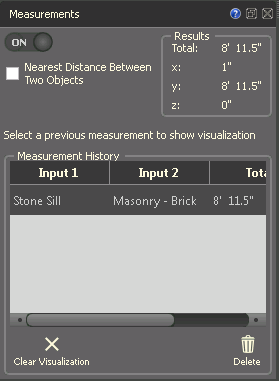
2. Slide the On/Off toggle at the top of the Measurements panel to On to turn on measuring.
You can also click the ![]() icon
in the notification tray in the lower left corner of the window to toggle
measurements on and off. To open the Measurements
panel, right click on the Measuring
icon and select Measurement Panel
from the popup menu.
icon
in the notification tray in the lower left corner of the window to toggle
measurements on and off. To open the Measurements
panel, right click on the Measuring
icon and select Measurement Panel
from the popup menu.
3. Left click on the measurement starting point with the crosshair cursor. The selected object is highlighted in yellow.
4. Move the mouse around to view various distances. The end point objects are also highlighted in yellow.
5. Click
on the desired end point. The final measurement is displayed in the model,
as shown below, and the measurement is added to the Measurement
History section of the Measurements
panel.
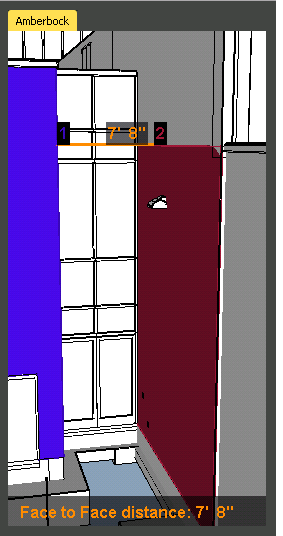
The starting point displays in blue; the end point displays in red.
To calculate the nearest distance between any two selected objects, select the Nearest Distance Between Two Objects checkbox.
6. Continue measuring as needed.
7. To return to a measurement, click on it in the Measurement History section.
The Measurement History is only retained for the current session.
To utilize sectioning to isolate objects in the model
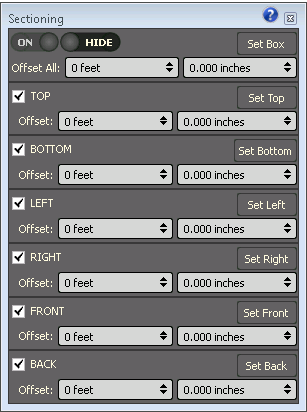
1. If you
do not already have the Sectioning panel,
shown below, open, click View>Sectioning
to access it.
You can also click the ![]() icon in
the notification tray in the lower left corner of the window to toggle
sectioning on and off. To open the Sectioning
panel, right click on the Sectioning
icon and select Sectioning Panel
from the popup menu.
icon in
the notification tray in the lower left corner of the window to toggle
sectioning on and off. To open the Sectioning
panel, right click on the Sectioning
icon and select Sectioning Panel
from the popup menu.
2. Slide the On/Off toggle at the top of the Sectioning panel to On to turn on the sectioning planes. All selected sectioning planes (TOP, BOTTOM, LEFT, RIGHT, FRONT and BACK) are now visible. To view a sectioning plane, position your cursor over the desired section in the Sectioning panel.
To show all planes simultaneously, slide the Show/Hide toggle to Show.
3. To move the face of any section, place your cursor over the desired section in the Sectioning panel and use the mouse wheel to increase or decrease the Offset value. You can also type a value directly in the Offset field.
● Each mouse wheel click changes the Offset value by one unit of measurement (meters or feet).
● If you hold down the ALT key while using the mouse wheel, each click changes the Offset value by .1 meters or 1.2 inches.
Using the mouse wheel while positioned over the area containing the On/Off and Show/Hide toggles changes the Offset All value.
4. Project Center (internal) users can save sectioning as part of a master preset, if desired. See To Create a New Master Preset below for more information.
To access Newforma Model Viewer panel help
1. Click
on the ![]() icon in a panel or dialog box to access
panel-specific help.
icon in a panel or dialog box to access
panel-specific help.
2. Click anywhere outside the help pop-out to close it.
To create a view to link to a Master Preset
You can save views you want to reuse as master presets within the Newforma Model Viewer.
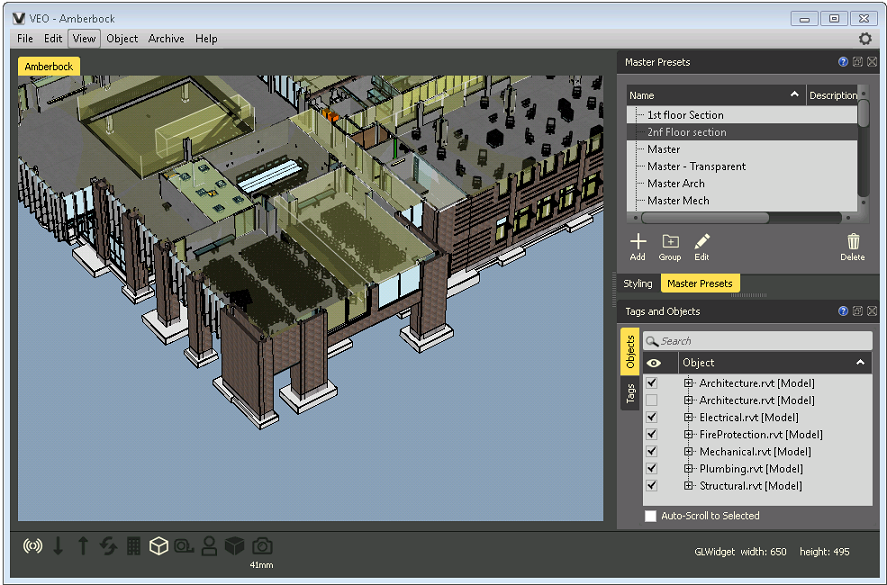
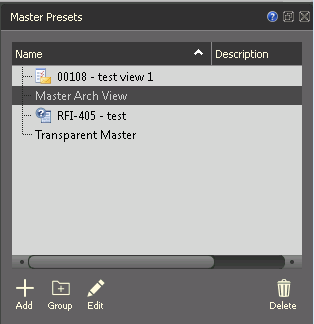
1. If you
do not already have the Master Presets
panel, shown below, open, click View>Master
Presets to access it.
2. Click
Add in the Master
Presets panel to open the Master
Preset Editor dialog box, shown here:
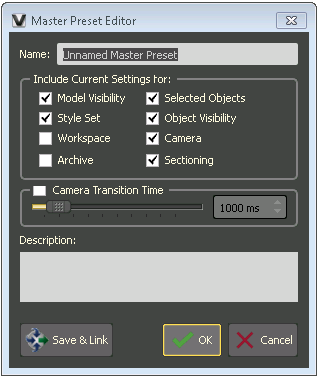
3. Enter a name for the master preset.
4. Select the checkboxes for the settings you wish to include from the current view.
It is recommended that you do NOT include current settings for Workspace.
5. Enter any additional information in the Description field as needed and click OK to save the master preset.
To link master presets to Project Center items
1. Open the Master Preset Editor dialog box in one of the following ways:
● Create a new master preset by clicking New Master Preset in the Master Presets panel.
● Right click on an existing master preset in the Master Presets panel and select Edit and Update Selected from the popup menu.
2. Click
Save and Link to open the Create Model View dialog box, shown
here:

3. Select the Relate the Model View to a checkbox. Select the New Item radio button and select the kind of project item you want to create from the Project Item Type list.
4. Select the Copy the Model View Snapshot to the Clipboard checkbox and click OK to create the project item.
5. The create form for the item type you selected appears. Fill in all required values as needed.
6. Select
the Description tab and press
CTRL+V to paste the model view
snapshot into the Description
field, as shown here:
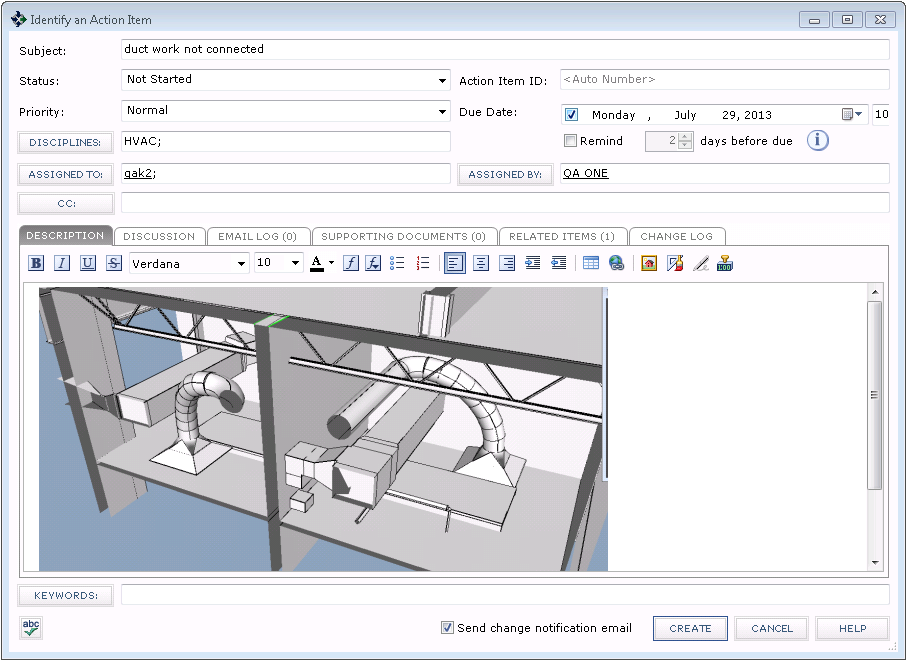
7. Click Create to create the linked master preset in the Newforma Model Viewer and its related Project Center item.
If you started with an existing master preset in the Newforma Model Viewer, no new master preset is created.